DIY Bulli Vaporizer

kingfisher

Well-Known Member
I agree. Could it be 5.6 watts after temp is reached without drawing sounds more like it...? 15 watt and over will get it glowing.

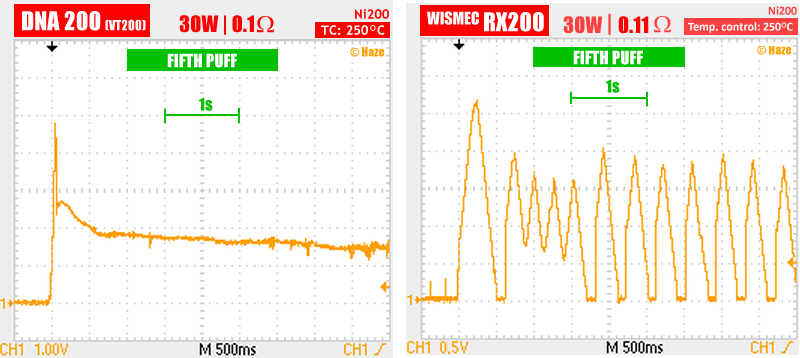
On a different note, the DNA mod has been mentioned a few times. I was really interested in the reason why it is so much more money. Basically, it's seems it's the way it regulates and doesn't exhibit oscillation like pretty much all other cheaper mods. OTOH, the oscillation is averaged out and the end result should really be undetectable. I picked the worst case (driest wick) comparison chart as we are using it dry which is the worst case.


The DNA only has an initial overshoot which is done on purpose as a pre heat.
Just an interesting comparison to share. Information was found here.
For the EVic Mini chart check it here. It actually looks pretty good.

Wow, glad you posted this. I was searching all over and couldn't find it. I did not think the pulsing would be so significant on the rx200. Looks like I might be looking for another mod...

In the mean time I will try to work on solving the heat distribution problem. I think part of the issue is the radiative heat generated by the coil. When it's red hot.
 

KeroZen

Chronic vapaholic
KZ's experiments #006 - 1mm x 0.1mm SS316L ribbon tri-part coil in Fishbone Xs V2 RDA

This time I used another promising RDA, it's the Xs V2 version of the Fishbone (SKU 3584804) It costs basically nothing, has adjustable bottom airflow, SS and glass, and it also has a different arrangement inside designed to host 3 coils each fed by two airflow holes :

22khCMW.png


Thankfully I bought a few spare glass bodies as there is quite some variation in dimensions and the one that came with it was very loose on the RDA. I swapped with a better fit. Then I tried the SS316L flat ribbon (1mm wide x 0.1mm thick) from Crazy Wire in the UK:

HnPt5yu.png


My first attempt was a complete failure. I hoped I could do some wild 3D sculptures with it, but it's way too soft and springy. It's hard and frustrating to work with, you can bend it a bit but the straight sections don't stay straight under their own weight.

The only thing I was able to do was to turn it into a coil, and even this proved harder than normal as it had a bad tendency to unroll. I thought doing 3 small coils would be again horribly low resistance, so I opted instead for a 3 part coil (technically three coils in series) with looser connecting parts. It allowed me to have each section cover its own pair of intake holes.


nFcuaoV.png


The geometry is clearly not optimal, the upper middle section is way closer to the load than the two others. The screws inside the terminals struggled to grip on the ribbon because it's too thin, I had to leave some legs that I bent to secure the coil in place.

The build came up at a whopping 2.43 ohm and I had little hope that it would perform well.

32YXoOV.png

bBVUXmY.png


But against all odds, it was not that bad! I got vapor from cold under a few seconds. With such high resistance I was only able to use the mod in power mode. I first tried at 20W and it worked well but it was a bit tricky to tame (my Milaana experience proved helpful here)

For the following sessions I lowered to 18W and it was a good compromise. The pros: the device and everything ended colder than the previous builds, I had to hold the trigger for less time and I could draw relatively strong and also for less time.

The cons: the coil had to be glowing a bit to produce good vapor (in fact I needed to release the trigger as soon as it started glowing, that was the indicator) so the metal turned into a very nice blue hue with some purple parts, it was way wilder to ride than the rollercoaster coils set to the same power (those have way more inertia and feel like driving a truck in comparison to this one which is quite responsive) but I didn't combust, and finally there was a banana shaped darker spot in the load, as expected where that upper coil was located (rotating every couple of hits countered the problem)

Conclusion: not perfect yet, a PITA to work with, but some potential both in the ribbon and this RDA.
 
Last edited:

KeroZen

Chronic vapaholic
KZ's experiments update

Here's some follow up about the previous experiments:
- I might retest the notch coils soon, although I have little hope (cf #001 and #002)
- I've been using the mountain trail alien coils from experiment #004 a lot and there has been a couple of quirks: once for some reason I got a single coil glowing red and the other was cold (made me combust the load of course) and it resolved magically all by itself... then I finally understood the failure mode I experienced a few times already where for some reason during a session where everything is going fine, it could combust out of the blue!

The explanation is: sometimes the mod reads a coil value slightly too high, say 0.30 ohm instead of 0.29 ohm in my example, and when you hit the trigger the reading jumps below the value displayed at rest (so it jumped to 0.29) and starts rising. If the rise is too slow, the device kicks out of TC mode into power mode... and instant combustion with those coils ensues...

This is also what @enjiatt said here: http://fuckcombustion.com/threads/diy-bulli-vaporizer.6601/page-23#post-988725 and the reason why experiments #003 and #005 failed to work in TC mode. If the resistance rise is too slow the device thinks there is a problem. Raising the wattage can help with this issue.

- I like the Fishbone setup but the glass can really become burning hot after a session, it's almost dangerous and not user-friendly at all.
- I used the roller coaster coils of experiment #005 for a while and I enjoyed using it in power mode. I found the inertia enjoyable and easier to handle than the almost too responsive alien coils of #004, but I needed the RDA for other experiments so I put them aside.
- The Cali RDA is nice to build on but the fins on the top part dissipate a lot of heat, meaning it's robbing power. But what is worse? Something that's larger and sinks heat but ends less hot to the touch or something that's very small and efficient but ends burning hot?
- I haven't used #006 much but I noticed that the three parts of the serial coil are not glowing as evenly as before, the middle one glows first and it's problematic as it's the one closest to the load and the one that scorches it... clearly not ideal.
 

m0qu4

Well-Known Member
hi pipes, hi fc

i felt to give some feedback as the bulli really is a game changer for me.

i used to be a log vape user for 2 years, since the beginning of vaping. i always wanted a portable vape to take covection hits, but never saw smth useable. since feb 2016 the bulli got my daily driver, even at home.

i use the v coil setup, now with 0.526 ohm. its really near the limit of what i can put into the heating chamber. for intial "burn" i begin at 100c and increase by 10c until wished temp. these steps in heating avoid an initial red lighting and the coil keeps having nice colors and a nice clean surface. i find the more even the coil is made and the more metal in the heating chamber - the more even the plant matter is heated. no need to stir and in three 15 sec hits a bowl is wasted. w00t!

aQ9rC7J.png


i used to order the original drip tip adapter, and put a round metal plate with a small 1,2 mm hole just before it. this spray makes the vapor smooth, due to breaking bigger particles into smaller ones - so far the theory. already did this in log vape times.
but i found a better thing. just order a metal vape-liquid tank (edelstahl leerdepot), and cut just before the end,. like seen in the second picture. with two air-intakes sitting opposite to each other, its not only doing the job of smoothening the vapor, it cools it really noticeable - for whatever reason.

here what i order for a full bulli setup, with original order numbers. for the mouth piece take either the orignal drip tip adaptder i used with spray

108 = Drip-Tip Adapter V2 =

or the tank cut until the end

111 = Edelstahl Leerdepot A2 =

and the rest of the bulli

109 = Kanülensockel = Material:Edelstahl
73 > Ersatzsockel A2 Edelstahl <
63 =Bulli-Smoker A2-TM Downgrade -> Klassik= Material:Edelstahl

to hold the mesh i made some swinged form with the awg22 316l we all have around like seen in the third pic. so no gum or silicone parts needed, all plain metal in the vapour path.

i use a fine mesh in above the heating elementl and a wider one for the bulli corpus to hold plant matter.

regarding air inflow, i find 5 holes with 1 mm works best for me. more small holes seem to distribute the heat more even, and sure are the reason for less noise compared to one or two holes for reaching the same diameter.

as software i use the myevic firmware. realy nice to have it open source.

i only use 35w to take care of batteries, and in the default algorithm for not overshooting to much. with more watts the overshoot time and overheat temp is higher.. smaller watts trigger more frequent changes between in-temp and over-temp phases, resulting in less hot spots.

but really the pid algo is what i use, as i see over or under-shoots of only 2 to 3 degrees. i use 1600 as p, 80 as i and d is 0. with the 35 wats it takes 2 to 3 seks to reach temp, but no overshooting and only small changes as mentioned. if you use more watts increase the i value for less overshooting, which will result also in reaching temp faster. the default algo overshoots some times about 20 to 30 degree and even more. also when i use a 0.48 ohm coil i used that pid numbers with good results.

i see some comments and now even in the project faq about the wish to adjust a temperature referring to the bowl temp and not the coil temp. people do that by adjusting the coil ohms and tcr values manually.
i already did a patch for an older myevic firmware, and now for a recent one. all coil readings and the internals work the same, just whenever the temp is shown in the display it is shifted by the offyset which is set in the expert menu. i use it since days without problems, having increased the shift possibility just today to 99. use this firmware on your own risk and responsability, no warranty given.

http://ge.tt/6QNIwEi2

this is really the mobile log vape i was waiting for. thanks pipes for sharing your ideas.

i even dont miss it when i travel. since all is metal, just clean in an iso bath and good to go.

#bullilife (c:

regards
moqua
 

Pipes

Addicted DIY Enthusiast
Accessory Maker
:clap: Very nice work!
The addition of an "off set" into the firmware is the feature we much needed. Nice not to have to alter the heating curve by altering the ohms. Do the numbers correspond to both degrees F or C depending on setting in preference menu?
Another nice feature to have would be to cap the max temp to avoid burning up coils.
You coil looks very precise. I'm jealous. The screen standoff idea is unique too, very well thought out. Is there anything to keep it from getting pushed down into the coil? Or are you just careful not to push against the screen?
I also like that top mouthpiece screen. Is that something new from the King of Vapes?

Welcome to FC @m0qu4, I think you going to fit in perfectly!
 

Pipes

Addicted DIY Enthusiast
Accessory Maker
@m0qu4, I loaded up your firmware and works great in the Cuboid. Thank you!
However, the offset is not working on my 2/3. Shows in menu but no effect.
In the Cuboid, setting the offset to -20 does the trick perfectly without manually altering the ohms. Great stuff.
:clap::clap:
 
Pipes,
  • Like
Reactions: marduk

m0qu4

Well-Known Member
hey pipes

the shift is done regardless the setting of celcius or farenheit, and no conversion is done. it just decreases the temp shown in the display by the value you set in the menu.

about the screen standoff, it only avoids a movement torvards the mouthpiece, and does this job without having to care about. direction coil isnt a problem neither, due to the screen being cut quite precice and thus sitting quite tight, and also there isnt any force torvards coil. so really nothing to care about, nothing which makes any issues.

the top mouthpiece with that two opposite intake holes is really smth new from last year as far as i know.

the rx23 not displaying the shift is really weird. i own a vtc and vtwo mini, where the firmware works as excpected. guess all wismec devices wont show the shift for now.
already took a look, but didnt see anything obvious. have to check further..

regards,
moqua
 
m0qu4,
  • Like
Reactions: Pipes

virtualpurple

Well-Known Member
Guys I've periodically dipped into this thread and I know that the Bulli is different than the Project but I am having trouble determining the major differences and what draws someone towards one vs the other.

I already love the Project but I'd love to have someone explain the Bulli to me like I'm a seven year old.

Thanks all, sorry for dragging my primate brain into this thread!
 

E0x

Well-Known Member
disclaimer: all of this is my personal opinion , maybe a better answer can be give by @Pipes

@virtualpurple the project to my knowledge is the evolution of the bulli , the main dif of the bulli vs the project is that the bulli almost all part are from a 510 atomizer and maybe be look like more like a e-cig atomizer, but still is a particular atomizer in my opinion the stealthiness is not better ( contrary of what maybe other can think ) because can call the attention of others.

but the main things i think of why the project come to the light was that the bulli parts are a more hard to get and more expensive and this can be another dif too.
 

virtualpurple

Well-Known Member
disclaimer: all of this is my personal opinion , maybe a better answer can be give by @Pipes

@virtualpurple the project to my knowledge is the evolution of the bulli , the main dif of the bulli vs the project is that the bulli almost all part are from a 510 atomizer and maybe be look like more like a e-cig atomizer, but still is a particular atomizer in my opinion the stealthiness is not better ( contrary of what maybe other can think ) because can call the attention of others.

but the main things i think of why the project come to the light was that the bulli parts are a more hard to get and more expensive and this can be another dif too.

Thank you very much for the prompt response! I will continue to keep an eye on this thread and I appreciate the insight and clarification!
 
virtualpurple,

KeroZen

Chronic vapaholic
For my part, I don't own the original BULLI but like many others I hang in there to talk about other 510 custom RDA's. It's not about the BULLI anymore, but Pipes preferred to keep the original thread name for the sake of clarity.

But really there are countless cheap RDA's that you can find on fasttech for about $5 to 15 shipped, and by building your own coils you can experiment and get similar if not better results.

The Project is a ready-made solution, while this thread is more for those who love to tinker and tweak.
 

JackBrus

Member
But really there are countless cheap RDA's that you can find on fasttech for about $5 to 15 shipped, and by building your own coils you can experiment and get similar if not better results.

- Does the Bulli have anything over other RDA's ?

- What should an RDA have or not have for our purposes? I see lots of RDA's that have air holes that may be placed too high. We want the air to go through the coils, not to pass over it, right?
 
JackBrus,
  • Like
Reactions: KeroZen

JackBrus

Member
Regarding coil material: I came across an e-cigarette project where they used stainless steel mesh as coil material. Can't find the webpage :doh: but they rolled up a piece of SS mesh, and used that roll to form a coil. Did anybody experiment with this?
 
Last edited:
JackBrus,
  • Like
Reactions: KeroZen

Pipes

Addicted DIY Enthusiast
Accessory Maker
You can get ss mesh to work in power mode but not very TC friendly.

The closest mod to match the Bull's dimensions was the Kayfun V2.1 mini. Some paired it with it's larger brothers bigger deck for ease of building and better connector terminals.
 

natural farmer

Well-Known Member
hi pipes, hi fc

i felt to give some feedback as the bulli really is a game changer for me.

i used to be a log vape user for 2 years, since the beginning of vaping. i always wanted a portable vape to take covection hits, but never saw smth useable. since feb 2016 the bulli got my daily driver, even at home.

i use the v coil setup, now with 0.526 ohm. its really near the limit of what i can put into the heating chamber. for intial "burn" i begin at 100c and increase by 10c until wished temp. these steps in heating avoid an initial red lighting and the coil keeps having nice colors and a nice clean surface. i find the more even the coil is made and the more metal in the heating chamber - the more even the plant matter is heated. no need to stir and in three 15 sec hits a bowl is wasted. w00t!

aQ9rC7J.png


i used to order the original drip tip adapter, and put a round metal plate with a small 1,2 mm hole just before it. this spray makes the vapor smooth, due to breaking bigger particles into smaller ones - so far the theory. already did this in log vape times.
but i found a better thing. just order a metal vape-liquid tank (edelstahl leerdepot), and cut just before the end,. like seen in the second picture. with two air-intakes sitting opposite to each other, its not only doing the job of smoothening the vapor, it cools it really noticeable - for whatever reason.

here what i order for a full bulli setup, with original order numbers. for the mouth piece take either the orignal drip tip adaptder i used with spray

108 = Drip-Tip Adapter V2 =

or the tank cut until the end

111 = Edelstahl Leerdepot A2 =

and the rest of the bulli

109 = Kanülensockel = Material:Edelstahl
73 > Ersatzsockel A2 Edelstahl <
63 =Bulli-Smoker A2-TM Downgrade -> Klassik= Material:Edelstahl

to hold the mesh i made some swinged form with the awg22 316l we all have around like seen in the third pic. so no gum or silicone parts needed, all plain metal in the vapour path.

i use a fine mesh in above the heating elementl and a wider one for the bulli corpus to hold plant matter.

regarding air inflow, i find 5 holes with 1 mm works best for me. more small holes seem to distribute the heat more even, and sure are the reason for less noise compared to one or two holes for reaching the same diameter.

as software i use the myevic firmware. realy nice to have it open source.

i only use 35w to take care of batteries, and in the default algorithm for not overshooting to much. with more watts the overshoot time and overheat temp is higher.. smaller watts trigger more frequent changes between in-temp and over-temp phases, resulting in less hot spots.

but really the pid algo is what i use, as i see over or under-shoots of only 2 to 3 degrees. i use 1600 as p, 80 as i and d is 0. with the 35 wats it takes 2 to 3 seks to reach temp, but no overshooting and only small changes as mentioned. if you use more watts increase the i value for less overshooting, which will result also in reaching temp faster. the default algo overshoots some times about 20 to 30 degree and even more. also when i use a 0.48 ohm coil i used that pid numbers with good results.

i see some comments and now even in the project faq about the wish to adjust a temperature referring to the bowl temp and not the coil temp. people do that by adjusting the coil ohms and tcr values manually.
i already did a patch for an older myevic firmware, and now for a recent one. all coil readings and the internals work the same, just whenever the temp is shown in the display it is shifted by the offyset which is set in the expert menu. i use it since days without problems, having increased the shift possibility just today to 99. use this firmware on your own risk and responsability, no warranty given.

http://ge.tt/6QNIwEi2

this is really the mobile log vape i was waiting for. thanks pipes for sharing your ideas.

i even dont miss it when i travel. since all is metal, just clean in an iso bath and good to go.

#bullilife (c:

regards
moqua
Not sure that I understood much of what is shown in the pictures or what you have done there but that coil I see in your Bulli does indeed look like an amazing accomplice! I'd love to watch a video of yours while you are building one! :drool: :tup::clap:
Regarding coil material: I came across an e-cigarette project where they used stainless steel mesh as coil material. Can't find the webpage :doh: but they rolled up a piece of SS mesh, and used that roll to form a coil. Did anybody experiment with this?

Milaana uses SS mesh and it's done completely unregulated. I prefer regulated at the moment...
 
natural farmer,

KeroZen

Chronic vapaholic
- Does the Bulli have anything over other RDA's ?

- What should an RDA have or not have for our purposes? I see lots of RDA's that have air holes that may be placed too high. We want the air to go through the coils, not to pass over it, right?

The BULLI is just where it all started, but as of today I don't think it offers any advantage over any of the countless Chinese clone RDAs we can get on Fasttech.

You are right that the air inlet location is of prime importance. I found that bottom fed RDAs are the best for our use case (ie those where air enters from the base and not from the sides)

Regarding coil material: I came across an e-cigarette project where they used stainless steel mesh as coil material. Can't find the webpage :doh: but they rolled up a piece of SS mesh, and used that roll to form a coil. Did anybody experiment with this?
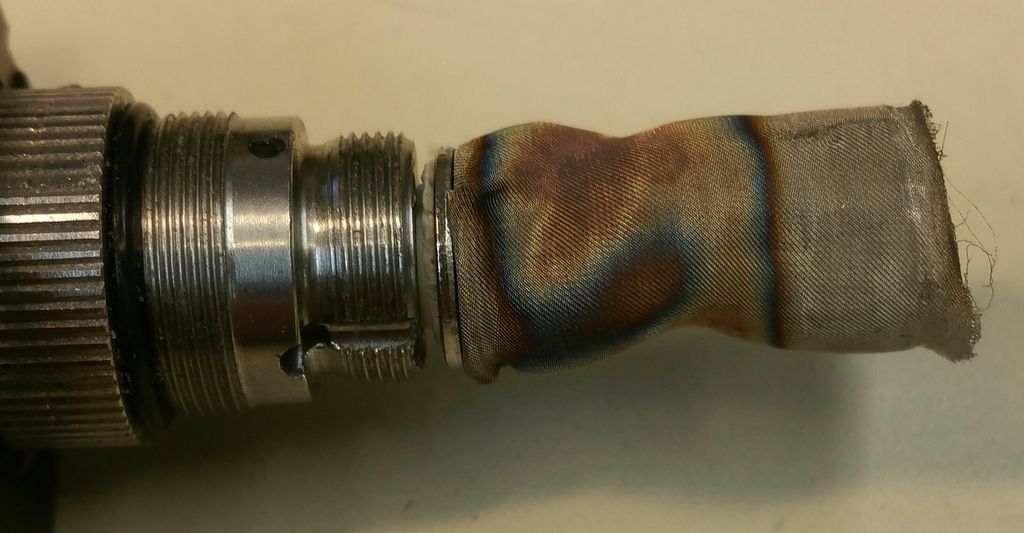
Yes I did experiment some but haven't posted the results. @Pipes also played with the idea a bit but with not much success.

There are some challenges to overcome though. But the idea is good, and the Zion/Milaana are the living proof that increasing the surface area is definitely working and produces massive cloudage.
 

Pipes

Addicted DIY Enthusiast
Accessory Maker
Regarding mesh heaters. This was the method I thought had the most promise. Squeezing the lower with an Xmm outer diameter washers and using Xmm inner hole diameter washers for the top. This would allow for an even and secure connection.
I had the lower part figured out and tried a couple top side ideas but drop the endeavor do to other priorities.
Would love to see it picked back up.


And after a couple test burns before the top give up the ghost.


I used a KayFun that I drilled out to use similar to the Project method as can really crank the washer pressure.

Regarding the TC ability, somehow you should get something happening beside just going to full. IMO. should at least find a setting that goes from off the full pending a temp setting. If still going full at lowest temp, maybe manually lower the ohms, if you can...? Gotta be a way. Even if not stable, there should be some effect.
:science::science:
 

JackBrus

Member
Maybe mesh is better heated through induction heating? Then ohms and short cuts matter less than resistivy and surface (the currents tend to run on the surface). Plus, surface should be large anyway, so that is a win-win.
 
JackBrus,

Pipes

Addicted DIY Enthusiast
Accessory Maker
I had a thought you could try.
Take your mesh and fold it back and forth like making a paper fan. Make it the width of the diameter of the mounting screw or washers.
Mount it sideways, leaving it a little loose between the mounts so you can fan it out. It will likely want to take on a more bowl like shape.? Give it a 90 degree twist so the wider part is horizontal. My first thought is the ohms will be too low...but never know?

IMO, induction could work but would take a lot of time to come up with many solutions to basic problems. Maybe for a desktop but can't see any benefits from current desktop techniques.
 
Last edited:

JackBrus

Member
IMO, induction could work.... for a desktop.... but can't see any benefits from current desktop techniques.

Thanks fur the other thoughts as well Pipes. One advantage for portable use would be that shorts or uneven thickness of the heater coil is not a problem. The "coil" construction could thus be way easier: simply put some metal wires/ mesh/wool/sticks in a glass tube. My mother could do that. :lol:

Now let's see of I can make some time to build vape concepts :spliff:
 
JackBrus,
  • Like
Reactions: Pipes

Goatbass

DIWhy
C284-EDB7-497-B-46-D3-940-F-8-AF0-A3-B8-A4-E2.jpg


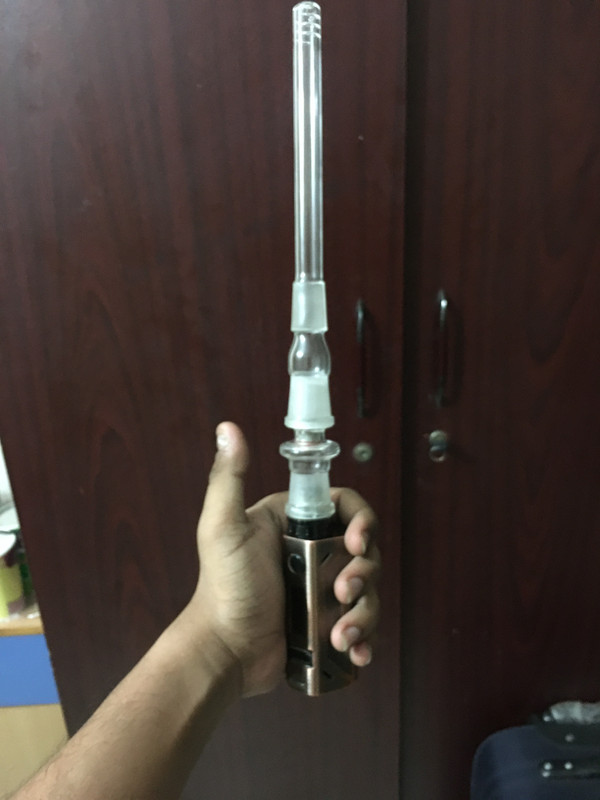
I think the coils are too far from the bowl to be working. There's about an inch gap in between. Gonna keep trying until I get it right!

Had only that long stem lying around from my halo log project to use as a mouthpiece.
 
Goatbass,
  • Like
Reactions: KeroZen
Top Bottom