• Do NOT click on any vaporpedia.com links. The domain has been compromised and will attempt to infect your system. See https://fuckcombustion.com/threads/warning-vaporpedia-com-has-been-compromised.54960/.

DIY 510-Compatible Rebuildable Dry Herb Atomizer

rat949

Well-Known Member
Manufacturer
Just thought I'd share my creation with the community I've learned so much from. My main inspiration was the Thermovape T1 which I used to own and love so much, but has since been out of production. Also, @Pipes thread about his DIY bulli project provided a great proof of concept for the idea.

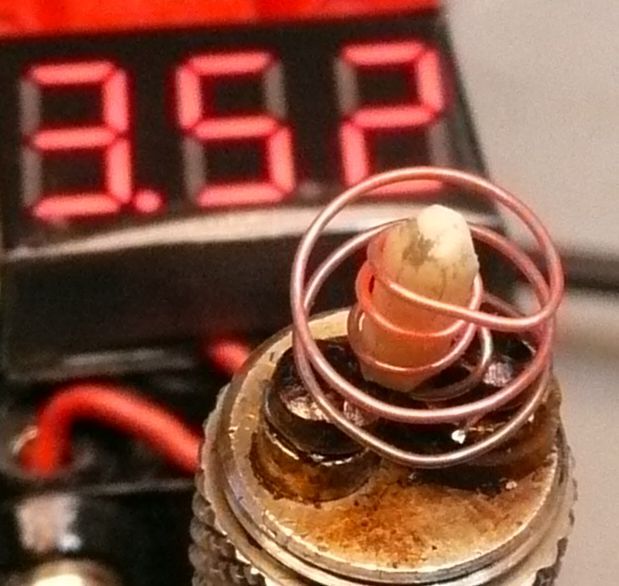
The base and top cap are from a Lancia rebuildable E-Cig atomizer, the tubes are custom cut quartz and borosilicate tubing for the herb tube and outer housing respectively, the bowl is a VapeXhale ELB, and the heater is made from 28ga kanthal and porous ceramic wick. All the o-rings are silicon to withstand the high temps.

The coils light up within a couple of seconds at 30 watts, and get fully up to temperature within 10 seconds. After the heat up, It's pretty much straight convection vaping with a very nice taste, even though it's pretty hot vapor being so close to the heater.

Let me know what you all think!

S5wt12X.jpg


sDqIwMR.jpg


r8rYi1B.jpg


lHdnluK.jpg


KStHF48.jpg
 

Pipes

Addicted DIY Enthusiast
Accessory Maker
Very cool. Love the double glass tubing idea. Excellent!!!
Couple questions. That DNA handle your using, I have one and cuts out with "over temp" after a few seconds of continuous power on. Does this not kill the fun just as getting going?
The herb chamber looks huge. Can it be partially filled or does the herb get sucked up to the top?
I like the way you can see exactly what's happening with the coil.
Keep up the great work!!! :clap:
 
Pipes,
  • Like
Reactions: steama

Puffers

Micro-Climate Mastermind
This would be awesome for my new SMY 260watt box mod. I love the glass tubes it looks very nice.
 
Puffers,
  • Like
Reactions: steama

rat949

Well-Known Member
Manufacturer
@Pipes the box mod I'm using is an IPV 2S. It runs all the way up to 70 watts, and I've only had it say "too hot" once after a lot of tinkering with the coils and pulsing the power button. In normal use, the bottom of the atty gets pretty damn hot, but it cools quickly. Also, I haven't had a lot of time with it yet, but it seems to work fine with a small amount. The ELB is gigantic to fill all the way, but I like how long you can sip on a single chamber with just tossing and turning the herb around.

@Puffers that mod will most likely work great, but I have to say, I use this at about 30-35 watts and I can get the herb dark, dark brown. All that extra power is too much for our delicate plants.
 

Pipes

Addicted DIY Enthusiast
Accessory Maker
Those units with temp control are really just another calculation such as the wattage is.
These are all still based on the variable voltage setup with came out years back. Then they threw in the variable wattage which is just a calculation made by the processor. Now the variable temperature is much the same idea but the resistance of the element material must be of a know composition. In the case of the units out there now, it is pure nickle. Nickle has a very low resistance and the windings will be much longer for this type of application. The temp control mods are IMO, for very low resistance coils in around the .3 ohm area.
Would be interesting to give a whirl but would expect some possible glitches.
 

rat949

Well-Known Member
Manufacturer
is this something that could work with such a DNA 40 mod, where you can set the temperature exactly?
http://fuckcombustion.com/threads/dna-40-mod.16952/

Those units with temp control are really just another calculation such as the wattage is.
These are all still based on the variable voltage setup with came out years back. Then they threw in the variable wattage which is just a calculation made by the processor. Now the variable temperature is much the same idea but the resistance of the element material must be of a know composition. In the case of the units out there now, it is pure nickle. Nickle has a very low resistance and the windings will be much longer for this type of application. The temp control mods are IMO, for very low resistance coils in around the .3 ohm area.
Would be interesting to give a whirl but would expect some possible glitches.

I actually have a friend who owns a DNA40 device so I got a chance to play with it a bit. There's a few issues with the temperature control for this application. Issue one, the temp control is not +/- 1 degree accurate. In fact, it functions as a temperature "limiter" more than anything. The DNA 40 allows you to choose a wattage (ex, 10w-40w), as well as a temperature limit (ex, 250F-600F). So for example, using the temp limiting function set at 400F, you could use 20w or 40w (or any number in between). The difference would be the amount of time it takes to reach that temperature protection. Once the temperature is reached, the box throttles back the wattage to however much it needs (all the way to zero, IIRC) to maintain that temp. So while both coils will be at 400f eventually, the wattage levels will change how fast it will recover from an inhale and the temperature control will change how hot the vapor is.

Next issue... If you're using the temperature limiting function, you're forced to use pure nickel wire, or another wire that changes resistance predictably in response to temperature changes. This is the second main issue, as those wires are more expensive, harder to work with, and have much, much lower resistance. I also don't believe that the nickel wire will maintain it's shape and positioning as well as nichrome or kanthal.

So @Pipes, while you are correct that the temperature control is indeed just another calculation, the calculation is used to know when to throttle back the power. This is an important distinction between "heat" and "temperature". So while 40 watts will be the same amount of "heat"/"power" no matter how long you hold the button, temperature will not instantly jump between room temp and "hot" temp, but rather the longer you hold the button, the higher the temperature goes (to a certain limit of equilibrium). This is why most herb vape pens burn/combust rather than vape. They don't know when to cut off the power to maintain the "magic temp" for vaping. My design allows me to regulate the temperature through draw speed, while the wattage will determine my maximum possible temperature. 30w seems to be a good balance between heat up time and vapor strength.

I have rebuilt my device several times since my last post, and I will probably continue to do so until I find the perfect "goldilocks" balance between heat up time, battery consumption, vapor quality, and ease of use.

Here's my current setup that works with NO heatup time and no ceramic rods.
939OoEL.jpg
 

Pipes

Addicted DIY Enthusiast
Accessory Maker
I have rebuilt my device several times since my last post, and I will probably continue to do so until I find the perfect "goldilocks" balance between heat up time, battery consumption, vapor quality, and ease of use.
Here's my current setup that works with NO heatup time and no ceramic rods.
939OoEL.jpg
That design is very close to what I had best luck with in the Bulli. Mine liked like a slide ride with a inner spiral going back down. Less "hot streaming" and more generalized. If that makes sense..?
I did end up still using a small piece of ceramic to help from over heating and could keep the power on in a more continuous manner.
Anyway, two thumbs up. Really love the whole concept happening here.

Here's a pic of what I ended up using and is still intact. It's also at about the glow which seemed to work best as well.

P1050210_zps683a2386.jpg
 
Last edited:

rat949

Well-Known Member
Manufacturer
Wow, I'm quite humbled by the response here. This is the site that made me take a serious look at vaporizing, and it's the one I follow for trustworthy information and reviews for everything vapor. I'm planning on getting the functionality down before I start offering it for others to use, but I definitely would love to provide some discounted kits/samples to some users here to help me refine it later.

That design is very close to what I had best luck with in the Bulli. Mine liked like a slide ride with a inner spiral going back down. Less "hot streaming" and more generalized. If that makes sense..?
I did end up still using a small piece of ceramic to help from over heating and could keep the power on in a more continuous manner.
Anyway, two thumbs up. Really love the whole concept happening here.

Here's a pic of what I ended up using and is still intact. It's also at about the glow which seemed to work best as well.

That's actually the thread that made me realize that an herb atomizer/vaporizer was possible on a simple mechanical device. Without sounding too artsy, your pictures and videos are what inspired me for this project and let me know that it was possible to get clean, real vapor out of an ecig style device with no regulation or temperature control.

My current iteration takes inspiration from all of the vaporizers I've owned, but specifically draws ideas from the Thermovape T1, ESV, VXL Cloud, Arizer Extreme Q, and the Pinnacle Pro. I'll have to post up some pictures of my newest iteration of the oven tube and coil in a little bit.

Again, the feedback is fantastic.

Thanks, all.
 

rat949

Well-Known Member
Manufacturer
Okay all... I think I found a really good setup for vaping with very little heatup time and no combustion. Here's what I learned:

1. The atomizer I chose as the base is a really important part as it allows for adjustable airflow through different sized "pins" that press into the deck. I use the two smallest sizes on each side to allow for sufficient airflow without overwhelming the coil.

2. Convection vaping heating elements must be SIGNIFICANTLY hotter than your target vaporization temperature, especially because of the low thermal mass of my heater. However, using the ceramic rods and increasing the thermal mass made the vapor very, very hot but not necessarily more dense or potent. I moved the heater up above the posts and just under the oven tube with approx. 15mm of space below the screen.

3. The ELBs rob a lot of heater power compared to the glass/screen setup I have now. This also makes the ovens significantly cheaper. I'm using a stainless steel screen pressed into the tube enano-style. It allows for bowl size/distance adjustments very easily and makes cleaning simple.

4. I need a longer and better drip tip to smooth it out a bit... but it's very, very usable and looks very much like an ecig tank from a distance... minus the glowing coil...

I've combusted only once when experimenting with a fully filled capsule, 35 watts on the ceramics, and some water filtration... but in regular use with my current 0.6ohm stovetop coil, 20-30w, it's vaped perfectly to dark golden brown. Looks just the same as where I stop my Solo abv.

Let me know what you all think! I may make a run of them if there's significant interest...

fDN9mz1.jpg


aEpUZ5M.jpg


m8XeuZD.jpg


LN9zWrH.jpg


hH9cOEn.jpg


juHTjpA.jpg


vPpEHGq.jpg
 

rat949

Well-Known Member
Manufacturer
Sorry for the double post, but it seems like a totally different subject matter so I'm gonna do it...

I've posted up my project on Reddit and seem to be getting a pretty decent response from the vaporents over there. I'm looking into sourcing some lower cost suppliers for some of my parts, but as of now, it's looking like I can get the price for these atomizers down to under the $100 mark (Certainly less than $100 for FC members...). So after you have the atomizer, all you would need to have it up and running would be an 18650 high drain battery, and either a mechanical 510 mod (Not ideal: won't supply constant power through the life of the battery and it will put out less and less heat as it drains), or a cheap regulated device that's capable of 30 watts at 0.5ohm. This would include all IPVs, iSticks that are 30w or higher, the new MVP, new Kanger boxmod, any DNA device... tons of options for power for around 50 bucks, and most of those options have USB charging included.

Please let me know either here or in a private message if you're interested in one when I have more units built.

Thanks!
 

Grim Chiclets

Well-Known Member
Have you tried holding the button down for a second or 2 before you start hitting it?
That thing looks awesome haha.
 
Grim Chiclets,

Ducttape22

New Member
WoW...rite on man talk about making a TrU•°•°A°B•C}another bad creation for those not old enough to know ...man your post with pics was hands down by far the most helpful and inspiring post I've come across searching thru all these yahooz...Thx u very much I'm off to go an build mine
 
Ducttape22,

E0x

Well-Known Member
WoW...rite on man talk about making a TrU•°•°A°B•C}another bad creation for those not old enough to know ...man your post with pics was hands down by far the most helpful and inspiring post I've come across searching thru all these yahooz...Thx u very much I'm off to go an build mine

i am in the quest of replicate this too , please report you progress ( i am still waiting for parts )
 
E0x,

jimt0r

Well-Known Member
Time to revive this thread, in my quest to tinker my V.A.S. away I had ordered a couple LANCIA RDA's through fastech and I was waiting on them to arrive before working out the requirements for the glass. Now that I have them they look so tiny, I really should be used to this as most pictures to do with vaping seem deceptive and i have come to the realization i really need a micrometer and a variety box of heat resistant o-rings
 
jimt0r,

jimt0r

Well-Known Member
the parts are piling up

https://imgur.com/a/yKlg2

kinda looks like stuff in the bulli thread, I would have to reconsider the size or type of glass adapter 18 female to 14 female seems rare without increasing the mass of glass. Any guesses the sizes of glass the op used?

I twisted the SS wire to create turbulence as the air passes the coil, I will likely try that with some ribbon wire
 
jimt0r,
  • Like
Reactions: KeroZen

rokko

Member
How do you think guys, is it possible to rebuild full metal drip with temperature control box mod into on demand convection vaporizer for micro tokes with minimum changes? I want to keep it small and without glass parts. It can be model with wide drip tip for a bowl with inserting into/above it another drip tip as a mouthpiece. I don't vape e-liquids, so don't have box mod, maybe someone who has it could try to make something like this?

RNRCVWZ.png
 
rokko,
  • Like
Reactions: KeroZen

KeroZen

Chronic vapaholic
Check the BULLI and Project threads, you'll find happiness over there (and your answers)

But your drawing has one major flaw: with convection you can't use such a short vapor path, it would be unbearably hot to the throat. You would need a longer mouthpiece clearly.
 
Top Bottom