
You are using an out of date browser. It may not display this or other websites correctly.
You should upgrade or use an alternative browser.
You should upgrade or use an alternative browser.
VapCap Induction Heater for Desktop and in Car Use
- Thread starter Pipes
- Start date
-
- Tags
- dynavap induction heat vapcap
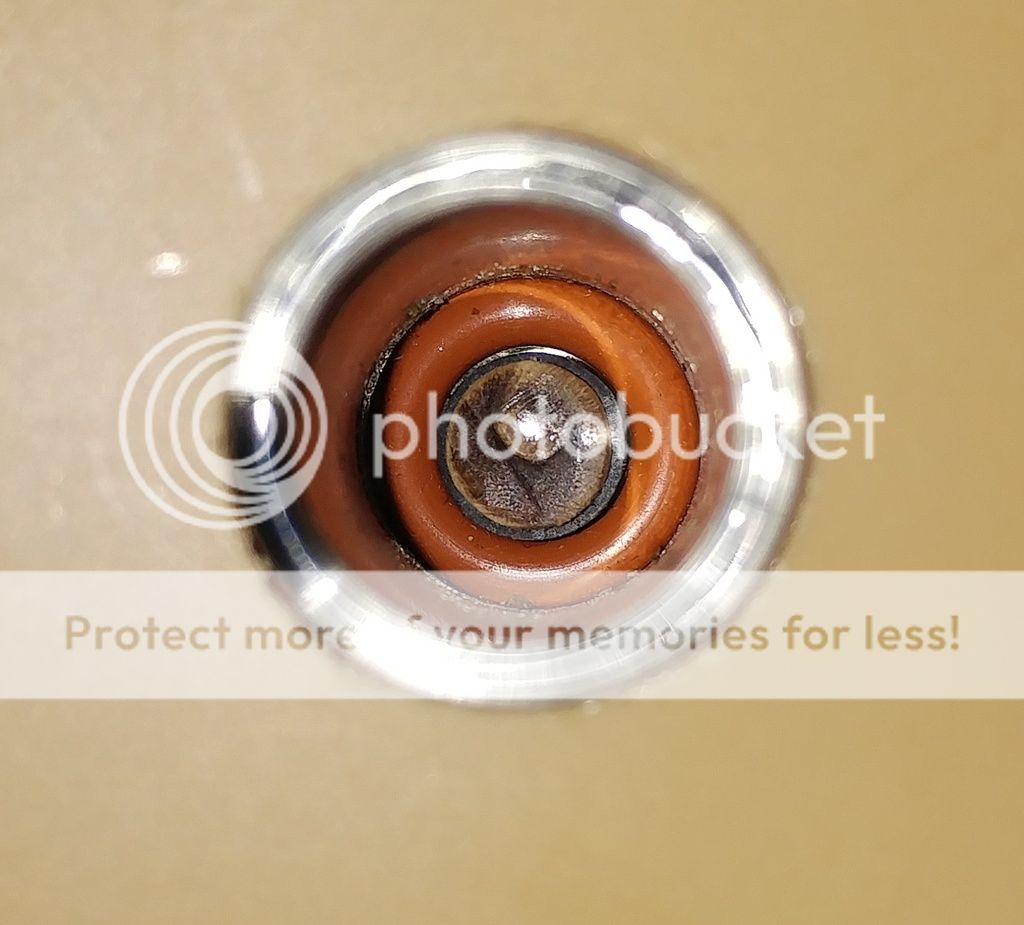
Wow, yeah I see what you mean now.. I can definitely see charing when I zoom into the picture.
Also looks like that o-ring has black "ash" on it..
And of course your followup post shows it certainly charred.
Like Squiby i dont see this either. I have a skeletor and jarhead II, and honestly, I run them both hot... consistently heat 3-5 sec after the click.. almost always flirting w combustion
Also looks like that o-ring has black "ash" on it..
And of course your followup post shows it certainly charred.
Like Squiby i dont see this either. I have a skeletor and jarhead II, and honestly, I run them both hot... consistently heat 3-5 sec after the click.. almost always flirting w combustion
Square4Life
Well-Known Member
Until I hear from pipes, I flipped the dowel over so I can monitor from a fresh slate

Thanks for the input and help!
Thanks for the input and help!
Square4Life
Well-Known Member
I accidentally overheated several times......too many beers and back to back reloads .......
I'm thinking it has to be overheating. I just don't recall doing it. Since the wife isn't a member here...I'm going to say she did it! Lol jk... overheating does make the most sense though. And we are usually using together in tandem so back to back hits between two people...who knows lol
I'm sure Pipes will set you straight.. I wonder how many times you thought you were combusting, it was that silly dowel
See that's another thing, whatever charring that is taking place either happened when I wasnt around or is very very little charring at a time and therefore very little smell.
I'll definitely just keep an eye on it and see. Watch, it probably won't happen again now that I'm monitoring it lol
LabPong
Well-Known Member
I defiantly combusted at least 4 times ......couldn't multitask watching tv...surfing the net...drinking beer..clicking and clicking.....oops yea I was supposed to lift. haaaa
I think mine looks ok after going through that and I usually go 1-2 seconds past the click on 1 or 2 draws of each load.
I think mine looks ok after going through that and I usually go 1-2 seconds past the click on 1 or 2 draws of each load.
I think all those pics look pretty much normal. I actually use a thin grinder to cut the doweling while rotating it with my fingers. Only leave the center attached so I end up with a stick of spacers that I can take off one at a time as I need them. And managing to keep all my fingers in the procedure can be a challenge.
The charring should get less and less as the charred layer should act to slow down the burn process. However, if you have a severe overheat, this would give a deeper charring, but can't see it losing that much in physical length. @Square4Life , if there is suddenly that much of a noticeable performance change, it might be worth taking the front panel of your PS off and ensure the switch assembly is all still firm. The switch is held in place by the shrink wrap tubing. Check the switch or tubing isn't slipping down from the work coil. If it is, PM me and we'll get it back in place. Can't think of anything else that would cause power boosting. Same batteries, correct?
If you guys want or need to adjust the Oring, it's easier than it looks. Just use a pin or even a paper clip and bend the end into a small hook of sorts. Push past the top on the inside and snag the Oring from under. I use the cap off a pen to push it back in evenly and stop at the top of button. Removal also makes it easier to remove the wooden spacer.
")
Home stretch for B3 Portsides and notifications will be coming shortly.

EDIT:
If your getting black burn on the top of wooden spacer and Orings, it may be the small black shrink tubing that holds the wooden spacer in place has risen up some and gotten burned by the VC.
Remove the Oring and spacer and check it out. Should not change performance in any way though.
The charring should get less and less as the charred layer should act to slow down the burn process. However, if you have a severe overheat, this would give a deeper charring, but can't see it losing that much in physical length. @Square4Life , if there is suddenly that much of a noticeable performance change, it might be worth taking the front panel of your PS off and ensure the switch assembly is all still firm. The switch is held in place by the shrink wrap tubing. Check the switch or tubing isn't slipping down from the work coil. If it is, PM me and we'll get it back in place. Can't think of anything else that would cause power boosting. Same batteries, correct?
If you guys want or need to adjust the Oring, it's easier than it looks. Just use a pin or even a paper clip and bend the end into a small hook of sorts. Push past the top on the inside and snag the Oring from under. I use the cap off a pen to push it back in evenly and stop at the top of button. Removal also makes it easier to remove the wooden spacer.
It should have being in the shipping notification. PM me if you missed it.Did anyone get tracking?
Home stretch for B3 Portsides and notifications will be coming shortly.
EDIT:
If your getting black burn on the top of wooden spacer and Orings, it may be the small black shrink tubing that holds the wooden spacer in place has risen up some and gotten burned by the VC.
Remove the Oring and spacer and check it out. Should not change performance in any way though.
Last edited:
Square4Life
Well-Known Member
Awesome! Thanks Pipes...I'll check it out and get with you if anything seems out of place. Glad to hear it all appears normal though...not sure I can handle going back to a torch all the time LOL!I think all those pics look pretty much normal. I actually use a thin grinder to cut the doweling while rotating it with my fingers. Only leave the center attached so I end up with a stick of spacers that I can take off one at a time as I need them. And managing to keep all my fingers in the procedure can be a challenge.
The charring should get less and less as the charred layer should act to slow down the burn process. However, if you have a severe overheat, this would give a deeper charring, but can't see it losing that much in physical length. @Square4Life , if there is suddenly that much of a noticeable performance change, it might be worth taking the front panel of your PS off and ensure the switch assembly is all still firm. The switch is held in place by the shrink wrap tubing. Check the switch or tubing isn't slipping down from the work coil. If it is, PM me and we'll get it back in place. Can't think of anything else that would cause power boosting. Same batteries, correct?
If you guys want or need to adjust the Oring, it's easier than it looks. Just use a pin or even a paper clip and bend the end into a small hook of sorts. Push past the top on the inside and snag the Oring from under. I use the cap off a pen to push it back in evenly and stop at the top of button. Removal also makes it easier to remove the wooden spacer.
It should have being in the shipping notification. PM me if you missed it.
Home stretch for B3 Portsides and notifications will be coming shortly.
LabPong
Well-Known Member
Glad to hear it all appears normal though...not sure I can handle going back to a torch all the time LOL!
I can not even imagine having to fill torches or make fire again.....that would be uncivilized.....haaa

Square4Life
Well-Known Member
I can not even imagine having to fill torches or make fire again.....that would be uncivilized.....haaa
EXACTLY! I'm not sure if I have ever said it in this thread although I can truly say the induction heater has been one of the best additions to my vape family lol (aside from the necessary DV). I would even venture to say that if you weren't dead-set on getting a desktop vaporizer but considering it, and already had a DV, get an induction heater from @Pipes instead of a true desktop. For me, it really does get that much use and fit in that well. I love the quickness and simplicity.
Hell, just the other day I was outside with my brother and brought the Dynavap along. First time I had used a torch in quite awhile AND I brought the single flame torch....totally forgot how long it takes and tiring my hand gets spinning it!
I personally feel that the people which disregard the induction heaters because "they are comfortable with torches" or "don't see the benefit" or "using a torch doesn't bother them" are TOTALLY missing out. I was fine with all of that as well, but the induction heaters are a whole new ball game.
GreenHopper
20 going on 60
I personally feel that the people which disregard the induction heaters because "they are comfortable with torches" or "don't see the benefit" or "using a torch doesn't bother them" are TOTALLY missing out. I was fine with all of that as well, but the induction heaters are a whole new ball game.
Couldn't agree more on this point.
The induction heater improves the VapCap user experience no end.
@Pipes is one of my heros!


ClearBlueLou
unbearably light in the being....
So Mr. Skellington has entered the country.
Mr. X will meet him at his destination.
The Battery Boys arrive today, and their luggage (chargers) follow tomorrow...
Mr. X will meet him at his destination.
The Battery Boys arrive today, and their luggage (chargers) follow tomorrow...
jimt0r
Well-Known Member
Did anyone get tracking?
didn't get any with mine, or it it was broken going on a ship instead of a plane
 tHe WaItInG iS dRiViNg Me BoNkErS
Last edited:
ClearBlueLou
unbearably light in the being....
So, three LG HE2s charging in my new 4-cell charger (with car-cord @ Amazon for ~$30 - makes it a desirable camping companion). Looks like they arrived empty: @1:45, they're just now showing 2 of five bars of charge.
I'm glad I get to charge them up in advance.
I'd been meaning to add a new independent-channel charger anyway...
I'm glad I get to charge them up in advance.
I'd been meaning to add a new independent-channel charger anyway...
Summer
Long Island, NY
@ClearBlueLou, link to charger please?
Square4Life
Well-Known Member
Not sure which one @ClearBlueLou has but I love my VC4@ClearBlueLou, link to charger please?
https://www.amazon.com/XTAR-Charger-Lithium-ion-Batteries-Authentic/dp/B010J9GE5G
ClearBlueLou
unbearably light in the being....
This is currently pushing 3.92 volts (or however you say that) @ the 3-hour mark, with all showing 4 bars:
NITECORE D4 (New 2015 version) Intellicharge universal smart battery Charger with ELECCESSORY(TM) CAR CHARGER For Li-ion / IMR / Ni-MH/ Ni-Cd 26650 22650 18650 18490 18350 17670 17500 17335 16340 RCR123 14500 10440 AA AAA AAAA C types
I like this thing: works at home, works in the truck, works connected to the solar panel
The link below is from Pipes earlier in this thread:
TalentCell 12.6V/1A DC 5.5mm x 2.1mm Li-ion Battery Pack Car Charger, Black
It might be overkill, seeing as I can take the entire charger, but what if...?
ClearBlueLou
unbearably light in the being....
I hope Stu won't mind if I add (well past the edit chance):
- entire process took ~6 hours,
- all 18650s reading 4.20 volts, 375 ma on completion
- entire process took ~6 hours,
- all 18650s reading 4.20 volts, 375 ma on completion
LabPong
Well-Known Member
ClearBlue.....you will rarely if ever have to charge up all 3 batteries like that again. If they are only used in your skelly.....it is super easy to keep them topped off from 60-90+% when you go through your day to day use cycle. The supplied charger does not take very long to charge up if you charge before it drops below say 50%. So when I see my middle light go off....its time to charge up, usually an hour or so is plenty.
Grifo
Well-Known Member
Dang! I put 249 instead of 349 on my address for my batteries and they could not deliver it to me! I also lost my ID so i cant pick it up at the post office. And my Skelly is arriving today =( Im gonna have to go to a smoke shop.
NVM i dont have an ID so they might not sell me the batteries.
well im all set up now! Time to experiment
NVM i dont have an ID so they might not sell me the batteries.
well im all set up now! Time to experiment
Last edited by a moderator:
 Soon to be shipped.
  It may just make it to my camping trip
 So I've PMed everyone on the Portside Batch 3 list. If I missed anyone, please let me know.
Batch 4 will be out in 4-6 weeks and list is about 1/2 full.
The mini is now in the beta stage and as far as electrically and enclosure fitting go, all is as expected. So the main fears are now history and looking good. Just some minor tweaking and longer term testing before it becomes a reality. Looking like early into the new year as I don't want to commit to make them before Christmas.
All is good and wait times are down.
Batch 4 will be out in 4-6 weeks and list is about 1/2 full.
The mini is now in the beta stage and as far as electrically and enclosure fitting go, all is as expected.
So the main fears are now history and looking good. Just some minor tweaking and longer term testing before it becomes a reality. Looking like early into the new year as I don't want to commit to make them before Christmas. All is good and wait times are down.