
You are using an out of date browser. It may not display this or other websites correctly.
You should upgrade or use an alternative browser.
You should upgrade or use an alternative browser.
VapCap Induction Heater for Desktop and in Car Use
- Thread starter Pipes
- Start date
-
- Tags
- dynavap induction heat vapcap
Just added this to the FAQ sheet as well.
Installing the Batteries:
Only 4 screws need to be removed. Looking from the front the two screws on the right and turning the unit around again the two screws on the right. Unit will slide open as shown. Install batteries and re-install the screws being careful not to cross thread.
")
Installing the Batteries:
Only 4 screws need to be removed. Looking from the front the two screws on the right and turning the unit around again the two screws on the right. Unit will slide open as shown. Install batteries and re-install the screws being careful not to cross thread.

CharmCityVapeGuy
Known to some and enigma to others
I
Is it ok to leave
I had stopped checking this thread because I didn't want to tease lyself. Just got my notification and I'm super excited. These look great!A few pics of the progress.
Here is a group shot of the Skeletors and a couple custom requested builds.
Here is the inside of the Portside.

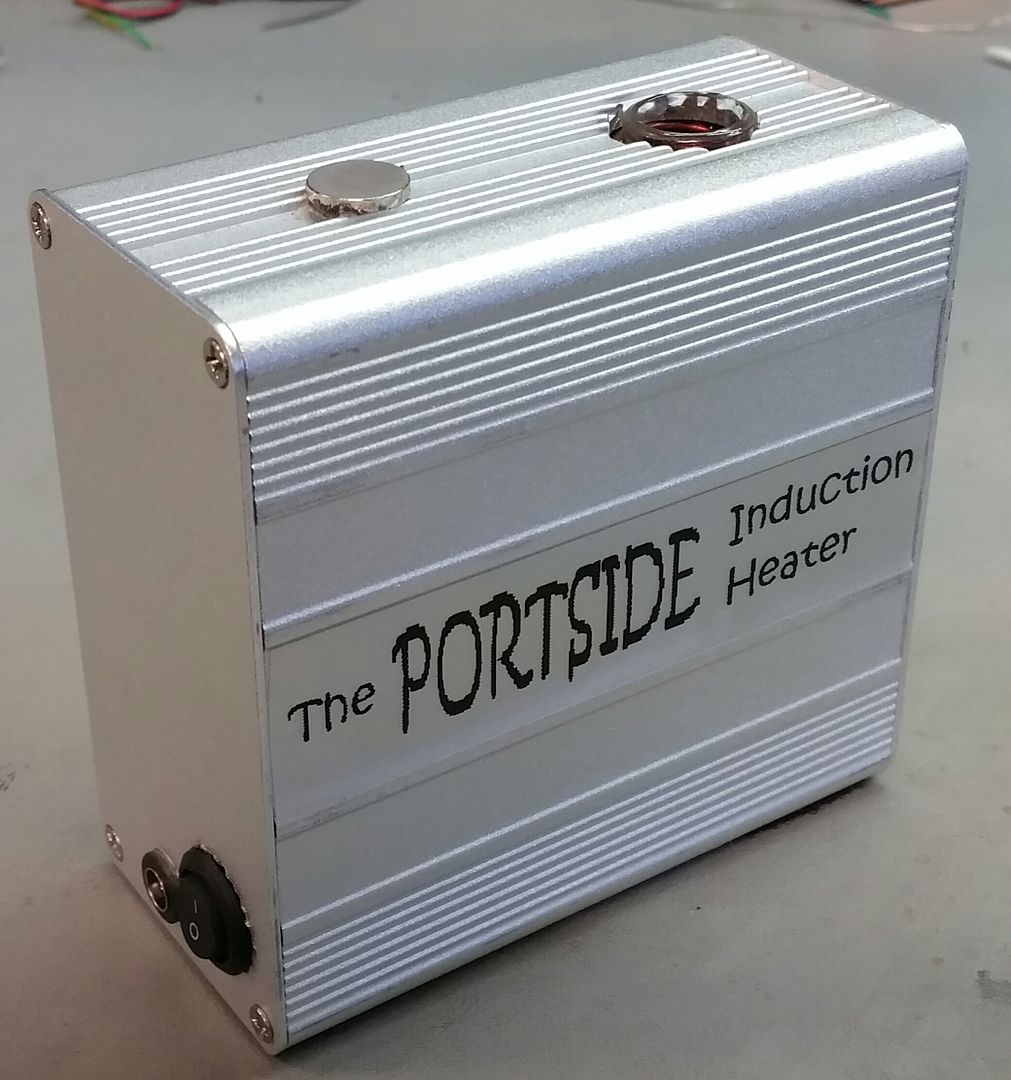
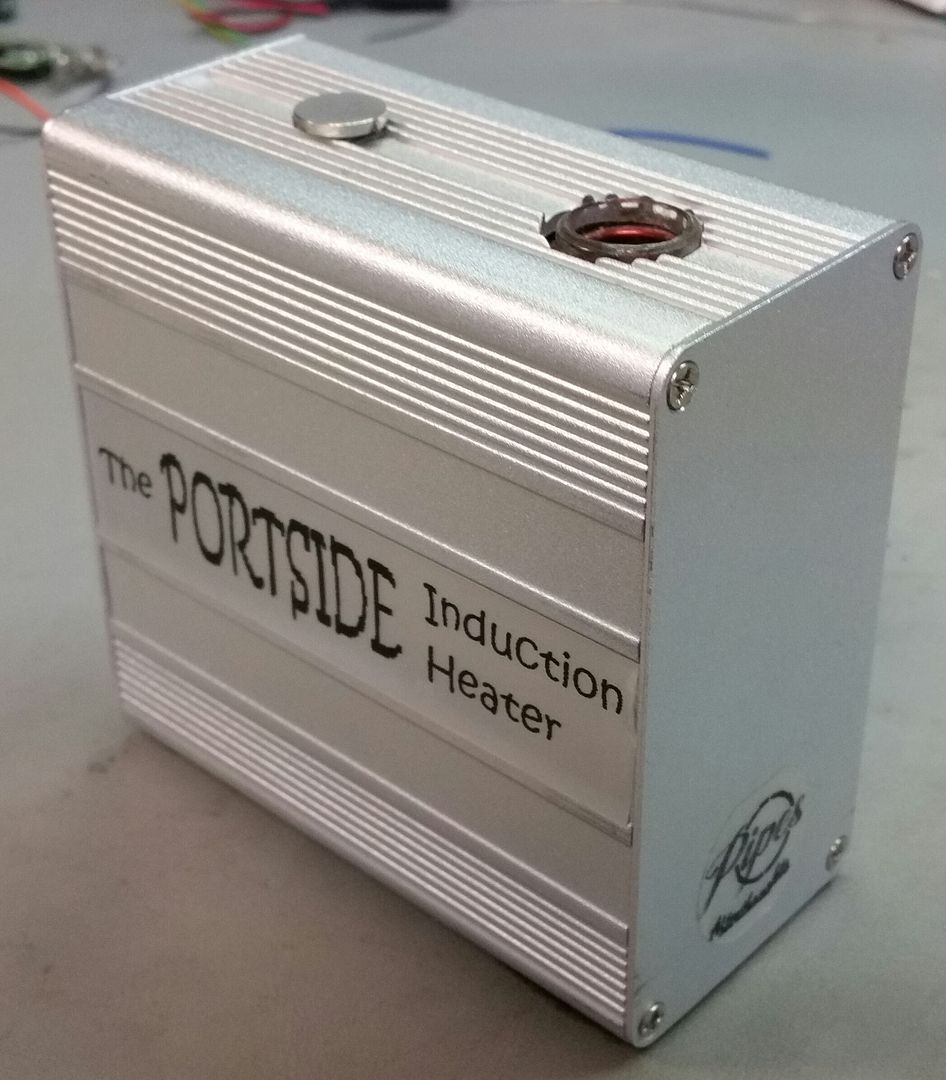
And completed Portside from different angles. Note the gauge lights are on but they turn off after 5 seconds.
I have reached out to all those on the first batch Skeletor list. Will be moving into second batch list shortly as well as the Portsides will be receiving PMs shortly.


Is it ok to leave
the batteries in there long term or should they be removed between uses or long breaks from use?Just added this to the FAQ sheet as well.
Installing the Batteries:
Only 4 screws need to be removed. Looking from the front the two screws on the right and turning the unit around again the two screws on the right. Unit will slide open as shown. Install batteries and re-install the screws being careful not to cross thread.
Last edited by a moderator:
Is it ok to leave
the batteries in there long term or should they be removed between uses or long breaks from use?
Leave them in there.
Depending on your use, a charge should last a good few days.
IIRC they come with the right charger already, so just charge for a few hours and you're good to go again.
Try avoid leaving them plugged in to the charger for more than, say, overnight.
If you know it'll be a long break (> few days, weeks), try leave them while they're about half charged. No need to remove unless it'll drive you crazy, then no need to get driven crazy. If you do remove them, insulate at least one terminal. don't throw them at walls. DO NOT EAT. And definitely do not let them go to waste. Enjoy!

grokit
well-worn member
I'm very pleased to make it just under the wire on a portside, thanks to whomever cancelled
So what's all coming, anything besides the portside and an ac charger?
This will be living in my car so it sounds like I should use a small inverter to keep it charged (which I already have). It also sounds like it's a good thing it won't be charging when the car's turned off...
As discussed earlier the portside would otherwise need a 12.6v DC source wired straight to the car battery, for use with its batteries removed...
There's no way a USB source will keep this charged right?
Or anything straight from a cigarette lighter outlet?
Yes I read the FAQ
Diggy Smalls
Notorious
Yeah I had actually forgotten about it. I blew the Nugget I set aside for it, but at least sometime else got to snag my spot for the portside this time.
This is the charger you need for in car charging.
If it's going to be living in your car permanently, and going to run off the car battery, best run a wire direct from fuse box and do not have any batteries installed in the device. Direct wiring is because the car accessory connectors can't reliably take the current. Found this out the hard way.
When running as designed with batteries, ONLY use a "smart" 12.6 volt charger.
Oh, it also comes with a smile....
Last edited:
grokit
well-worn member
Thanks for posting that again, I think I remember nowThis is the charger you need for in car charging.
If it's going to be living in your car penitently, and going to run off the car battery, best run a wire direct from fuse box and do not have any batteries installed in the device. Direct wiring is because the car accessory connectors can't reliably take the current. Found this out the hard way.
When running as designed with batteries, ONLY use a "smart" 12.6 volt charger.
Oh, it also comes with a smile....

I was hoping to be able to take the portside away from of the car and use it, so I want to keep the batteries installed in it. And if I take it into a hotel room (for example), using the regular 110v charger run by the inverter seems to make sense that way, just leave the inverter in the car. Is the included AC charger the same as the $6.69 AC-DC option on the same product page? So either charger would be just as 'smart'?
The straight AC adapter (for use without batteries) would be the one I'm already using with my jarhead, but more like the DC charger it would need a wire straight to the car battery and a heavier inverter?
I'm thinking that there would be less of a load if the inverter is really small like 150-300 watts, would that be sufficient to drive the AC charger without putting too much of a strain on the car's accessory circuit?
I guess I'm wondering if I can avoid the direct wire to the battery if I go with a small inverter instead of the 12v DC charger. If I want to use it with batteries, do I need to run that wire just to keep it charged?
Apologies for making you repeat yourself, or if this is in the FAQ. Thanks for your patience!

No special wiring if just using a charger. Yes, those chargers are very similar. 1 amp and cuts off when battery is fully charged at 12.6V. (3X4.2V)
Supplied charger and an inverter should not be a problem. Even a 25 Watt inverter should work fine as charges at 1 amp, or 12 watts. (1AX12V)
Don't worry about the questions as good timing to ask.

Supplied charger and an inverter should not be a problem. Even a 25 Watt inverter should work fine as charges at 1 amp, or 12 watts. (1AX12V)
Don't worry about the questions as good timing to ask.
grokit
well-worn member
Great angle with the logo
So in my car; still wondering whether to grab that very reasonable 12v charger cable or to find that cheap inverter I've been meaning to put into the car anyways. Probably both but I still have a couple of q's...
It seems that we're being advised to disconnect/turn off the power to the portside once it's fully charged...
Do we see when it's all the way <, then 'unpower', meaning when it turns red (>), it's time to charge?
I have a way to turn off a 12v outlet without unplugging it, so it's no hassle either way as far as that goes.
Does a small inverter add another level of protection, to anything, or is it just another level of hassle?
Last edited:
Good questions. The way I see it is, it comes down to battery educate which is basically the same with any battery of this type driven device.
When new it is recommended to do a complete charge and leave on charge for an extra few hours, followed by a complete discharge before charging again. The discharging cycle should be done a couple times. Thereafter, the discharge is not as important and top ups are OK.
As for leaving on the charger, the charge cuts out at 12.6v or 4.2v per cell and monitors until the voltage drops to X volts. (Somewhere around 11.8 I think) Then trickle charges back up to 12.6V. This cycle repeats which over time is not good. Comes back to recommended storage is 60-70%.
As batteries age this cycle gets faster because the voltage drops faster.
Bottom line is it's best to use the batteries from full to closer to bottom end as much as possible but as we all know that is usually never the case.
Oh, the small inverter is just a hassle unless being used for something else.
flotntoke
thoroughly vaped
All great stuff! Thanks for the questions @grokit and all the great answers @Pipes .
I plan to mount mine in the car with velcro behind a little door in front of stick shift. Easy to remove for use elsewhere or to bring inside for charging as needed. All the other possible options seem great, but this seems pretty simple - which usually works best for my often stoned brain.
Can't wait to try it. This weekend ended up being more VC than other portables, and kept thinking how cool it would have been to have this on-hand - especially when my second lighter sputtered out of butane. Fortunately, I always carry a third in my bag!
I plan to mount mine in the car with velcro behind a little door in front of stick shift. Easy to remove for use elsewhere or to bring inside for charging as needed. All the other possible options seem great, but this seems pretty simple - which usually works best for my often stoned brain.
just a thought... not sure where you are located (geographically) but here in FL the inside of our cars get really really really hot, like hot enough for the leather seats to burn your legs if you sit down w/ shorts on.. hot enough to cook an egg on the dash board (i shit you not)..
heat is a battery enemy.. be safe, i'd hate to see a potential health problem if your car happens to get a hot as a car in the parking lot in FL summer
flotntoke
thoroughly vaped
just a thought... not sure where you are located (geographically) but here in FL the inside of our cars get really really really hot, like hot enough for the leather seats to burn your legs if you sit down w/ shorts on.. hot enough to cook an egg on the dash board (i shit you not)..
heat is a battery enemy.. be safe, i'd hate to see a potential health problem if your car happens to get a hot as a car in the parking lot in FL summer
Thanks and great point I should have mentioned!!
I should be OK as long as I remember to pull from the car. I'm usually pretty good about any batts. I carry a bag regularly (yes.... everyone busts on my man purse/murse, whatever!), to keep track of all this stuff and everything I need with me these days. When it's really hot (or really cold) never leave stuff in the car for more than a hour or so.
55cruzer
Member
how do the Guage lights work, do they show battery power and or heating the cap?A few pics of the progress.
Here is a group shot of the Skeletors and a couple custom requested builds.
Here is the inside of the Portside.
And completed Portside from different angles. Note the gauge lights are on but they turn off after 5 seconds.
I have reached out to all those on the first batch Skeletor list. Will be moving into second batch list shortly as well as the Portsides will be receiving PMs shortly.
Rumble Duck
Member
Those look amazing Pipes!
Also, I found a cheaper alternative to the glass tubes from fast tech. They will require some cutting, but should work nicely. I have 10 on order right now
http://ebay.to/2rJqnxD
Also, I found a cheaper alternative to the glass tubes from fast tech. They will require some cutting, but should work nicely. I have 10 on order right now
http://ebay.to/2rJqnxD
Thanks. Should be some feedback before long as all but one are shipped already.Those look amazing Pipes!
Also, I found a cheaper alternative to the glass tubes from fast tech. They will require some cutting, but should work nicely. I have 10 on order right now
http://ebay.to/2rJqnxD
That is really thin glass. I had found an alternative tube from FT as well. Pretty much identical to the one I posted before but this one is in stock. Have to admit, it's nice not having to cut and heat treat.
Rumble Duck
Member
Thanks. Should be some feedback before long as all but one are shipped already.
That is really thin glass. I had found an alternative tube from FT as well. Pretty much identical to the one I posted before but this one is in stock. Have to admit, it's nice not having to cut and heat treat.
Ooooo those are perfect! Just ordered 4 in different colors, thanks Pipes! And yeah I was going to ask you how you heat treated the glass? I don't have any fancy equipment, I was hoping I could do it with like a propane torch or something
Rumble Duck
Member
A propane torch will work, that's what I was using. A very fine line from getting the lip to soften and round out, to glass distortion out of round. Not sure if thinner would be easier or harder to work with. I'm guessing the latter.
Ahhh okay, I'll do some testing when they come in and let you know!
The main reason I want to use the tubes is that I can use the rounded part at the bottom to hold the vapcap. I've opted for the button to be placed at the top of my little box instead of the vapcap actually pressing it. Just a personal preference really. I ordered some 13mm tubes as well, hopefully the vapcap will fit inside them. I'll probably have to re-wrap the coil for those though