VapCap Induction Heater for Desktop and in Car Use

phattpiggie

Well-Known Member
Accessory Maker
IMG-20200222-112329.jpg

First try out and it's worked.
Never wanted a bloody battery to run out like I've wanted this one too.

If it continues to work then we are on for swapping out batteries anywhere. All you need is a fresh battery, screwdriver and this lead.

What's the phrase 'chameganger' :rofl:

Drained the battery on my IH, of course now the BMS needs a jump start and we'd usually do this with the charger.
Turns out there is enough power in a dead battery to jump the BMS.
I put the fresh one in the IH, used this lead to plug in the old one for a second and it's alive.
 
Last edited:

jackel

New Member
Trying out my caldron for the first time. When I insert the vapcap I hear a click but the red LED is blinking, not static. It’s not getting hot after 30-40 sec of holding it down. Also blue light on the power brick flashes in sequence to the red LED on the heater.

the cord into the device doesn’t insert flush. Looks like it can go in another few mm but feels tight. Tried inserting the AC cord severa times to ensure it is snug.

I’m sure I’m missing something obvious. Thanks for any help.


Quick update, @Pipes was very helpful in getting me sorted. All is well and I'm back to using the OmniXL regularly. I kind of gave up using a torch in favor of dabs through a Puffco Peak or flower with an Argo. Once I got my IH, I told myself I wouldn't use the term "gamechanger" but in fact nothing describes it as well.

This thing is a gamechanger. Still get a nice terpy hit on the first heat cycle, then perfectly dense clouds for subsequent cycles. If I wait an extra second on the first cycle, I can get dense clouds right away but I prefer the flovorful, wispy hit at first.

I actually thought I combusted once due to the amount of vapor but quickly realized it didn't taste awful. After the initial heat cycle, it takes 3-5 seconds to click. So easy to use and great quality.

Thanks for everything @Pipes. Great product, excellent service.
 

TommyDee

Vaporitor
IMG-20200222-112329.jpg

First try out and it's worked.
Never wanted a bloody battery to run out like I've wanted this one too.

If it continues to work then we are on for swapping out batteries anywhere. All you need is a fresh battery, screwdriver and this lead.

What's the phrase 'chameganger' :rofl:

Drained the battery on my IH, of course now the BMS needs a jump start and we'd usually do this with the charger.
Turns out there is enough power in a dead battery to jump the BMS.
I put the fresh one in the IH, used this lead to plug in the old one for a second and it's alive.

Not exactly the 'right way' to charge these but okay :\ That second cable connects to each cell. Each cell want a maximum of 4.2V. Your charger will dump 12.6V into all 3 cells. This will work on a limited basis. It much prefers a proper balance charger of course.

Is this just to reconstitute a cell that was over-discharged?
 

phattpiggie

Well-Known Member
Accessory Maker
@TommyDee it's to allow changing batteries when you have no mains outlet.

If you swap out a battery now the heater won't work until you put power in the BMS. This has to be done via the DC jack, plug your charger in and it's good to go.

I'm not sure what the BMS requirements are for it to work again but a battery the heater looks upon as 'discharged' is enough to reset the BMS.
 
phattpiggie,
  • Like
Reactions: Pipes

endof3d

Cognitive Dissonance D4 ++++
Quick update, @Pipes was very helpful in getting me sorted. All is well and I'm back to using the OmniXL regularly. I kind of gave up using a torch in favor of dabs through a Puffco Peak or flower with an Argo. Once I got my IH, I told myself I wouldn't use the term "gamechanger" but in fact nothing describes it as well.

This thing is a gamechanger. Still get a nice terpy hit on the first heat cycle, then perfectly dense clouds for subsequent cycles. If I wait an extra second on the first cycle, I can get dense clouds right away but I prefer the flovorful, wispy hit at first.

I actually thought I combusted once due to the amount of vapor but quickly realized it didn't taste awful. After the initial heat cycle, it takes 3-5 seconds to click. So easy to use and great quality.

Thanks for everything @Pipes. Great product, excellent service.

Was just wondering about your situation when your post appeared. Sounds like @Pipes got you up and running in no time at all. Glad all worked out and you are experiencing the game changing Caldron.
 
endof3d,
  • Like
Reactions: jackel

TommyDee

Vaporitor
I'm building a portable battery pack for my IH with a BMS. This is to pocket the cells and hold a smaller Caldron-sized IH as a hand-held unit. Mine is a Skeletor-IH but same difference.

MODs; Feel free to move this to its own thread.

First of all, at 60 watts of energy draw using my IH, I find my 18650 cells will maintain 3 days of medicating with good margin. I've been using these cells in a non-BMS system and regularly remove them to charge. I want to try charging using the 20A 3S offering that fits on the end of the 3x-18650 cell-holders. This is what I came up with;

49570895568_272a93eb21_b.jpg


Note the white 3D-printed case that holds with a snug fit.

Because there are some high temp devices on the BMS, I opted to relieve the plastic in this area. I missed the mark by a millimeter but it will suffice.

49570895668_0f0351fa71_b.jpg


The wires that connect the cells and the BMS are lain across the backside. I used 20 awg silicone wire. It should be 16 awg but I don't have any. This will deliver about 10 volts to the IH under load. The IH doesn't care but the wire sure is nice and flexible.

49570895623_ef74a7dd47_b.jpg


The final case size inside was 81x62x24mm. I use a 1.8mm wall that my printer will lay 4 walls for. I kept this part simple so I can drop it in a sleeve to make it truly pocket-able. Larger wire gauges will require a little more clearance.

The BMS itself is working nicely. It is terminating at 4.2 volts consistently when provided 12.6 volts DC.

49571401931_d465330c33_b.jpg


I mounted the board using trim-tape (thick double sticky gel). More rigid than foam tapes. I placed 4 strips in the recesses of the case. Solder joints had to be tack-soldered as most of the provided holes are too small. However, the layout is pretty straight forward. I decided to consolidate the input/output wires letting the case strain relieve the cable.

And I ended up with this;

49570895508_c84cce5c24_b.jpg


Note the notches of the two middle ribs. This helps a lot when you try to remove the middle cell.

I am hoping to put this on the 12.6V power supply to keep it charged. I'll keep an eye on this BMS circuit to know if it has any issue. So far, looking good. Need to get a dedicated and trusted 12.6V wall wart.

I'm thinking a hemp pouch would make for a good insulator rather than more 3D-printed plastics.
 

phattpiggie

Well-Known Member
Accessory Maker
@Newcastle there is a link to the Lipo in @Pipes FAQ thingy.

@TommyDee much more pocket friendly than the Walnut one I did a while back and great run time off the 18650's.

When I'm back home again I'll be trying this little booster out. Just needs a guage or LED to let you know the battery is fully charged.

Buyer beware. So far I've bought 3 of these boards and non of them came as described. They should have a female micro usb fitted.
The Ebay seller I got the last one from thought it was funny when I told them a full refund or the correct part was more acceptable than a partial refund.
I very much doubt they have the listed items.
Can't stand folk who lie.
 
Last edited:

Newcastle

Stoned!
@phattpiggie I found the link under parts. The funny thing is its running fine now. It died after one and a half sessions twice and now its fine. It is eighteen months old so a backup battery isn't a bad idea.
 
Newcastle,

TommyDee

Vaporitor
I've worked with that little boost driver before (MT3608). This should work to kick-start the BMS. I was thinking battery charger. Battery chargers requires current limiting as well as voltage limiting. This unit would likely overheat as a charger trying to push the current the cell may demand depending on level of depletion. I edited this because I am mixing up use-cases. I need a Boost CC/VC circuit to drive it from a 2 amp USB.

I also have to redo the cell wiring. Turns out the contact for the cell carrier are very hard. When you bend them they break. I suspect I have a fracture on at least one of the legs as I get a disconnect when I push on the pack. Work fine under load though. I will wait until I get some heavier gauge wire too.
...and the battery pack is rebuilt with some 18awg I found laying around. Had a cracked pin on "0v" lead when I bent it over. This became a intermittent contact. All solid now with a new case. Live and learn. Fortunately the wire OD was the same so no new case to 3D-print.
 
Last edited:

Siebter

Less soul, more mind
IMG-20200222-112329.jpg

First try out and it's worked.
Never wanted a bloody battery to run out like I've wanted this one too.

If it continues to work then we are on for swapping out batteries anywhere. All you need is a fresh battery, screwdriver and this lead.

What's the phrase 'chameganger' :rofl:

Drained the battery on my IH, of course now the BMS needs a jump start and we'd usually do this with the charger.
Turns out there is enough power in a dead battery to jump the BMS.
I put the fresh one in the IH, used this lead to plug in the old one for a second and it's alive.

Hm, how about something like this:

image.jpg


...it's build for the same type of LiPo, so I'm quite sure it would work with the PSM. This way you can charge on the go and won't need screwdrivers, instead of the extra battery you'd use a powerbank. Needs about 40 minutes for a full charge, after 10-15 minutes it's charged up enough for a session or two.
 

TommyDee

Vaporitor
I'm pretty sure that unit is also a MT3608 in a box.

Can someone explain the directions on the voltage dial :mental:

image.jpg
 
TommyDee,

Siebter

Less soul, more mind
„+“ and „-“ is not for for polarity. That dial is used for calibration.
 
Siebter,

Saturn_Corp

Well-Known Member
Hi guys! Wired up a DIY induction heater and I I blew something on the induction module. Clrackled for a second then magic smoke arose. Will getting a new one be fine, or am I doing something that will do the same to a new one? Here is my first test which blew it up.


Pipes

Addicted DIY Enthusiast
Accessory Maker
It's so hard to troubleshoot from that video but can see a couple of things you need to improve.
First thing is to solder the work coil as those blue connectors cannot be trusted. One just needs to give an intermittent connection and the FETs will instantly blow. Not as important on the power input side. There is a good chance this is what caused the smoke.
Also, you used good gauge wire except for between each cell. That needs to be a heavy gauge as well.
Good luck! :science:
 

TommyDee

Vaporitor
Your FET fried. One of the connections couldn't handle the load. Do test first without the VC in the coil. The load will be much less.
 

Saturn_Corp

Well-Known Member
Yah those screw connections sketch me out. I added some kapton tape to help prevent shorts around them and the charging XT 60 but I will solder directly both the input leads and coil next time to the module.

All the wire I used is 14awg (except for the balance leads), figured it would be good enough, especially with these short runs. I have some 12 gauge lying around so if I have problems I can change it around. Thanks for your input!

What I really should get is a voltage readout. Gotta charge this with my balance charger but I imagine it will be annoying to check the voltage through that when I want to know.
 
Saturn_Corp,

TommyDee

Vaporitor
You won't be pumping 10 amps. 8 tops. In a compact housing 16 will work. I'm running 2' of 18 and getting 10.6v at the module during the heating cycle.
 

Hazey

New Member
Hey peeps. I’m sure it’s been asked but I can’t find it.

It’s normal for the plugs not to go all the way into the unit?

Both of mine are like this. Just wondering what the reason is.
 
Hazey,

endof3d

Cognitive Dissonance D4 ++++
If your talking about the Caldron the answer is yes. My PSM won't arrive till next week so I can't comment on that. Regardless, if it's secure and working you should be good to go. :nod: 
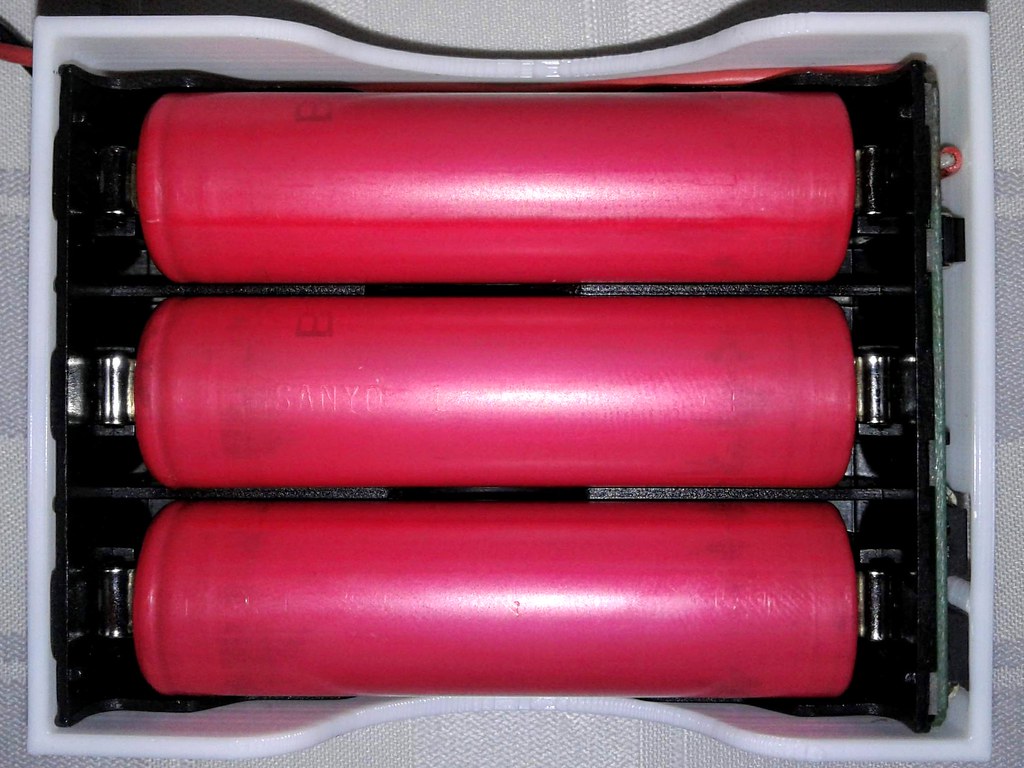
Let us know about your experience using it.
 
Last edited:
endof3d,
  • Like
Reactions: Pipes

warren0728

Well-Known Member
Hey peeps. I’m sure it’s been asked but I can’t find it.

It’s normal for the plugs not to go all the way into the unit?

Both of mine are like this. Just wondering what the reason is.
yep ... normal ... i have one of each and both plugs are the same ... talked to pipes and he said it was normal ...
 
warren0728,
  • Like
Reactions: endof3d
Top Bottom