
You are using an out of date browser. It may not display this or other websites correctly.
You should upgrade or use an alternative browser.
You should upgrade or use an alternative browser.
VapCap Induction Heater for Desktop and in Car Use
- Thread starter Pipes
- Start date
-
- Tags
- dynavap induction heat vapcap

Insertion depth is your only control. Having the tip close to the end windings is the longest click but also can be too hot if inserted too far and may combust before the click. If the depth is not deep enough, a long count after the click is needed and heat distribution will not be as even with the tip been hotter. I found about 2-3 mil shy of the last winding is good.

Thanks for the help. When you say "the end windings" I assume you mean the windings farthest from the insertion point?

bibblybobbly
Well-Known Member
I made one of these and destroyed it within a day!!  I made another thread about it http://fuckcombustion.com/threads/i...but-broke-it-within-a-day.43755/#post-1412829 but I thought I would ask my questions here too...
I had several happy uses, and on the last attempt the LEDs flickered and it made a weird high pitched clicky noise, and smoke began rising from between the pair of inductor coils.
So I was using a 12V 10A power supply, not batteries. Somebody advised this might be too much, should I try to find a lower voltage power supply? Also I didn't solder the heater coil, I plugged it into the blue plugs. I had jiggled the coil around a little just prior to its death - maybe this was the reason?
I just ordered another induction heater unit to build another one. Is there anything else I can do to avoid this happening again?
I made another thread about it http://fuckcombustion.com/threads/i...but-broke-it-within-a-day.43755/#post-1412829 but I thought I would ask my questions here too...I had several happy uses, and on the last attempt the LEDs flickered and it made a weird high pitched clicky noise, and smoke began rising from between the pair of inductor coils.
So I was using a 12V 10A power supply, not batteries. Somebody advised this might be too much, should I try to find a lower voltage power supply? Also I didn't solder the heater coil, I plugged it into the blue plugs. I had jiggled the coil around a little just prior to its death - maybe this was the reason?
I just ordered another induction heater unit to build another one. Is there anything else I can do to avoid this happening again?
Almost guaranteed to be the issue. The work coil connections are critical and if one opens up, even for a millisecond, the drivers will likely short. And they love to smoke when they do...I made one of these and destroyed it within a day!!
Also I didn't solder the heater coil, I plugged it into the blue plugs. I had jiggled the coil around a little just prior to its death - maybe this was the reason?

bibblybobbly
Well-Known Member
Almost guaranteed to be the issue. The work coil connections are critical and if one opens up, even for a millisecond, the drivers will likely short. And they love to smoke when they do...
I see, thanks. I have confidence that my next attempt will go smoother with your advice in mind. Thank you for that, and for trailblazing this whole field. In the few uses I had of vapcap induction heating I knew this was the way forward. You are a gentleman!
TheThriftDrifter
Land of the long vapor cloud
In the few uses I had of vapcap induction heating I knew this was the way forward. You are a gentleman!
That must have been a tease.
Hope your next driver lives a long life.
bibblybobbly
Well-Known Member
So I just received my replacement induction heater for the one I burned. It wasn't packed very securely and the pair of coils are bent:

How robust are they? Is this a big problem and I should send it back for a replacement? Or I should just bend them back into place and continue with my build?
EDIT: why does the image keep disappearing from this post? I uploaded it to imgur. Is there a better way? Here's a link in the mean time https://i.imgur.com/yR5ck1v.jpg
Last edited:
Here is my first DIY build. Finished it this weekend. Already got some flak on Reddit for using a rocker switch but I'm very conscientious and unplug it in addition to turning it off after every use so I doubt it will cause issue in the short term. Will use a different switch next time.
https://imgur.com/a/7fGWgMa
https://imgur.com/a/7fGWgMa
bibblybobbly
Well-Known Member
Here is my first DIY build. Finished it this weekend. Already got some flak on Reddit for using a rocker switch but I'm very conscientious and unplug it in addition to turning it off after every use so I doubt it will cause issue in the short term. Will use a different switch next time.
https://imgur.com/a/7fGWgMa
Nice. I used a momentary switch but I find it a little frustrating to hold down for so long so I might well SWITCH over to using a toggle switch instead.
P.S. See my post above. You might want to solder the coil instead of plugging it into those blue plugs.
Yeah. Attempted to solder them but apparently I suck at it (or my iron sucks) so I went with the crappier option for now. Will attempt to solder it again after I have some practice.Nice. I used a momentary switch but I find it a little frustrating to hold down for so long so I might well SWITCH over to using a toggle switch instead.
P.S. See my post above. You might want to solder the coil instead of plugging it into those blue plugs.
bibblybobbly
Well-Known Member
I notice there are a pair of little "bumps" on the shiny silver part of the induction heater board. Can the coil be soldered to any part of this flat region, or does it need to be soldered to the little blobs?
TheThriftDrifter
Land of the long vapor cloud
I notice there are a pair of little "bumps" on the shiny silver part of the induction heater board. Can the coil be soldered to any part of this flat region, or does it need to be soldered to the little blobs?
I soldered my coils "legs" onto the shiny silver, parallel to the edge on opposing sides of the board.
Last edited:
In keeping with the open-source spirit for these drivers, I put together a few pictures for the DIYers that want to clone my modification methods.
It starts with doing some mods to the driver board.

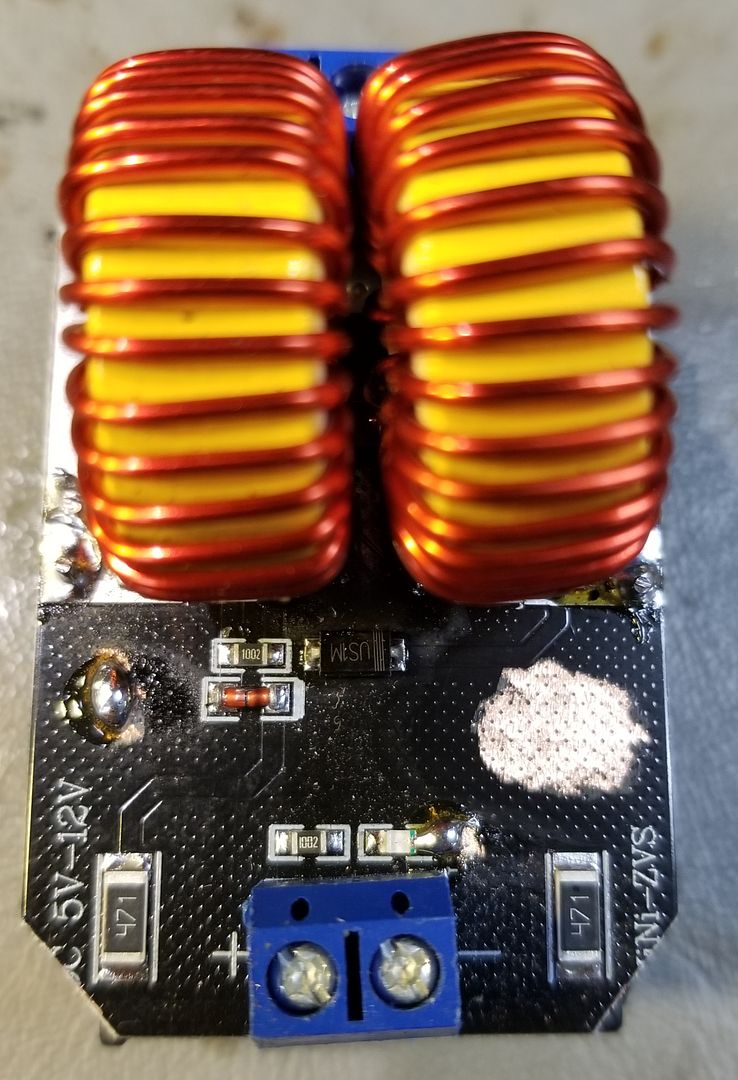
The first thing is a thorough inspection for cold solders, badly mounted or backward components. Then I snip the corners so it will fit into my enclosures. Not needed for other enclosures. I now found a supplier that has good FETs but I always add solder to the FET legs as they can look pretty dry.
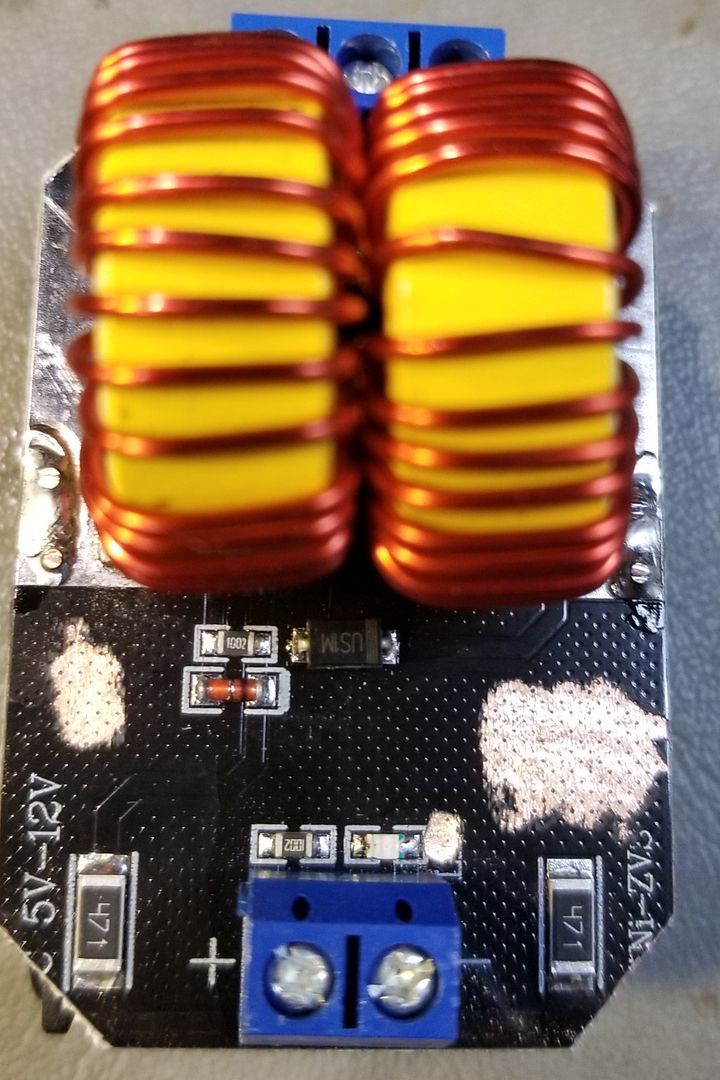
The next thing I do is grind off some enamel in particular areas that need to have solder added. Left spot is for adding the ground wire from the LEDs in the activation tube. The small area above the blue connector is to ground the foil that we are going to use as ground. Depending on the board manufacturer, some is already at ground potential but other manufacturers have left this foil floating. The larger spot is for mounting the FET switch to provide the soft power switch capability.
Here the solder is added for the LED ground wire and solder jumpering the floating foil to the ground which is the end of the little LED that comes on the board.
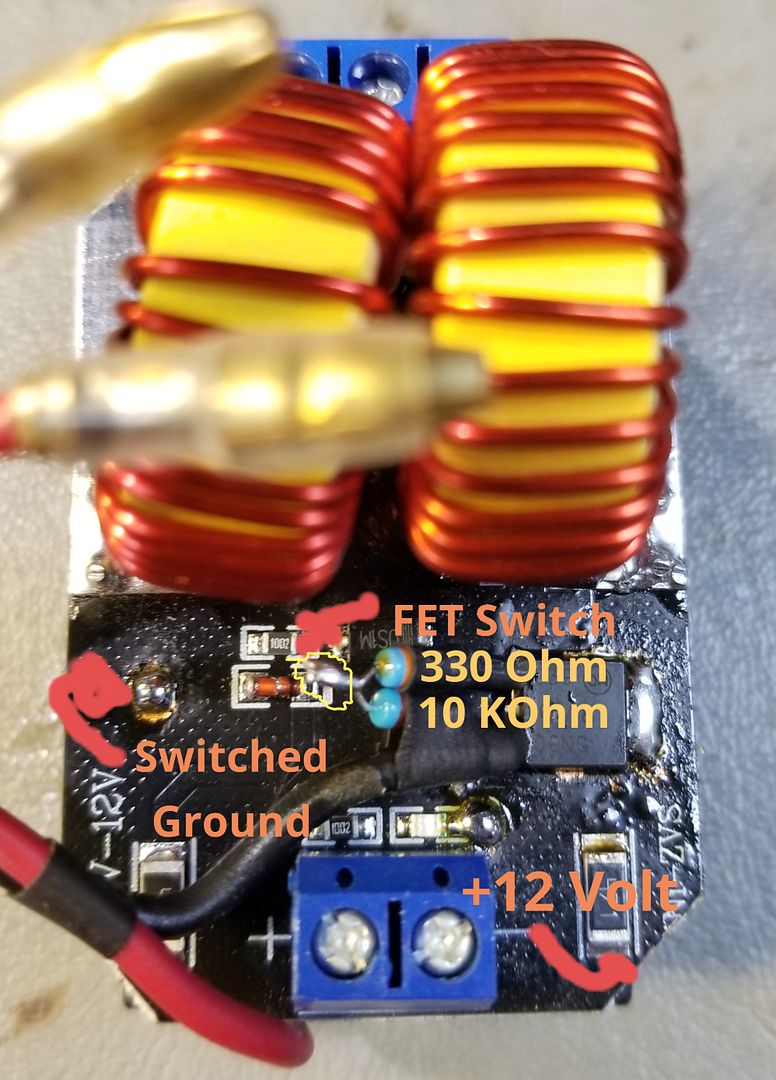
This is the modified driver board with FET mounted. The main 12 volt "in" is the same as before any modifying but the ground now goes to the source of the added FET. Once the FET is switched on via the tactile switch, the output will become ground potential. Thus turning the unit on.
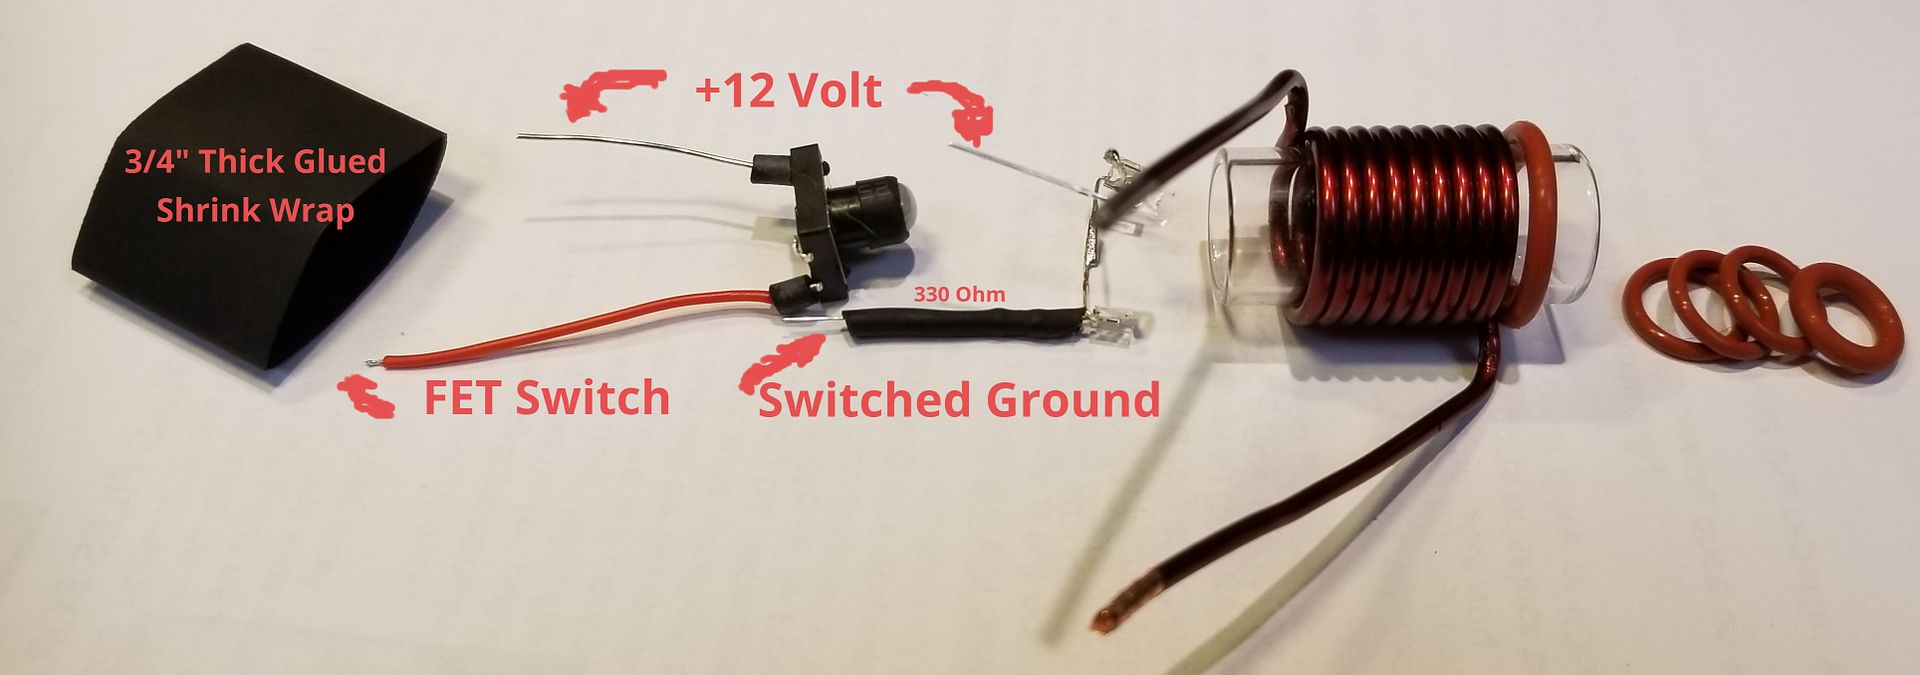
And finally, the work coil setup. Those two 12 volt wires get twisted and soldered together once the tube is assembled. Thus has 3 wires coming from it. 12 volt, FET activation signal and ground for the power on LEDs.
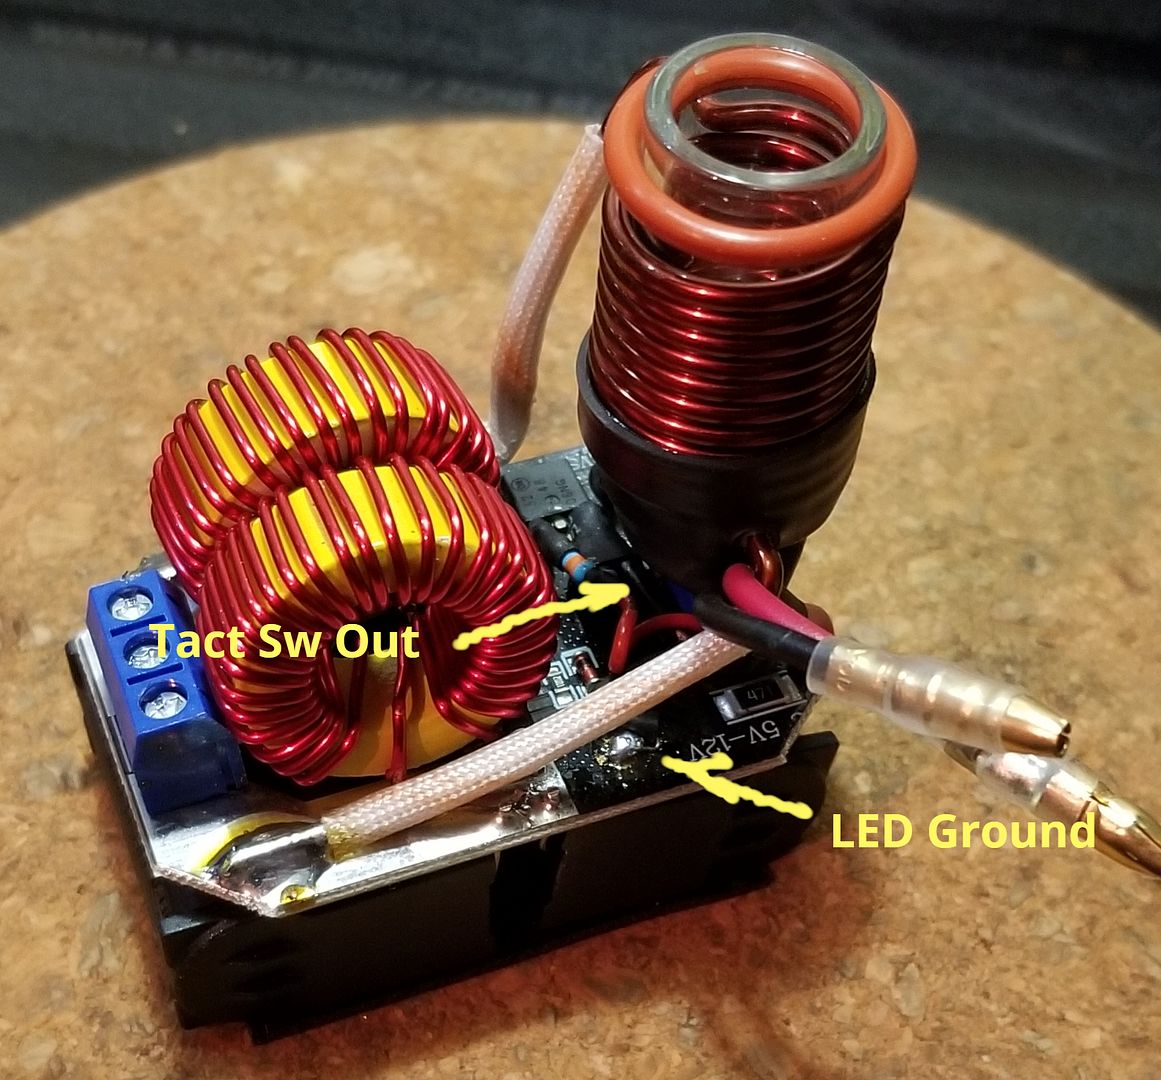
Here is where the connections are from the tube mechanism to the board. This side shows the ground and the tact switch out to the resistor bridge to the FET switch.
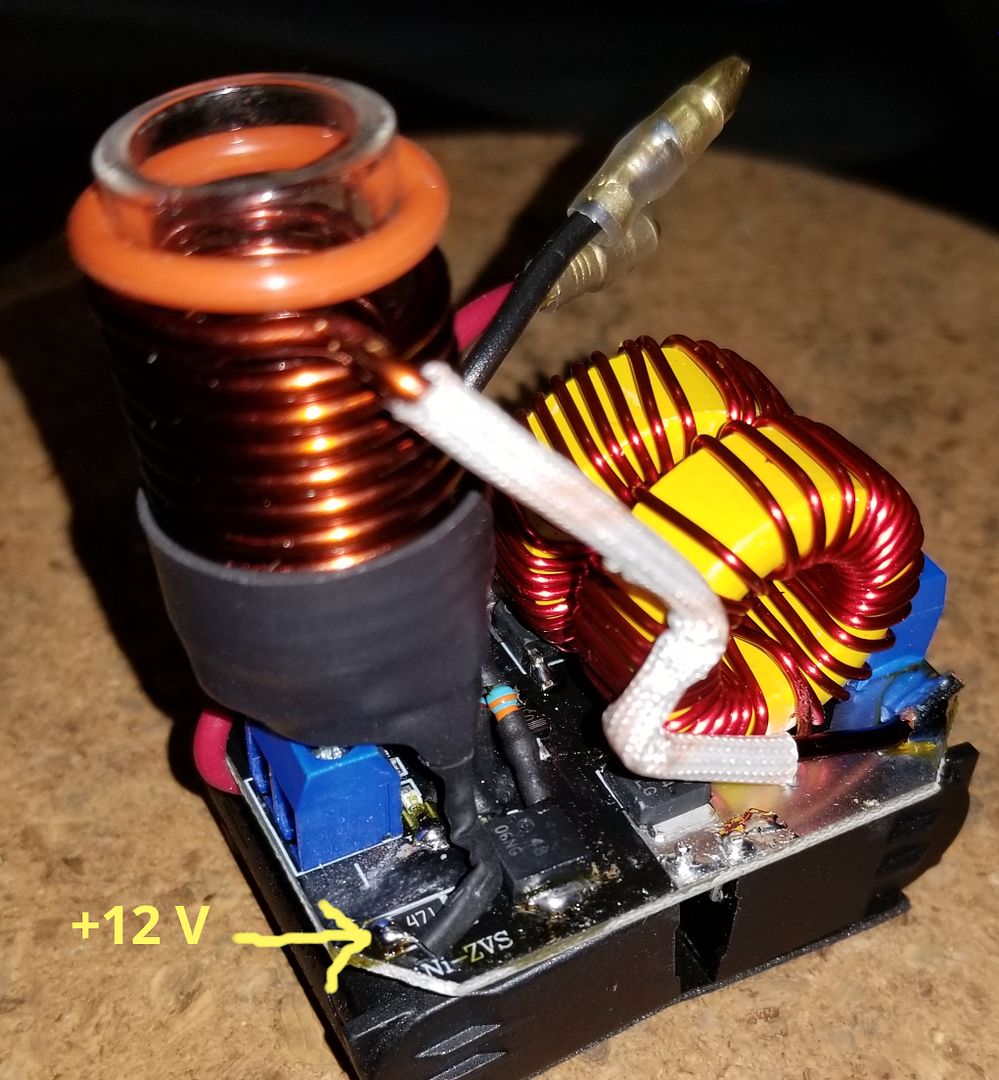
And this side shows where I steal the 12 volts from. It is present on either board side on the same resistor.
That's about it in a short tutorial. The rest is time and patents along with some soldering skills.
Enjoy! And have fun!
It starts with doing some mods to the driver board.

The first thing is a thorough inspection for cold solders, badly mounted or backward components. Then I snip the corners so it will fit into my enclosures. Not needed for other enclosures. I now found a supplier that has good FETs but I always add solder to the FET legs as they can look pretty dry.

The next thing I do is grind off some enamel in particular areas that need to have solder added. Left spot is for adding the ground wire from the LEDs in the activation tube. The small area above the blue connector is to ground the foil that we are going to use as ground. Depending on the board manufacturer, some is already at ground potential but other manufacturers have left this foil floating. The larger spot is for mounting the FET switch to provide the soft power switch capability.

Here the solder is added for the LED ground wire and solder jumpering the floating foil to the ground which is the end of the little LED that comes on the board.

This is the modified driver board with FET mounted. The main 12 volt "in" is the same as before any modifying but the ground now goes to the source of the added FET. Once the FET is switched on via the tactile switch, the output will become ground potential. Thus turning the unit on.

And finally, the work coil setup. Those two 12 volt wires get twisted and soldered together once the tube is assembled. Thus has 3 wires coming from it. 12 volt, FET activation signal and ground for the power on LEDs.

Here is where the connections are from the tube mechanism to the board. This side shows the ground and the tact switch out to the resistor bridge to the FET switch.

And this side shows where I steal the 12 volts from. It is present on either board side on the same resistor.
That's about it in a short tutorial. The rest is time and patents along with some soldering skills.
Enjoy! And have fun!
Last edited:
TheThriftDrifter
Land of the long vapor cloud
Do you rewind your coil to fit nice and snug around your glass tube? It looks way better and tighter than mine that I left stock.
Yes, I do. I sanded a piece of doweling to just shy of the glass tube. I twist the coil(s) around it as I push it tight together. Fits on the glass very tight and gain about one wind which comes back off to lengthen one lead to go down to the board. 
Siebter
Less soul, more mind
Hello! Just created my account on fc to join this thread because I have two problems with my Portside Mini (which I did not buy directly from Pipes, but from an italian website). Well maybe it's two half problems, for the device does work fine. However:
1. I own the PSM for a couple of weeks now, but only yesterday I saw that the glass tube seems to sit quite a bit lower than what I see on pictures of the PSM; it's pretty much flush with the case, on pictures it seems to sit about 5mm above the case. Is that an issue? Because I do notice that the PSM heats quite aggressive compared to another IH I own: I will pretty much have to release my VC the moment it clicks (after about 7 seconds of heating when it's cold), I haven't combusted with it, but I suppose I would if I wouldn't follow the click strictly. I don't really mind that, I'm just wondering.
2. I don't get the battery indicator. When I press the „Test“-button, it will show me either all LEDs or all but one LED (after about three sessions), but never less than that no matter how full the battery is.
Would be cool if someone enlightens me about those issues – I'm sure they have been addressed somewhere in this thread, it's just a bit time consuming to browse through 120+ pages... :-)
endof3d
Cognitive Dissonance D4 ++++
Hello! Just created my account on fc to join this thread because I have two problems with my Portside Mini (which I did not buy directly from Pipes, but from an italian website). Well maybe it's two half problems, for the device does work fine. However:
1. I own the PSM for a couple of weeks now, but only yesterday I saw that the glass tube seems to sit quite a bit lower than what I see on pictures of the PSM; it's pretty much flush with the case, on pictures it seems to sit about 5mm above the case. Is that an issue? Because I do notice that the PSM heats quite aggressive compared to another IH I own: I will pretty much have to release my VC the moment it clicks (after about 7 seconds of heating when it's cold), I haven't combusted with it, but I suppose I would if I wouldn't follow the click strictly. I don't really mind that, I'm just wondering.
2. I don't get the battery indicator. When I press the „Test“-button, it will show me either all LEDs or all but one LED (after about three sessions), but never less than that no matter how full the battery is.
Would be cool if someone enlightens me about those issues – I'm sure they have been addressed somewhere in this thread, it's just a bit time consuming to browse through 120+ pages... :-)
Probably best to PM @Pipes directly for quickest response and solutions.
Howdy @Siebter! Welcome to the club. Good info and people around these woods.
First off about the tube protrusion. It has no effect on performance from unit to unit as this is more the finial resting place when assembled. The driver portion rests on four rubber wedges along the insides of the enclosure. They can move upon assembly or be pushed down by the user. There is no problem with functionality but if you wish to show more glass then you can install a spacer between the battery and under the driver raising it some.
The 7 second seems a little quick as generally 8-10 is what I hear back but this does differ some from VC to VC. Yes, the click means its ready to rip without much delay. It took quite a few changes to get this right. It is also very evenly heated you'll notice. Earlier units had more heat towards the tip and caused an uneven colouration in the AVB.
The test button should be observed while a VC is inserted as well. Without load, the voltage will read high. You should be getting more than 3 sessions. Did you adhere to the conditioning instructions? This is very important, especially when new and needs to be topped up to full before using.
This is from my FAQ:
New Lithium batteries must be FULLY CHARGED and FULLY DISCHARGED 2 to 3 times, before being FULLY CONDITIONED. Please remember that a new Lithium battery's full performance and longevity is only achieved after 2 to 3 complete charge and discharge cycles. After you go through 2 to 3 cycles, you'll never have to condition your battery again!
If indeed you are getting low counts per charge, do an overnight charge and do not top up until completely drained and repeat for a couple cycles to see if it comes back some.
Hope this helps.
First off about the tube protrusion. It has no effect on performance from unit to unit as this is more the finial resting place when assembled. The driver portion rests on four rubber wedges along the insides of the enclosure. They can move upon assembly or be pushed down by the user. There is no problem with functionality but if you wish to show more glass then you can install a spacer between the battery and under the driver raising it some.
The 7 second seems a little quick as generally 8-10 is what I hear back but this does differ some from VC to VC. Yes, the click means its ready to rip without much delay. It took quite a few changes to get this right. It is also very evenly heated you'll notice. Earlier units had more heat towards the tip and caused an uneven colouration in the AVB.
The test button should be observed while a VC is inserted as well. Without load, the voltage will read high. You should be getting more than 3 sessions.
Did you adhere to the conditioning instructions? This is very important, especially when new and needs to be topped up to full before using.This is from my FAQ:
New Lithium batteries must be FULLY CHARGED and FULLY DISCHARGED 2 to 3 times, before being FULLY CONDITIONED. Please remember that a new Lithium battery's full performance and longevity is only achieved after 2 to 3 complete charge and discharge cycles. After you go through 2 to 3 cycles, you'll never have to condition your battery again!
If indeed you are getting low counts per charge, do an overnight charge and do not top up until completely drained and repeat for a couple cycles to see if it comes back some.
Hope this helps.
Last edited:
endof3d
Cognitive Dissonance D4 ++++
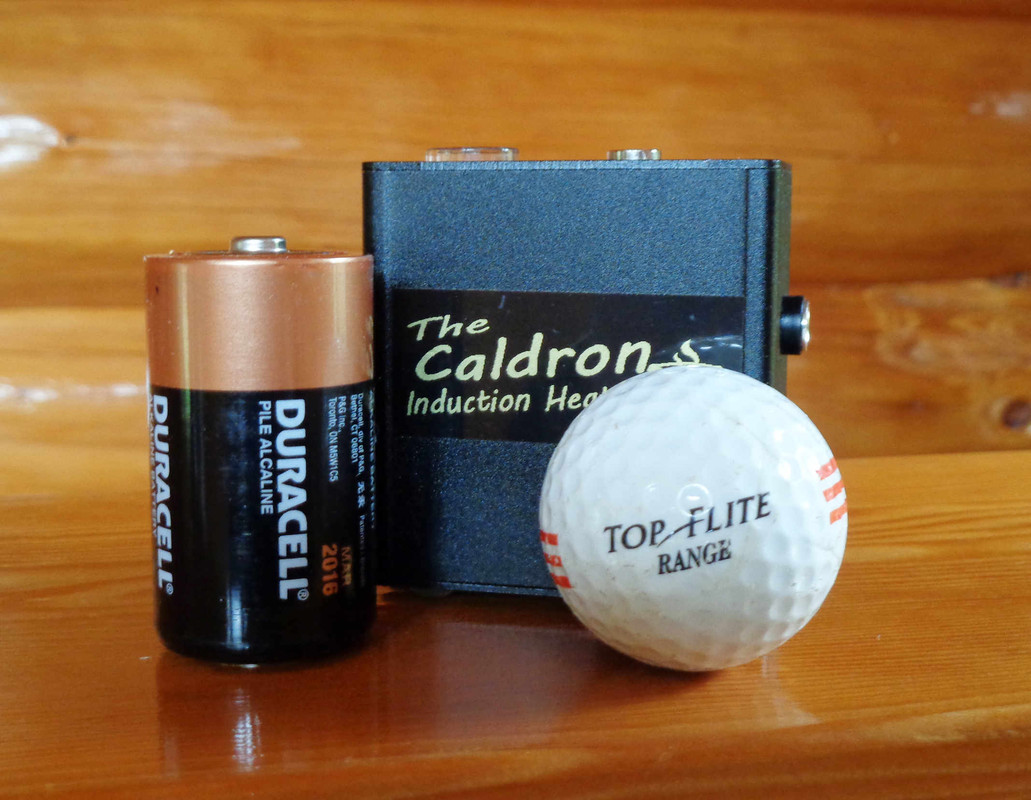
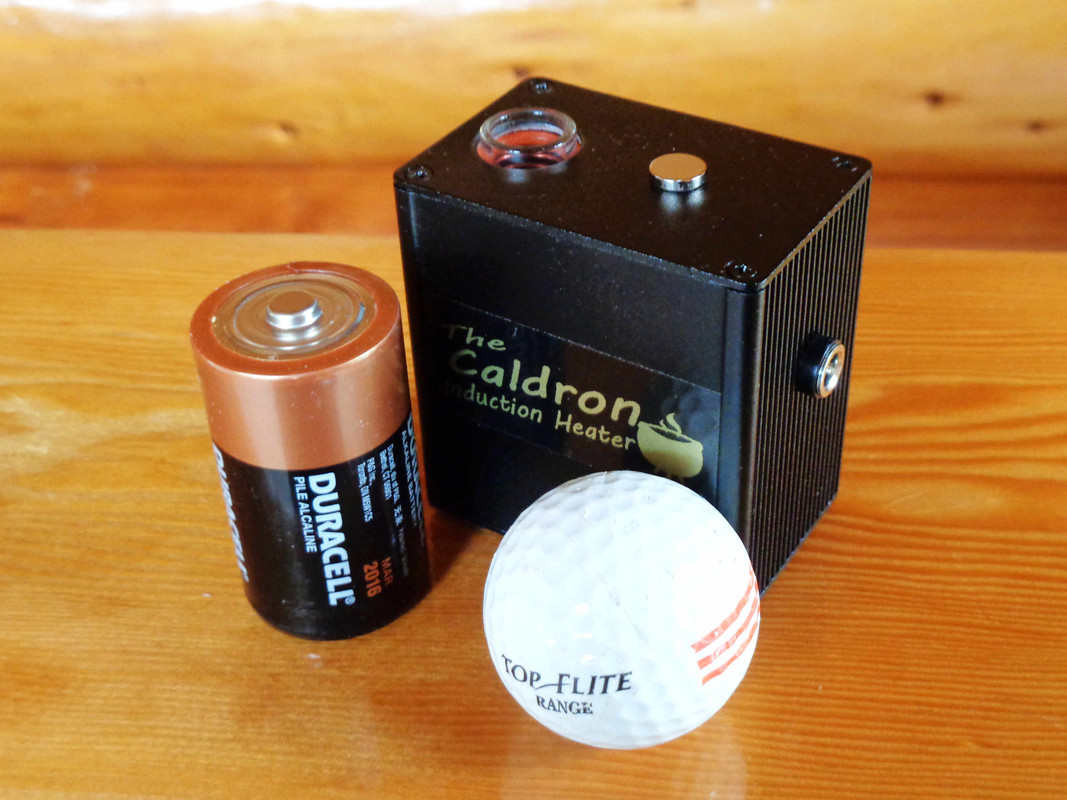
Thought it was time to upgrade from a torch to an induction heater (IH) and after several weeks of research decided to purchase @Pipes Caldron model. The unit was shipped within hours of the order being placed and arrived on the assigned day, well packaged and protected. The box contained three items; the heating unit, an AC to DC converter module with cord and a heavy gauge two prong plug wall cord.

The unit itself is very small and compact (66 X 43 X 68mm) and minimalist in design and function. The Caldron is a AC (plug-in the wall) table/desk top IH enclosed in a solid metal housing. The set up of the unit only takes a few moments that simply involves attaching the above mentioned two cords together, then plugging one end into the unit and the other into an electrical outlet.
This black, no frills unit has four cushioned pads on the bottom assuring it confidently can be placed on any surface worry free. Because of its small, compact size and low centre of gravity it’s very stable and I found it to be equally so when used on a sculptured berber carpet. Two of the sides are vertically ribbed making the grip secure even for small hands.
Concerns
My two initial concerns with the unit were that the pressure needed to activate the tactile switch would be such that eventually the top of a DV cap would dimple and distort leaving the cap unreliable as mentioned by a forum member. The other concern was the lack of vent holes in the enclosure causing an overheating scenario that could damage the unit or even worse.
The first concern was quickly dispelled as I found that the tactile switch requires very little measurable pressure to engage and activate the red ‘ON’ light and heating coil in the glass well. Could this change over time if dust and other gunk some how finds its way into the switch requiring greater pressure to activate? Possibly, but the O ring seals around the switch look pretty tight and Pipes responded that he’s only had two instances where users mentioned cap dimpling occurring after hundreds of sales. Keeping it covered and minor housekeeping every so often should be all that’s needed to avoid any problems.
The other concern of excessive heat retention because of lack of ventilation holes was also a non starter. I did a number of back to back dry continuous runs, over a period of time leaving the DV in for three or more seconds after the ‘click’ and the only thing that got hot (very hot) was the DV. There was no noticeable temperature difference on the outside surfaces of the enclosure or any smell of over heating whats so ever. Several individuals using the unit at the same time for multiple sessions should not be of any consequence.
Game Changer?
When people remark that an IH is a game changer I was sceptical about their claims. After all I’ve become pretty proficient with a single flame torch and on most occasions acquire the extraction I prefer. So is the Cauldron a game changer? It certainly was for the wife who never felt comfortable using a torch and didn’t, but really enjoyed the DV experience. For me it just took a whole lot of the variables out of the equation while still being able to get the consistent results I wanted much quicker. If consistency, full extraction, relaxed and hassle free vaping is what you’re looking for, then yes it is a game changer.
Final thoughts
The internals of the Caldron has gone through many design upgrades over its evolution and is quite mature (reliable) in its current iteration. I’m confident with reasonable care this solid unit will last a long time. If you’re looking for a small, compact and reliable AC plug-in IH with zero learning curve and plenty of heating power all for a very reasonable price, I would give this unit serious consideration. Hats off to you @Pipes for your continued contributions to this community.
someTooL
Well-Known Member
Thought it was time to upgrade from a torch to an induction heater (IH) and after several weeks of research decided to purchase @Pipes Caldron model. The unit was shipped within hours of the order being placed and arrived on the assigned day, well packaged and protected. The box contained three items; the heating unit, an AC to DC converter module with cord and a heavy gauge two prong plug wall cord.
The unit itself is very small and compact (66 X 43 X 68mm) and minimalist in design and function. The Caldron is a AC (plug-in the wall) table/desk top IH enclosed in a solid metal housing. The set up of the unit only takes a few moments that simply involves attaching the above mentioned two cords together, then plugging one end into the unit and the other into an electrical outlet.
This black, no frills unit has four cushioned pads on the bottom assuring it confidently can be placed on any surface worry free. Because of its small, compact size and low centre of gravity it’s very stable and I found it to be equally so when used on a sculptured berber carpet. Two of the sides are vertically ribbed making the grip secure even for small hands.
Concerns
My two initial concerns with the unit were that the pressure needed to activate the tactile switch would be such that eventually the top of a DV cap would dimple and distort leaving the cap unreliable as mentioned by a forum member. The other concern was the lack of vent holes in the enclosure causing an overheating scenario that could damage the unit or even worse.
The first concern was quickly dispelled as I found that the tactile switch requires very little measurable pressure to engage and activate the red ‘ON’ light and heating coil in the glass well. Could this change over time if dust and other gunk some how finds its way into the switch requiring greater pressure to activate? Possibly, but the O ring seals around the switch look pretty tight and Pipes responded that he’s only had two instances where users mentioned cap dimpling occurring after hundreds of sales. Keeping it covered and minor housekeeping every so often should be all that’s needed to avoid any problems.
The other concern of excessive heat retention because of lack of ventilation holes was also a non starter. I did a number of back to back dry continuous runs, over a period of time leaving the DV in for three or more seconds after the ‘click’ and the only thing that got hot (very hot) was the DV. There was no noticeable temperature difference on the outside surfaces of the enclosure or any smell of over heating whats so ever. Several individuals using the unit at the same time for multiple sessions should not be of any consequence.
Game Changer?
When people remark that an IH is a game changer I was sceptical about their claims. After all I’ve become pretty proficient with a single flame torch and on most occasions acquire the extraction I prefer. So is the Cauldron a game changer? It certainly was for the wife who never felt comfortable using a torch and didn’t, but really enjoyed the DV experience. For me it just took a whole lot of the variables out of the equation while still being able to get the consistent results I wanted much quicker. If consistency, full extraction, relaxed and hassle free vaping is what you’re looking for, then yes it is a game changer.
Final thoughts
The internals of the Caldron has gone through many design upgrades over its evolution and is quite mature (reliable) in its current iteration. I’m confident with reasonable care this solid unit will last a long time. If you’re looking for a small, compact and reliable AC plug-in IH with zero learning curve and plenty of heating power all for a very reasonable price, I would give this unit serious consideration. Hats off to you @Pipes for your continued contributions to this community.
Great overview. I’ve had mine for about two weeks now and definitely feel the same way regarding @Pipes work.
Regarding the cap dimple thing. Mine has left a small outline of the activation button, but that’s all it is, an outline. I’ve ran my finger across it and can feel no dimple. Cap still clicks as normal with the BEST most evenly heated AVB of any of my vapes.
Siebter
Less soul, more mind
Hey @Pipes, thx for replying so quickly (and helpful).
I jumped headfirst in this whole IH-topic only a few weeks ago, so I think I must have mixed up some information about the height of the tube and performance (probably the height of the VC in the coil is what I was thinking of). Anyway, I don't mind the flush look at all and am glad to hear that things are as they should be (or at least could be).
No, I definitely get more than three sessions per charge (and have followed the conditioning instructions) – about 40 clicks which equals to about ten sessions. But after three sessions the battery-o-meter will show me all but one LED → when not inserting a VC, that's the point I was missing, so thx, now it makes quite a bit more sense.
I can confirm that the performance is on point, evenly colored abv, ripping hard, yet reliable. Also really like your open sourcesque approach btw.
One bonus question just out of curiosity: how low does the PSM discharge the battery?
Last edited: