VapCap DIY Induction Heating : Bits 'n' pieces

TommyDee

Vaporitor
Thanks for pointing that out. Definitely worth reposting the schematic.

The other note in that post was about maximum gate voltage.
Now I under stand the 470 ohm resistors.
That should also mean those zerers are in the 2.1V range.
Also note that the LED circuit is omitted.

complete.jpg


I do want to lay out a board but not sure I'll order any. I'm going to wait and see how this 'half power' version will function. If that works out as a mini-portable, then I won't have a choice but to lay one out.

And if anyone ever wanted to lay out PCB's but simply lack the tools - Go find Design Spark. They have some very powerful freeware. I know how PCB's are designed but that is not my discipline. I was able to lay out a fairly demanding PCB using their PCB software and had them made. Came out perfect! 3 times no less!
 

PKOK

Well-Known Member
Thanks for pointing that out. Definitely worth reposting the schematic.

The other note in that post was about maximum gate voltage.
Now I under stand the 470 ohm resistors.
That should also mean those zerers are in the 2.1V range.
Also note that the LED circuit is omitted.

complete.jpg


I do want to lay out a board but not sure I'll order any. I'm going to wait and see how this 'half power' version will function. If that works out as a mini-portable, then I won't have a choice but to lay one out.

And if anyone ever wanted to lay out PCB's but simply lack the tools - Go find Design Spark. They have some very powerful freeware. I know how PCB's are designed but that is not my discipline. I was able to lay out a fairly demanding PCB using their PCB software and had them made. Came out perfect! 3 times no less!
Well dang TD you have 3X my experience:cool:, take a look at the Mosfet/Debouncer jobbie, see what you think.:nod:
These were in "DipTrace" a free program, I loaded it, seemed fairly simple but like you it's not my discipline.
The program had a "check" and when run on the "Mosfet/Debouncing switch Module" it came back with these little red circles the seemed to be showing a tiny mismatch on the circuit path but may be nothing.
The Parts List is there, good stuff, it's all for the (Mosfet/Debouncing switch) I even ordered parts though I don't really know what the Debouncer does :uhh:.
I'd love to build the ZVS driver board as well so lay that puppy out :hmm::shrug:
Just kidding, I could try but I'd have no confidence in it. End goal- a stable safe desktop unit
 

TommyDee

Vaporitor
My thoughts on the debounce; bypass the electronic switch and debounce isn't an issue :2c: I have no issues with breaking up the mains because I also have no use for a switch activation at the end of the coil. I am focusing on a "ReHeater"... or whatever a cleaver name will end up being. Having a switch at the end of the coil is not helpful if all you want to do is add heat to your current draw. This is where my focus is. This last switch I found would lend itself to activation of the unit and still break the mains. It is a 1/2" 1/2" 'log' with a small 1/4" button that has a very light actuation. For desktop, drop a marble in the glass coil-tube and you got a mains switch rather than a FET switch.
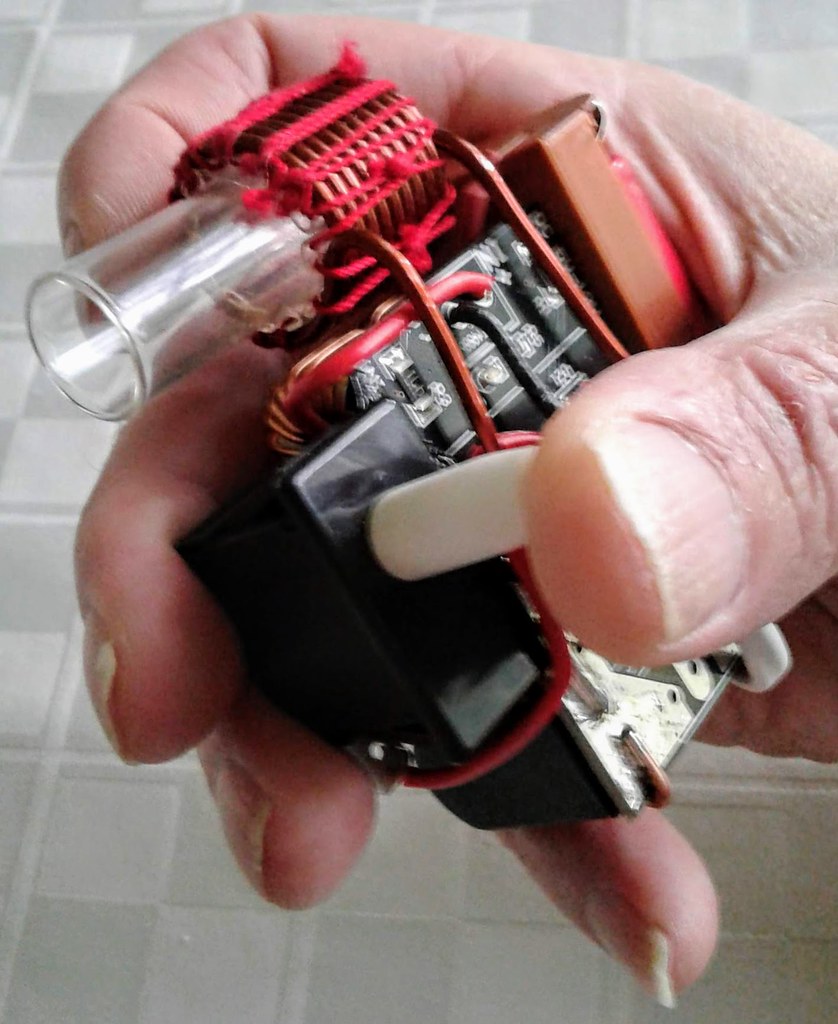
For a desktop unit, I still recommend a momentary switch somewhere in the circuit to be sure it turns off on its own. Left alone these things get dangerously hot even without a VC. The debounce circuit is an old trick that has been required in sensitive circuits. It is mostly done to deal with high speed transients that cause problems in circuits. I've had boost converts completely knock out digital volt meters for instance. I even discovered a WiFi interrupter the other day. That was fun to diagnose!

The board design program might throw errors but that doesn't mean the designer hasn't taken those errors into account.

I still need to verify the zener somehow. The circuit I am looking to come up with is part of making this thing pocket-able. It will be the FETs and control only ready for a solid connection to a coils and caps.

And for those following my switch selection process; I got in the two 16 amp switches. They are the same except that they don't have the bypass. Not that need it, but found that interesting. I opted for this one on 'The Runt'. Next; fashion a 2x 14500 battery holder and stuff everything into a hand-held -ReHeater-.


------------------------------------------

I have to add a note; I think there is an error in the ZVS schematic. I believe the larger diodes crosses over to the opposite output. I'll have to double check that.
 
Last edited:

TommyDee

Vaporitor
7 volts/5 amps - that is where The Runt ranes in on 2 remote 18650's. That is still a lot of loss, mostly in the 18 gauge wire and the cheap connectors.

I had an interesting flame-out yesterday. Second draw using the full output of the DDIH. Wasn't sure but quickly realized it had gone off and stopped drawing. Went outside and blew the wad out. And I picked it up and it looked like half-baked ABV! What the hell! It had developed a coal dead center of the load. That is a strange place for a hot-spot using an IH :\

And I will remind that The Runt has the tightly gathered coil at the stock diameter. And I will remind that both The Runt and the DDIH use the same technique of centering the VC while heating. Therefore all things being equal -except- the gathering. This has increased my steady state current where the gathered antenna requires a little more power. Exactly how much is voltage dependent but we know The Runt has a higher draw. I am leaning towards the gathered coil only in that it focuses the heat at the bowl. It doesn't heat faster or better in any way other than it appears to reduce the vape's heat. Subtle but with the last few days I can and will make that statement.

I wanted to make this one aspect of the coil configuration clear before continuing. That working load is part of the calculations but not part of the power delivered to the sample, that being the VapCap. Therefore if the nominal no-load reading is 7.8V/1.22A, that means 9.5 watts is required to run the circuit. When I insert the VC, I get 7.0V/5.10A. Now I have almost 36 watts. The VC is receiving about 26 watts minus the efficiency factor for the circuit. This is not much. This is the characteristics of The Runt, which is the basis for a VCRH, or VaCapReHeater. For comparison - DDIH 7.8V/1.00A = 7.8 watts for the circuit, and 7.1V/5.20A=~37 watts or about 29 watts to the VC.

Word on this low end power delivery - You still cannot outdraw 25 watts of IH energy into a VapCap. This puts the power requirements in the conduction range!
Of course we want fast heat-up if we like power hits! VCRH is just a supplemental heater that lets you draw longer. That warmth won't fade either. Release the button already!

But some of you seem to love the low temp clicker. It is not that the VCRH won't click the VC, its that it takes a while and this is very much charge dependent. At 25 watts imparted to the VC, this is the bottom end of the desirable range in my opinion. You know how some of those heavily scented concentrates smell? Had my first draw today that never reached the second click but the lungs were full. That specific terpene taste was exactly the same as the smell of a concentrate I have. Now that is a micro-dose. Way to much work for my tastes. However, the ability and occasion to do this is fantastic! And it began the effects for this evening that are all too short-lived no matter how much I vape. I really want to see how a micro-doser reacts to a device like this and usage case utilizing real-time heating. Chances for combustion are reduced many fold!

If the numbers hold up and I can deliver this 7-volt minimum using 14500 IMR cells, then my calculations say I have about 8 minutes of power available. So I'm going to normalize that to about 5 minutes for performance level. This means minimal losses in the circuit are required as there is very little headroom over the 3.6v nominal cell voltage. 18650 is easy, just too bulky.

Final word comparing The Runt to the DDIH; There really is little difference in the original configuration and the one moving coils and caps. Short of pruning this circuit to half the capacity, the final configuration will be driven by ergonomic factors to keep things compact.
 

TommyDee

Vaporitor
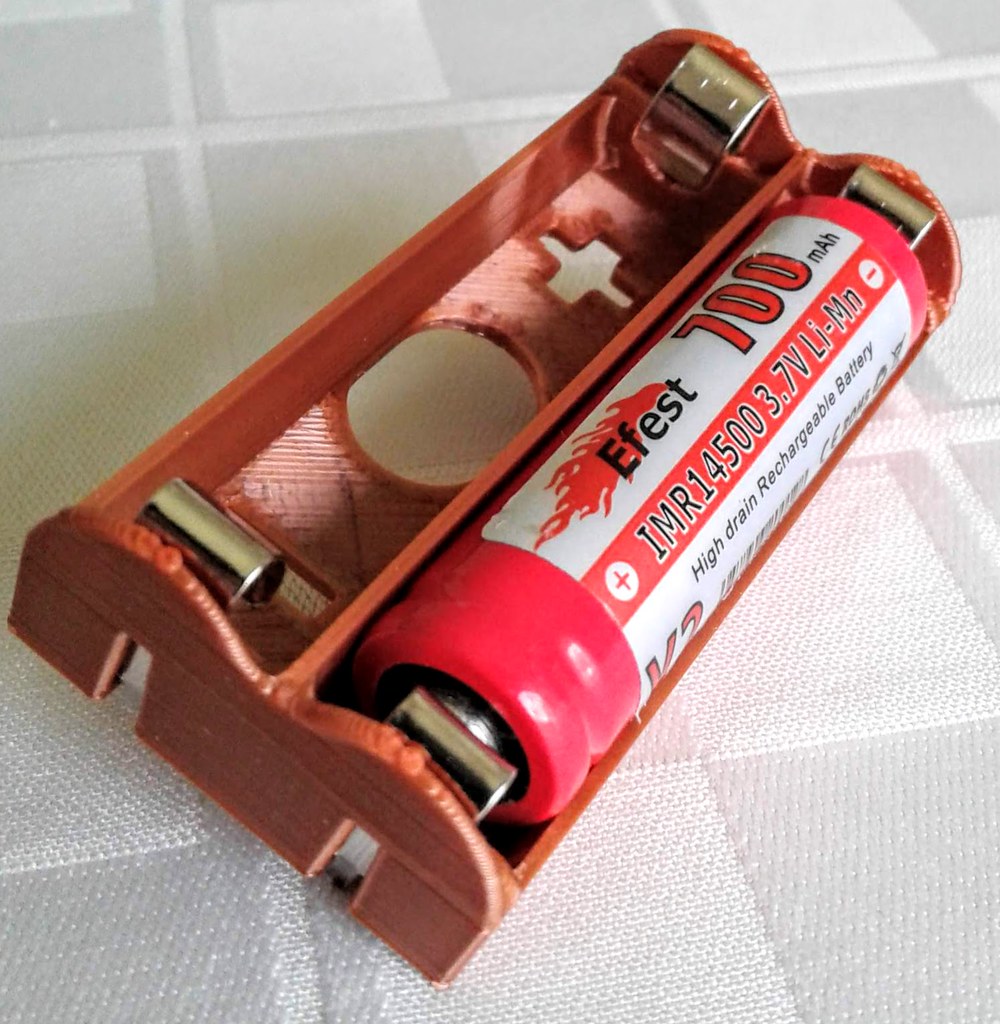
...and a new day on this experiment. Properly vaked on a mcro-dose followed by a full long-draw I went to work on a cell holder. I hope this works in practice. Used the clips from the five 3x-18650 boxes I got to scale things.
Making this work took 3 tries. Came out nice though...

49632026522_5e3b834000_b.jpg


That copper color is a new filament for me. Really stands out.

For button top unprotected 14500 cells, you want 60mm wall to wall ID.

And I now have the basis for 3x 14500.

Also got some coil wire; 15 gauge 200C. That is part of the reason for The Runt's design - easy access for soldering on new coils for testing.

-------------------------------------

I've completed the hard-wire of The Runt.

49632703147_7ac975cb92_b.jpg


I kept the 18 gauge in place. Now you see the impact of a switch on size. I do like the light touch these switch require. They have a lot of travel but trigger within an 1/8".

This is about what we're looking at for space claim;

49632436081_d5b7ac192b_b.jpg


That makes the ReHeater perfectly palm-able without cords;

49631915503_12738ee570_b.jpg


I've done the first draw with it and passed the first click no problem. The hit was again super terpee. And the cells still had charge.

What I don't have is a current meter or a volt meter in-line just to eliminate line losses. I'll get some data with this setup on battery life and effectiveness of charge level.

Perfect use-case - nice long draw outdoors when it is cold out. :rockon:

...and that confirms that - 2x 700mah IMR cells have enough juice to push The Runt to a double click on a full charge. I am running the charge analysis now to see how much juice was required to finish off a cap.

I did notice that the first 2 draws are the usual killer VC signature hits. It is much harder to get to that dark ABV. Those temps simply are not getting reached. Again, greatly reducing combustion risks with significant power reduction.

The dark ABV can be achieved with a rapid heating. This normally achieves one more dusty yet potent draw for those of us who want or need that decadent illusive dark spirit. And again The Runt can help extend that last tease to perfection!

We don't have a 2-setting offering out there yet. But that could make a corded version a game changer. Think of a wand style IH corded to a battery box switchable between 2 cells and 3. 3 for initial heat-up and 2 for sustained heating.

... first data-point - 250mah to vacate a vapcap. 45 minutes at 500mah charge rate. That says the full charge -may- get you 2 sessions. I'd say charge between sessions is needed. That will further add to a consistent experience.
 
Last edited:

TommyDee

Vaporitor
I don't know what I was smoking when I put limitations in place regarding dark ABV. I was way off!

I'll do some heating time analysis at some point but this is rock'n my vaping experiences.

I need some market feedback. I should start a new thread for this. Admins?

2x 14500, AA-sized cells, is kicking some royal butt and not just the peek charge. :tup:

I've added a volt meter at the cells as a protective measure. For safety reasons, I want to know when the cells hit 6 volts when firing the VC. Hense the need for a charging dock [think landline phone]. I have now fully expressed 2 full caps to dark ABV on a single charge. This is remarkable :D And charge remains. When I discharged the cells to 3V each, they were at a resting voltage of 3.5V. This is well within a usable range for these cells.

And the hard-wire worked. I'm only loosing 150-200mv open circuit whe pushing the button. During heating I loose about 600mv. This meets the goal of maintaining 3.6V nominal which will deliver 3.3V per cell and still has opportunity for improvement. eFest IMR's are good to about 6 amps. How long can you draw the best tasting vape ever :wave: And how long could you draw using this thing? No, I'm not saying it improves the VapCap nor that the VapCap is the best vape in the world. But I am saying this is a whole new look at what the VC can do. Very versatile for micro-dosing users and power hitters alike by giving each more control over the draw - while actually drawing :nod:

This last test gives me confidence that the power density is sufficient for this type of device. Is 2 caps per pair of "AA"'s good enough? Will the car charging dock cover concerns? This is an "in-the-field" quick hit device for delivery of smaller doses with greater control. A reduced power IH - on purpose :uhoh:

Now as to a corded puck version... I am liking this a lot more now. The 3X 18650 cell pack can have a single switch to change from 12.6v to 8.4v. SPST at 10 amps is sufficient. A BMS can still be used for charging. 18 gauge wire is showing good performance with longer leads. This means a flexible cord is easy to achieve.

I am absolutely torn between fully portable and a corded device to a battery pack. They are both considered portable but the cord is so yesterday! A cradle charge version would be the absolute bomb but the cost would reflect this. A lot of moving parts. Not to mention liability if all the safety protocols were not implemented. This is why DIY is so fun. Safety is on me and me alone. But this is a game-changer for your VapCaps peeps :science: No more dipping and twirling. Just draw and bake.
 

TommyDee

Vaporitor
That's what I am dealing with. 18650 are huge compared to 14500. That is why I see that being a remote pack. Certainly doable that way. Question always comes down to how big is too big to hold for your draw. This is MOD territory. I want to stay within the size of a decent Mod.

How many caps do people do during lunch at work? Charge during the next 2 hours and its ready for break. Of course, if you're a heavy user on a construction site, of course you have a Cauldron plugged into the cigarette lighter, but what about when you're 50 stories up and need a quick fix, and it's cold and you only have one hand free because the other one is keeping you from falling 52 stories into the basement. You know... the perfect time for a quicky :p

Brain fart - sure, how about a plug-in pack like power tools so you can choose :hmm:

Oh, and yes, there would be a 3x 18650 option with a boost switch for normal heating. This is about what you'd be looking at;
49589997181_114e844374_b.jpg


At this size I don't see that as "pocket-able" anymore. Also a lot less inviting to hold up to your vapcap while drawing. If the unit separated, maybe a 2-piece pocket gadged.
 
Last edited:

TommyDee

Vaporitor
Zero-sum loss assured either way @TheThriftDrifter - but the price is reflective of the lack of bureaucracy and the nature of man. Hell, I'm at risk just suggesting it but my verbose writings will surely envelop the thing that should go without saying -

:rant: DO ANYTHING I SAY OR DO AT YOUR OWN RISK! I AM AN OLD FART THINKING OUT LOUD. :myday:
I CAN STILL FUCKING DO THAT IN THIS WORLD, RIGHT?
This disclaimer applies to every fucking thing I've ever said on this and other forums.
About as fucking useful as posting it in the local daily newspaper.
But its been said!
PAY ATTENTION TO YOUR DIGITS!
And back to our usual programming -

DATA!

I got a near full 600mah out of the 14500 IMR cells. That is actually a very good result when you consider the current being drawn.

I also got heat-up timing. My cap, mind you. And I have it set to HOT.
8.4V newly charged 14500; 8.4V ;
@10 seconds - start drawing lightly
@15 seconds - first click; draw in earnest
@37 seconds - second click; Start thinking about withdrawing the VC and finish off the draw -or- release the button and modulate to your liking (if you still can).

Again, Stainless bowl and dense load. This is already a full hit. Micro-dosers will have let go of the button @20 seconds where taste is phenomenal.

And the second draw was 1 minute 10 seconds - from pre-click1, click2, and cooling click1. Nice airy draw really stretched that second click out nicely. Rare free draw on that one. Voltage was right at 6.5v during firing. ABV is now light brown. There is one left that I'd rather finish traditionally. There is no real flavor left in it. Just meds. Lesson learned, draw speed matters but easily adjusted. Never been a real issue with VC's. I'll finish this off with The Runt though. Now I can roast it more and draw less.
 
Last edited:

TommyDee

Vaporitor
I'm impressed too :clap: I set out to find a way to control the power level of an IH and realized a real-time heater for the VC.

I gave this a lot of thought today. And broadened my vision on the power source. We really should have access to input power to our IH. That alone is an improvement. This is only viable for a select few offerings, and I believe they all have the activation switch at the end of the coil. That is not quite user friendly. So the project needs a 'wand' solution.

Now here is today's thinking. Put effort in the power supply. Let it be desktop. Give it infinite output control; fuse and relay-protect the output; remote the fire-button with the 'wand'. Give it a 2-1/2' power cord, flexible... and make the cord detachable. Optionally, pop a small 2x 700mah pack on the wand for a full portable to 'step away with'. MaxPax and MegaPax can be added for more power or additional portable functionality.

Again, a lot of moving pieces but that seems to be the full platter or possibilities. Bits and pieces of all of it is readily available.
Power source; AC adapter - sizable and restrictive
Battery pack; Requires charging but still easily remoted. BMS circuit could give convenient charging options.
Adjustable voltage (Constant Current) module with connector for the wand cable; Fused and relay protection. Can be powered by battery pack or AC power adapter.
Wand cable; 3-wires silicone with robust connections on both ends [18 gauge x 2, 24 gauge trigger]
Full 120W IH wand; Full sized IH capable of fast heating or slow roasting. Power adapter governs behavior. Cell docking or cord capable.
1/2-Pint IH; Literally half the components of the iconic IH for a 6-8.4 volt micro-doser/reheater. Pocketable portable that utilizes the same docking cell as the full version.
Dockable 700mah pack; 2 loads in a pocketable solution with the 1/2 Pint. Drop it into a charging dock for constant readiness.
Dockable 3000mah pack 8.4V; loads of power for the ReHeat/MicroDose users. Can still be pocketable even if optionally split to 2 pieces.
Dockable 3000mah Boost Pack; 12.6V with a 8.4V/12.6V switch. This makes the Full 120W wand a normal IH and a ReHeater all-in-one for the heavy hitters. One handheld device, many draws, and power options!
Vape-Dock; Charging dock for 700mah pack for convenience.

That's a shitload of options guys and gals!
 
Last edited:

TommyDee

Vaporitor
Too funny. Someone is cost cutting. 120W => 100W. Yes, that is what I was planning to do with the coil that has the ferrite.
 
TommyDee,

Electrofever

Well-Known Member
Would these all be different ‘possible’ wands (5 different versions) or only one wand with different option or settings, with the possibility to switch from one to another ?
In any case, the idea seems really fun and functional :clap::rockon: and I agree that a ‘desktop’ version seems to give more options !
 
Electrofever,

TommyDee

Vaporitor
Would these all be different ‘possible’ wands (5 different versions) or only one wand with different option or settings, with the possibility to switch from one to another ?
In any case, the idea seems really fun and functional :clap::rockon: and I agree that a ‘desktop’ version seems to give more options !

I'm thinking this is another Lego set. You have 2 puck options; full power capable or the 1/2-Pint Reheater. Each will take the 700mah cell or a cord back to the power source. The Full unit will also accept a 'local' 8.4V pack (18650) or a 12.6V pack with a 12.6v|8.4V switch. Alternative power sources include a "rectifier"... basically a module to adjust the 12.6V to whatever you want. And then you have a desktop power supply [12v/8a] or a 3x 18650 battery pack with connectors and protection along with a simple charge circuit when the unit is idle. The charge cradle will come with the 700mah pack.

Okay, so this is my attempt at defining a marketable product. But that has to be done on a level that encompasses all the option. Each of these items is a development project in their own right. What I've done here is to look at what is easy and what is required. This type of product really should have a real company behind it.

@lookhigh - I've been handling my open frame unit since I've built it. I blew out the light with a bonehead mistake on a loose input wire. But it is now even more stealth. I make sure all the coils and capacitors are well soldered on both top and bottom. I also prefer a hard soldered coil in order to avoid any and all transients that can blow the transistor. I power the unit with pure DC. I do not know if the units are sensitive to switching supplies with a noisy output like a boost or buck driver or PWM drivers. I do know they read nearly open when you put an ohm meter across the input. This is the only thing that keeps a Mod from driving these as far as I can tell. I will try a CV|CC 2596 buck driver on one soon. That will at least tell me how sensitive the input is.
 

TommyDee

Vaporitor
Funny, the board says 18v(?)/5a which is 90 watts, not 300 watts advertized. That unit is sizable though.

Edit; finally... zener is 12v!

s-l1600.jpg
 
Last edited:
TommyDee,
  • Like
Reactions: lookhigh

PKOK

Well-Known Member
That's replacing the 2 Big Caps ??? If so there's the reason for a PCB. :p
 
Last edited:
PKOK,
Top Bottom