The "Project" DIY Herbal Vaporizer

virtualpurple

Well-Known Member
Hey guys, I've been meaning to post in here as I've been acquainting myself with the project, let me tell you, this is NO JOKE.

@Pipes thanks for including me into this group!

I took his recommendation on getting a cuboid and I followed his directions laid out and everything has been awesome! Battery life is great with the two 18650s and I have no trouble getting really good vapor production.

I alternate between using the stem included with @Pipes kit and a small piece of glass tubing used from a stem I had purchased from @Alan.

I have gotten my abv very dark with no combustion and have been super impressed with the extraction. Very even.

I am out of town and brought the project along since it clearly nails the e-cig look.

I have actually been abstaining until last night when I had trouble sleeping and the only material I had available was a bit of old crumble that I wrapped with hemp fiber. I was worried about combusting the fiber but had no issues. Vapor was not as dense as I usually have with flower but I think the effects were strong and I probably could have toyed around with the settings to try and get stronger vapor but I felt I best leave well enough alone.

I am really looking forward to using this piece more when I get home around some flower tonight!

Guys, if you're looking for a great, efficient piece that is super affordable, this is it!
 

Pipes

Addicted DIY Enthusiast
Accessory Maker
Thanks for the feedback @virtualpurple, glad to have you aboard!
Seeing your up in Alaska, I'm looking forward to your input regarding the usefulness in cold weather. I found while testing last February, it was just a matter of cranking it up a few degrees to compensate. But that was only around -10C. Also, how's the taste? There are silicone concerns by some here. TIA

So guys, @virtualpurple is the first to report back on the newest version Project I'm calling The Eraser. I finally feel no more need for improvement. Although, I've said that before..? Here it is without any stem.


The main difference is the oven is 3-4 mm longer giving room for the SS element to be spread out more evenly. Also, the upper portion is not as thick as the previous silicone piece. This lets the user tilt and rotate the stem slightly while inhaling, thus changing the airflow which in turn further evening out the heat path.


I highly recommend the Solo stems for this puppy.


It's one solid piece instead of two half's bonded together. The visible seem is from the outer mold. I use a temporary wax inner mold which I melt out once the silicone is set.
My picture gallery has pics of the process.

There are a few units out there and nobody has yet to complain so I'm hoping all is good with them.


I've being testing this all summer and can't see going back to any other vape device. I use my smallest bowl Solo stem when budgeting and go to my largest when times are good. Can get by without stirring but still find I do one dump and return at the end to get that last small toke. And using it with my D20 water tool is out of this world.

Close to having a couple more made up but always willing to add to a list. Gives me the initiative to get up off my butt.
:mmmm:

:cheers:
 
Last edited:

virtualpurple

Well-Known Member
I too look forward to testing the project in the winter!

I initially did not care for the taste and that it was muted and presented a sort of coconutty flavor, however either it has cured with age or been neutralized after many uses but I am finding the flavor cleaner with each passing use. I am finding great luck while feathering the device rather than holding the button for dense tasty clouds! Though I still prefer it through water.

I think with a little tinkering or adaptation this could be configured to rival the some of our favorite logs and convection portables.

Is there a way to make this compatible with some of the w9tech bubbler stuff like the nibbler Hydra tube? I'm just not familiar with ecig stuff in general or how easy it would be to incorporate mods from that area into our realm. Sorry I'm pretty medicated.
 

Vapor Trails

Well-Known Member
Do the Atomizers recommended in the opening post have a completely clean, chemical free vapor path, or is there a better recommendation if looking for as close to a medical grade vapor path as possible? I don't know anything about Atomizers and where the air comes in etc., but these temp settings are right up my alley IF there are 0 chemicals or off gassing of any sort, and no need for burnoffs before using it. I have terrible luck never being able to remove residuals from 'Most' vaporizer manufacturers in general (Boundless takes the cake for me in my history of vaping with the residue smell, except for an old box vape I had many years back that tasted like huffing glue...). I have major chemical sensitivities, and just being safe about the path of the Atomizer since I am clueless about them :)

I could not handle the CFX, and could never get the chemicals to burn off after Days of doing burn offs, and I don't need to bandaid the bad residue by simply packing herb in like most do so they simply mask and can't taste the chemicals they're inhaling anymore, lol. Of course terpenes will overpower the taste and smell of factory residuals, but it does not eliminate them. Sad, but true that most just mask it and don't mind what plastic or rubber or any type of odors coming from a vape. Now I have a parked CFX, and I have anxiety issues....and it is such a disappointment I don't feel comfortable even having it replaced. I haven't decided yet whether to throw it away or not.
That is how important a completely clean vapor path is to my health. I'm really hoping the atomizers have clean paths.
 
Vapor Trails,
  • Like
Reactions: KeroZen

thisperson

Ruler of all things person
Do the Atomizers recommended in the opening post have a completely clean, chemical free vapor path, or is there a better recommendation if looking for as close to a medical grade vapor path as possible? I don't know anything about Atomizers and where the air comes in etc., but these temp settings are right up my alley IF there are 0 chemicals or off gassing of any sort, and no need for burnoffs before using it. I have terrible luck never being able to remove residuals from 'Most' vaporizer manufacturers in general (Boundless takes the cake for me in my history of vaping with the residue smell, except for an old box vape I had many years back that tasted like huffing glue...). I have major chemical sensitivities, and just being safe about the path of the Atomizer since I am clueless about them :)

I could not handle the CFX, and could never get the chemicals to burn off after Days of doing burn offs, and I don't need to bandaid the bad residue by simply packing herb in like most do so they simply mask and can't taste the chemicals they're inhaling anymore, lol. Of course terpenes will overpower the taste and smell of factory residuals, but it does not eliminate them. Sad, but true that most just mask it and don't mind what plastic or rubber or any type of odors coming from a vape. Now I have a parked CFX, and I have anxiety issues....and it is such a disappointment I don't feel comfortable even having it replaced. I haven't decided yet whether to throw it away or not.
That is how important a completely clean vapor path is to my health. I'm really hoping the atomizers have clean paths.

I would assume you can use titanium wire and you'd be fine. I haven't done this though.
 

ZC

Well-Known Member
Really liking this project and how far it's come. Wondering if you could put a glass tube just inside the SS tube, which would allow you to fill more surface area with the coil and not have to worry about shorting it on the sides?

Also, have you seen the tubo evic? Seems similar to what you're doing but with a different approach.
 

Pipes

Addicted DIY Enthusiast
Accessory Maker
Why thank you. Yes, it's come to be a very nice and versatile vape. Fun journey too.
Actually, if one can find a glass tube having the correct diameter and a way to make some intake air holes, it could replace the SS oven all together. Sounds simple enough for people into the glass making thing. Any tips on techniques for this are welcome. The tubing itself likely isn't hard to find. The insertion idea would take away too much space in the current tube.

Just looked at the Tubo Evic mod. Very interesting that the video shows the vaping temperature numbers align fairly closely to real temperature..? Curious on the element material, gauge and TCR setting.
:science:
 

Hippie Dickie

The Herbal Cube
Manufacturer
if one can find a glass tube having the correct diameter and a way to make some intake air holes ... Any tips on techniques for this are welcome.

i use a Dremel at lowest speed (5,000 rpm), with the hole pattern punched in a copper foil template (placed against the glass) to keep the drill bit from wandering. Tube is filled with water and the drill surface is submerged under 1/4" of water. There may be a little chipping of the drill edge surface - slower speed may be better. diamond drill bit, of course.

here are holes drilled in the end of a 12mm diameter flat bottom vial using this technique with 0.75mm hole size (the notches in the edge are done with a diamond bandsaw blade):

picture.php
 

E0x

Well-Known Member
a glass inner tube will very nice for me because i can't make the new design ( v shape ) without touching the SS inner tube when it rotate sometimes.
 

funkyjunky

www.lamart.ch
Manufacturer
hey guys!

i should have posted here a long time ago. i am also owner of a project device and like its functionality and size very much. also i appreciate reading the ideas in here. the hole "project" has inspired me heavily on my own adventures.

now to get to the point:
i have been looking into other firmwares for the evic, mainly to increase the 10s timeout. i have found the evic-sdk, that has been mentioned in here, the vaporware-vtc (https://github.com/TeamClouds/vtc-VaporWare/releases) and the myevic (https://github.com/ClockSelect/myevic/tree/master/bin). the bins can be flashed with the original firmware updater.

dont get mislead by 'evic'. following mods all use the same chip apparently:
  • Joyetech: eVic VTC Mini, eVic VTwo, eVic VTwo Mini, eVic AIO, eVic Basic, Cuboid, Cuboid Mini, eGrip II;
  • Eleaf: iStick TC100W, iStick TC200W, iStick Pico, iStick Pico Mega, iStick Power, ASTER;
  • Wismec: Reuleaux RX200, RX200S, RX2/3, Presa TC75W;
  • Vaporflask: Lite, Classic, Stout;
  • Beyondvape Centurion

the evic-sdk is mainly the hardware functionality from what i understand.

the vaporware-vtc is imo a very cool firmware, seems more experimental, with its real time temperature and watt display and has NO timeout, user set-able resistance. it does overshoot but it even lets you control the PID values, so someone very experienced or interested could tune it to our liking.

the myevic is very close to the original firmware but has much more settings. interesting ones are: set resistance value, preheat time, disable unused modes. but has a 10 sec timeout.
another very great tool is the https://github.com/TBXin/NFirmwareEditor where you can make settings for your mod and also download your myevic firmware in its current status (including settings).

i ended up looking through the code of the myevic to change the maximum timeout to 25 seconds and compiled the firmware again. i uploaded it here: http://xup.in/dl,13874601
you can also use this with the official firmware updater.
hold fire & '+' to enter the menu (evic). there is an option under 'vaping' where you can set the timeout (originally 10s max, now 25s)

its supposedly unable to brick the device.

uh yeah, a lot of info, questions? :D
 

thisperson

Ruler of all things person
I have the eleaf Ipower 80w, is that the mod you are referring to under eleaf? That's so dope man. Way to go.
 

Pipes

Addicted DIY Enthusiast
Accessory Maker
That is fantastic @funkyjunky!!! Answers the mystery of how the tubo evic mod has the correct numbers showing in the video that @ZC mentioned.

I tried the NFirmware editor and looks pretty slick. Unfortunately it couldn't communicate with either my evics. Some error regarding DCOM or something. But I'm sure I'll figure it out. Seems the tweaks are all there. Thing I wonder is that if one can get the temperature numbers to be closer to what you'd expect, is there a way to set the max setting to 450 F instead of 600 F? Reason would be that if 375F is vaping temp, they if the temp is cranked up it would overheat almost instantly. This is the reason why we set the TCR to get the vapimg temp in the 500sF on the display. 600F is still well in the safe zone for over glow.

This is hugely awesome as now we can play with and share bins. (set-up files) Huge THANKS to @funkyjunky.
:clap:
 

funkyjunky

www.lamart.ch
Manufacturer
hmm, some need to sadly hold their horses...the supported device list above is only for the NFirmwareeditor :(
i just tried to flash my cuboid without luck. here is a list of the devices supported by the myevic firmware (and my 25sec build):

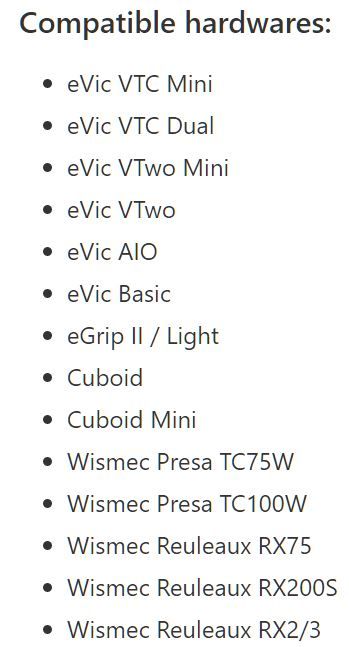
Compatible hardwares:
  • eVic VTC Mini
  • eVic VTwo Mini
  • eVic VTwo
  • eVic AIO
  • eVic Basic
  • eGrip II
  • Cuboid Mini
  • Wismec Presa 75W
  • Wismec Releaux RX75
maybe there is a possibility, ill find it, give me time :)

regarding the tubo evic, ill post more info soon. but quick info: 26awg tripple parallel coil around 0.3 ohms and tcr 140 now. with the tcr value and the lock resistance (changeable in the special firmwares) one can shift the temp display how one likes. imo ppl who want to set it to combustion temps need to deal with that :) but the option for crazy concentrate hits is still available.

it should be possible to adjust the temp range in the code, havent stumbled over it yet. i will get to that eventually :) maybe i can get the developper of the myevic firmware to implement a custom range
 

Pipes

Addicted DIY Enthusiast
Accessory Maker
Howdy guys. Couple of updates. I have for a few Eraser version units made and ready to be adopted.
If you prefers wood, let me know and I can make they per request basis.


Currently testing a glass version. Thanks goes out to @mistvaporizer for the 14/23 female tube. I found drilling the intake holes was not as bad as I had thought. Just takes patience.
Performance is pretty much identical to the SS version except for the stem being much narrower but longer. Volume of goods is about the same.
Note that only the first picture has intake holes and the rest were before before the drilling. (wanted to get pics before I broke it...lol)


Definitely fun times we live in. :science::tup:

EDIT:
:cry::cry: Dang it!:cry::cry: :ugh: First road trip and I broke the stem. Fell off when getting out of car onto the pavement.:doh:
Thinking a 14mm male to male adapter to replace it with....? A little thicker on the draw end which may help my clumsiness. Or at least the outcome.
 
Last edited:

E0x

Well-Known Member
i got one of the eraser version , it is great , not sure why or how but my coil get loose , maybe was when i try to take off the inner tube rotating it but not sure , anyway i get to tight it back again but the reading now is 0.48 , so my advice is be careful if you want take off the inner tube is too tight and i think that is the reason my coil get loose beside that like i say this new version is great i don't get any smell of flavor from the silicone , but the wood mouthpiece have some smell and taste , i get a arizer air glass steam and is great with this , and my other stem too work great ( e-nano stem and underdog SS stem ).
 

Pipes

Addicted DIY Enthusiast
Accessory Maker
The new units are a tight fit on the base. Wetting the O rings to re-insert helps a lot. .48 ohms sounds a little light. Ensure the top loop of element isn't touching at the cross over point as it starts its way back down. This will effect units stability.

Found this in my glass arsenal. It will do till I find a replacement.
A stay at home vape for now.
 

Pipes

Addicted DIY Enthusiast
Accessory Maker
Today's mishap has turned into a blessing!
The connector/bowl portion of the stem survived the fall. So I cut and bored it to fit a standard 510 drip tip. The selection of these mouth pieces is limitless. This also makes the insertion of the screen away simpler as well. Which was a concern for this version.


I'm happy again.
 

virtualpurple

Well-Known Member
Today's mishap has turned into a blessing!
The connector/bowl portion of the stem survived the fall. So I cut and bored it to fit a standard 510 drip tip. The selection of these mouth pieces is limitless. This also makes the insertion of the screen away simpler as well. Which was a concern for this version.


I'm happy again.

Are you able to replicate this and sell? I love how that glass connection looks (and it looks like somehow it could be used to heat a vapcap) and think that would make the project even better!
 

Zheka

Member
I have the eleaf Ipower 80w, ....

I am considering iPower mod. Have you had any problems with yours, specifically when using the Project? Can TCR setting recommended for VTC Mini be used with this mod?

Thank you
 
Zheka,

thisperson

Ruler of all things person
I am considering iPower mod. Have you had any problems with yours, specifically when using the Project? Can TCR setting recommended for VTC Mini be used with this mod?

Thank you

I haven't done it. I was asking if it was my mod, because I wanted to know if it could be done with mine. As is, I'm still happily puffing away at my Heat Island Bamboo unit. But I do want to make this. On demand convection seems too good to pass up. Sorry I couldn't be much help.

TL;DR I don't know. :/
 
thisperson,
  • Like
Reactions: Zheka

E0x

Well-Known Member
I am considering iPower mod. Have you had any problems with yours, specifically when using the Project? Can TCR setting recommended for VTC Mini be used with this mod?

Thank you
in theory any mod with tcr mod will work , maybe the tcr used at the vtc mini will not work the same but from there is matter of try and error to get the mod dialed right i guess.

i hope this help, good luck.
 

Pipes

Addicted DIY Enthusiast
Accessory Maker
Hey FC Project team. Decided to make a few of the Glass version Projects up. Ordered 15 of everything I should need.
Still have a couple Erasers left and planning to keep making them as well. I have to admit that I have some reservations about a totally glass vape because of the frailness aspect. Going from a bullet proof Eraser to a don't drop device are two extremes. But seems the interest is there so.... here we go. I do like the cool look and performance though.
Decided to keep with the short 14mm male combined with a 510 drip-tip for the stem. This is the 510 I ordered for the job.


I think it will go nicely. Of course, one can use any 510 tip.

As for mods, I recommend off this list:


The reason is they all have the same chip set and the code has been leaked out and now open source.
This chip set has proven to work well for our purposes. The newest firmware even allows for PID alterations of the heat up algorithm. The customized firmware is in a file called myevic.bin and is being changed regularly. Advanced options like 15 second time out is a nice option. The same file works on all the above compatible mods.

For information and menu instructions go here.

For the actual file and some history go here.

Set up the Project with a TCR of 145 and lock the resistance. Change the protection timer to 15 seconds if you like. To get into the full menu hold the fire and + buttons at the same time for a few seconds. Don't play too much with other settings until you read through the instructions as some are quite confusing. You should find the usable temps in the mid 500sF area.

;)
 

KeroZen

Chronic vapaholic
Gonna test the new firmware soon. I got erratic results with the evic... when it works it's brilliant, but unfortunately there are times where the experience is far from stellar... and I don't even mean the times when you combust because the damn thing decided to kick out of TC mode!

I'd like to reserve a glass version, please drop me an invoice by mail. I had more occasions to test the Eraser version recently. I'll report later on. But the new coil geometry is a huge improvement: instead of having to stir every couple of hits like in the previous version, I stir once or at most twice per bowl/session now, fantastic! :tup:
 
Top Bottom