scy123

Trusted Member Don't Worry
Thanks for the mention.

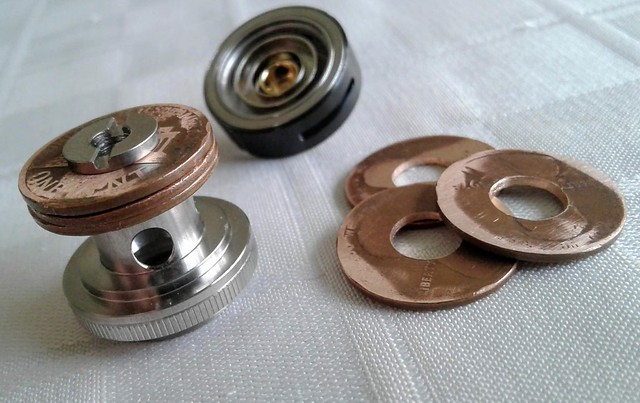
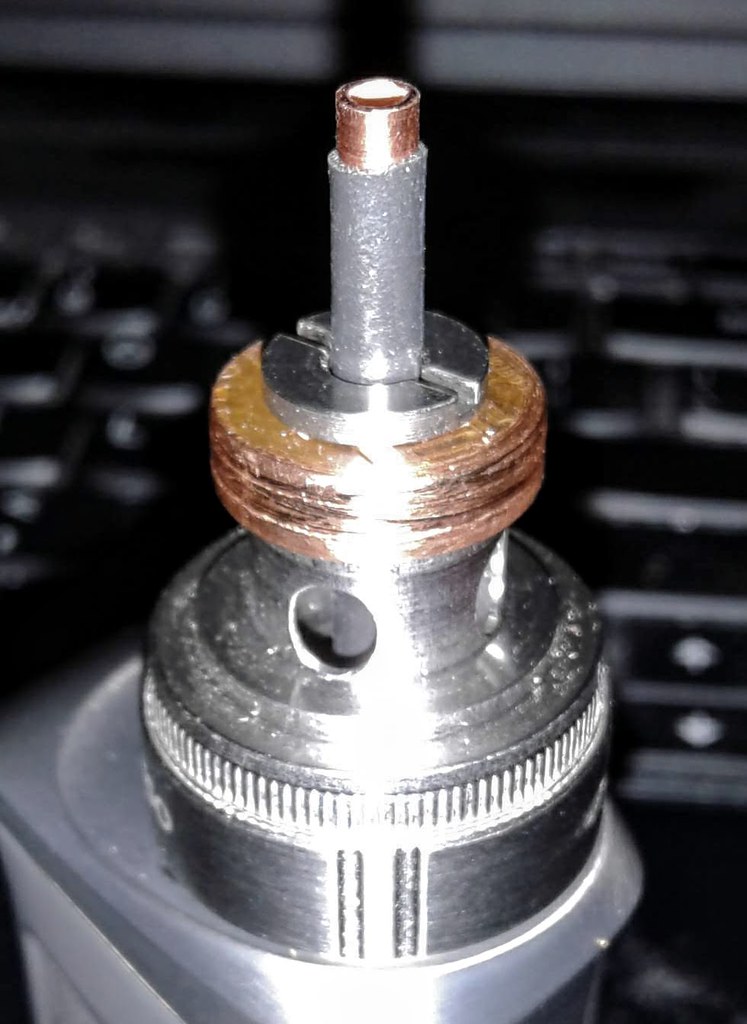
I never tried it with a regular mflb before this, just maud dib. Was acually surprised how well it hit. 2 sec pull and I could not handle the clouds comming out. Not to mention the temp limiting.

Should try a stainless steel tcr to get more accurate temp control. It's some form of ss just gotta figure out which. Here is a page with some tcr values for different metals. https://www.e-cigarette-forum.com/threads/the-ultimate-tcr-list.721201/ (*please note different sources sometimes have different values, I tend to trust steam-engine as they seem extremely knowledgeable. Also, their are variances in alloys even with same grade so....)
 
Last edited:
scy123,

TommyDee

Vaporitor
Yea, I missed the edit window. I meant Mode SS. It can be a bit closer but seriously rocked the box for the first time in 4 months. Having the MOD adapter hold the box for drags was the clincher (punn! :nod:)... and a happy accident. I understand the physics now, just happened on the right conditions. :shrug:

I don't have a good enough thermal camera to calibrate LB for TCR mode but I could make one for the LB. Its got 2 user defined TCR's available after all.
 
TommyDee,

scy123

Trusted Member Don't Worry
Doubt a thermal camera can accurately read the screen anyways.... dunno.

Might get a better reading with a temp probe. I have a ton of them from my 3D printer. The leads on some probes are hella thin doubt it will interfere much

Also, it seems herb have a combustion temp of 450f so if found a stainless steel tcr that don't combust a bit under think that would be good.
 
Last edited:
scy123,

TommyDee

Vaporitor
The Target Mini lets you tweak those settings so that's a plus. The trench from last night was amazing! Fully baked! That's what I've been needing.

Now here is a little Launch Box tip where Magic Flight still towers over others. At least when it comes to other conduction vapes. That silly window on the LB tells you when your vape is vanquished. With this kind of reliable power to the screen, 'button-shake-vapeonthecover' tells you it ain't done. Little sips to fool combustion but oh so satisfying. Lost vape is minimal and the flavor is always there. This MOD-mod is so much better than the PA.
 
TommyDee,

TommyDee

Vaporitor
Yep, 0.07 ohms :p. Yep, Temp Control! :smug:

49341997363_7ec7e13698_b.jpg


Vapresso VT-22 tank modified with pennies and a copper tube. And some heat shrink.

49342017918_1f03d9d2fe_b.jpg
 
Last edited:

stark1

Lonesome Planet
A pix of the interconnect/adapter, please!

That was quick! Thanks!

—Now, for a VDO, in action?

( Positive tip, negative, the barrel like plug. Separated by an insulating sleeve? )

Both positive, and negative, made of copper?
 
Last edited:
stark1,

TommyDee

Vaporitor
I don't do video but @scy123 did one and ...their missing! :whoa:

Now the LB is attached to the MOD, so holding the MOD against the positive rail and pushing the button no longer requires a 3rd hand. It is using the spring tension of the loop to push on the positive rail and hold everything together. I can clean it up a little with a sleeve or two but damn, it works a wonder. And thanks to @scy123 to drive this direction or I would have hardwired a MOD.

Another thing I like about the Target Mini II - the 10 second counter resets at every fire press so a quick release and press of the fire button will continue the fine bake with minimal interruption.
 
TommyDee,

TommyDee

Vaporitor
Cool! Thanks. :cheers:

This is insane... two trenches on a single charge and only down to 40%. That's 3 trenches fully baked per charge.

I feel I have a lot more control at the end of the bake. Still need to stir. Had keep just pack the screen. Definitely need to dial in the TCR for a LB. Found another parameter in the TMII... CCT set. What is that?

And the overheating seems to have dissipated with the copper tube. Now the pennies get warm and the copper tip is unremarkable. Same experience I had with the copper lead-wire that remained cool to the touch compared to the fuse cap contact which got hot as hell on the cell pucks. I am very greatful this was such a simple adjustment.
 
Last edited:
TommyDee,

stark1

Lonesome Planet
Interesting. Altho (IMHO) it is a bit of an overkill?


The original concept is (again, IMHO) simple, and elegant.

Actually, almost elegant: wish MF had aligned the LB power source (battery) along the long axis of the Box for a more compact form factor. And eye pleasing.

Something similar to this Pulsar (with a shorter stem)


You lads have a working mod for the LB which is great. Question is, is it practical. Portable?

I know. Critics, everywhere.

Oh. One other thing. Perhaps a more robust battery? :cheers::spliff:
 
Last edited:

TommyDee

Vaporitor
Yep, sub-C cells do very well in restoring the LB original experience. Easy hold and still portable.

The 'box' is elegant in its own right on an industrial design level. I wouldn't change a thing. It certainly isn't about looks, I agree.

MOD overkill? Not in the least. I've had two sessions with the LB-MOD and first of all, it functioned better than expected. It baked me more than any other cell or power adapter session. And the ABV is dark-dark. Temp control may not be perfect in this configuration, but it does well to help manage combustion. I still drive my LB daily.

Pages back you will see where I was having serious issues with the fire button and putting positive pressure on the pin within the LB. That was a three-handed job. With @scy123 's direct contact approach, the pushing requirement was not yet alleviated with my hacked version of @scy123 's modification. Only when I went to the slightly longer and copper center pin this things fall into place. The LB now swivels and holds fast to the MOD. This is what solved the last design element. Unfortunately, there are two LB designs out there. Any solution will need to encompass both. They are simply geometry tweaks that will make for 2 solutions.

This is the cell solution as far as ease-of-use goes -

48996345703_ec2bab0423_c.jpg


The design has been updated but this works!
 

scy123

Trusted Member Don't Worry
Yea, I kinda don't like it, too cumbersome even though it works great. I just made it when I really had nothing else but the mflb and the batteries just were not cutting it.

A mflb with a mod like solution built in would be great and with today's tech would not have to be much larger then the mflb already is.

Was just throwing it out there to see how people respond. Bought the new crafty + and enjoy it much more.
 

TommyDee

Vaporitor
Its not far from attaching a MOD permanently. Basically just bolt the adapter to the box. I do like the swivel thing though. I can see the MOD screen, the fog on the plastic cover, and draw all at the same time while holding the button. I need to replace the pennies with a better machined piece. Basically, the reliable connection solution is now in place. And this solution will be different with every tank so my solution is the VT-22 tanks which are spendy (and with good reason). But the connections are appropriate - direct tapered copper contact on the very rivet making contact to the MOD positive terminal, and gold plated no less. 2 pieces of stainless steel through a thread and a dedicated stainless steel screw all from the original tank. The 'cage' is removed as the only modification needed to the tank parts. This cage is press fit so prying should remove it. I cut mine off with a Dremel cutoff wheel. Additional parts is the 'pennies' or a similar copper slug, 14.5mm in diameter. Thickness is not critical as long as you can tighten the screw on it. A slight tweak to mine would have it sitting flush to the top of the VT-22 housing. The copper pin would be cut to the right length to assure contact pressure and the taper and size appropriate for the rivet in the 510 adapter. Shrink tubing on the pin, of course. The only other thing that helps limit the motion would be a stabilizing ring that that sits under the copper slug. I'm planning to cut one from wood just to finish this off.

An adapter like this would run in the $50 range if sold on eBay. I have no doubt it would sell. However, selling this as a complete kit including a functional MOD could get this into the $80-$100 range. I've spent at least that much on getting cells for the LB with no real solution until I opted for the sub-C cells.

@Choices - I'd be happy to try to modify your Vaporesso tank if you like. I just need to know if you have an older LB or a newer one with the Patent No. laser engraved. If you're in the USA then shipping is minimal.
 
TommyDee,

Choices

Well-Known Member
@Choices - I'd be happy to try to modify your Vaporesso tank if you like. I just need to know if you have an older LB or a newer one with the Patent No. laser engraved. If you're in the USA then shipping is minimal.

I will PM you before I head for bed tonight. Out and about now....
 
Choices,
  • Like
Reactions: TommyDee

TommyDee

Vaporitor
A quick word about temperature control on a Launch Box. IT STILL ROCKS!

But more accurately, I set it to 200F. FLAVOR GALORE!
210F - More flavor
220F - More Flavor
230F - Flavor
240F - a bit of baking taste first whisp of cloud
250F - First real cloud
260F - Now we're starting to roast
270F - Roasting
280F - In the groove
290F - Heavy roasting
300F - A bit over the top
Backed down to 280F to achieve near black ABV

Here's what is cool about this. This is a literal thermal fuse. You set your desired ON-wattage. I picked 20W for a pretty good roasting right off the bat with every fire trigger. Once the MOD senses the resistance change, it backs off on the wattage. At 200F and 20W, you get a bright glowing bulb in the Launch Box, full power, but within seconds, the light goes out and dims significantly. You draw and the light goes bright as it should. This is what temps does. For Launch Box owners, that is basically a safety fuse. At 20W I can combust the trench once the load dries out a little. Maybe 16W is more appropriate. Wattage also determines draw rate, or how well the MOD is keeping up with you draw rate. Still a balance but I have to say this; A LB trench is the same as 2 VapCaps. With the MOD in temp-mode, I get a lot more control and vape out of the Launch Box. And I don't say this lightly. I still do both daily and they both have their purpose. However, I would now pick the LB over the VC if I could only have one. I would not have said this before making the MOD work. The choice would have been much tougher.

Do you need to burn off some of that old soot? Yep, MOD does that too. Even at 20W, just put the temp to 400F and the LB gently melts away the built-up black stuff on the rails and elsewhere.

The only tip I can provide on the Target Mini II is to limit the wattage in all modes. 50W doesn't seem to kill it but it wasn't designed for that. Any smoke the LB generates operating a MOD will start off as vanquishing soot. Overdoing it is on you. You've been warned ;)
 

TommyDee

Vaporitor
Quick note... and something not made clear in the Vaporesso manual is that the CCT mode I found is the same as the other two CCx modes, Custom Curve. That means you can program custom curves for temp, voltage and current! This is way cool! To access CCT, go to the temp control menu like SS and select the 3rd option using the mode button. The fire button moves you along the graph.

And it looks like I'll have a second change to better document the adapter thanks to @Choices who will allow me to modify a couple more tanks.

I also want to make clear, in case this is still a worry by some, that changing from the stainless steel center pin to copper, the heat issue also went away on both poles.

Yesterday I did my daily session at 16W. This is perfect for sipping. Press fire, 'bump' the trench to get the vape visible, and sip. 240-250-260-280-310. 'till all is dark brown. My 'bumps' are a 'lifting and dropping' of the box like making the stash do jump rope. This liberates the vape trapped at the screen to know it is ready to draw. I can't think of a more efficient way to remove all the volatile elements without damaging the more delicate molecules. No big clouds but a whole lot of medicine hitting the mark.

If your going to draw on the box and you want it to keep up, you need the 20 watts or more. Here you might want to test out the custom curve for temperature. That way you can program in a soft-start that won't spike the load. 20W is manageable but more may just put you back into a combustion risk.

I only do a trench per day so testing modes will be slow.
 
TommyDee,

TommyDee

Vaporitor
And we have a new mode under our belt. I decided to try the CCT mode hidden under the SS setting. Way Freakin' Cool! :rockon:

Basically CCT is a Custom Curve - Temp mode. You get to program the temp setting every half second for 5 seconds. Whatever the last entry is, this is the temp that goes on until the 10 second timeout is reached. Same protection of the temp mode but capable of a soft start. This is big for a Launch Box.

I ran this session at 15 watts. More than sufficient to make quick work of a trench. A couple of things worth noting while trying to appear objective.
1) It's still a launch box. A large heating element with gradient heating from one rail to the other. A MOD with temp mode is looking at an 'average temp' while the screen will certainly have hotter regions than others. The bottom of the trench is what counts. You still have to make sure bits are not becoming attached to the screen because they will combust. Use the brush as you always have specially if your load is duffy with kief.
2) I am getting hints that temp mode has some issues with the varying load resistance. Consider that you could be watts mode, worst case, if the current doesn't automatically regulate the MOD's perceived temp. I need more time with that to better understand what I am seeing. A quick test is to drop to 200F and see if the current reduces automatically after a second or two. If not, reboot the device. I am also hoping this CCT mode will negate the need for straight temp mode.

Also found a temp range in Celcius on the Target Mini II :D

This link will get you to a video to see the MOD connected to the box in CCT mode:
https://photos.app.goo.gl/Y3qbpR51isfMhMKo6
 
Last edited:

TommyDee

Vaporitor
So this thread needs an update. @Choices was kind enough to let me update the Vaporesso atomizers. First piece of data I needed was the desired slug size for the negative lead.
Slug ID is 7.6-7.7mm if you can hold that. the thickness wants to be 3.4mm minimum where 4mm would be a good target. The receiving loop is ~14mm. The hole is around 14.5mm at it's smallest.
I have some copper I''ll have to forge into one of these. The force on the positive end can all be managed by the length of the copper rod.
First things first, I tried to remove the cage by just prying. Nope; wasn't happening. So the cage was cut off again using a Dremel cutoff wheel.
 

TommyDee

Vaporitor
Step one and two completed. First step is to remove the cage as noted above. the second step is to make a copper negative contact. I wanted to use a slug and machine it up right and proper when I realized just how much effort that would be...

...compared to this continuing the pennies. If you recall, I had to counterbore one of the pennies last time. This time i opted to flatten the pennies to 1.2mm thick first with rollers. Once flat, I was able to capture them individually in a lathe to drill the center 7.6mm hole. 3 pennies at 1.2mm thick works well on the Vaporesso housing. this setup makes it ready to put on the lathe to cut the final diameter.

49456978066_e039ccf961_z.jpg
 

Choices

Well-Known Member
Step one and two completed. First step is to remove the cage as noted above. the second step is to make a copper negative contact. I wanted to use a slug and machine it up right and proper when I realized just how much effort that would be...

...compared to this continuing the pennies. If you recall, I had to counterbore one of the pennies last time. This time i opted to flatten the pennies to 1.2mm thick first with rollers. Once flat, I was able to capture them individually in a lathe to drill the center 7.6mm hole. 3 pennies at 1.2mm thick works well on the Vaporesso housing. this setup makes it ready to put on the lathe to cut the final diameter.

49456978066_e039ccf961_z.jpg
Keep chopping wood! Looks good! ( I think? Heck what do I know...) :-)
 
Choices,
  • Like
Reactions: TommyDee

TommyDee

Vaporitor
Chippin' copper but yea, same difference. :nod: The steps are few but equipment is needed. I had access to the roll-press and a stronger lathe.
 
TommyDee,
  • Like
Reactions: Choices

GoldenBud

Well-Known Member
Magic Flight sells them.
Thanks alot! I didn't know. You got one of the glass/acrlylic ones? what's the diameter of these? I want them for my VaporGenie, almost certain that it fits.

edit: it fits, some friend confirmed it.
 
Last edited:
GoldenBud,
Top Bottom