vapirtoo

Well-Known Member
Too much tech for us regular peeps, but your DIY portable power source is incredible.
I would worry about "too much power" with that LB glowing like a Christmas ornament!
If everything works out and doesn't melt, you may have started a revolution.
I will be in the front lines! ( I have a few boxes to fuck with )
 

TommyDee

Vaporitor
@vapirtoo - yes, I have a tendency to have forums be my means to document a process but you are right in that I often find that good peeps really don't give a shit about the minutia. When you begin to suffer CRS, the only thing one has left is the cookie crumb trail that one has left behind. I find myself having much less trouble recalling actual information after the hugely frustrating task of searching forums where I might have left those crumbs behind. Of course, that's just before I finish off that trench and move onto a completely different brain fart and life just goes on as it has been, none the wiser.

As to frying the system... not worried! After all, the LB was vetted for as much juice one could squeeze out of a NiCad cell. So making cells bigger won't change the peek output by much, only the duration from the slower V-drop under load. All cells tend to have peek voltages right after charging. This is the initial state I took that image of the new LB with the light flared. That silly little light is what I use to determine just how much juice is available. Also note that I did do some extensive PA testing before. I know that the voltage output at the contact of the PA is 1.15V at full power under a LB-load and I've confirmed that my power adapter is more than capable of delivering 2 amps to the PA v1.0 making sure the PA wasn't starving for power. So the peek charge is the only concern I needed to deal with since that could be up to 1.35V open circuit. I'll do some more experiments here but that peek won't last through a full draw if it even sustains 1.25V after applying the load. And what do you know, that first 'warm-up' draw? It likes that little power to vaporize those tasty fuzzy bits. Way to soon to even consider combustion risks. This cell has given me the the biggest and best tricome draw yet with zero effort. Now topping off a cell before coaxing out the last bit of spirit from your stash... that will combust with very little effort. Modulation and box-shaking is critical here. But then again, getting that last bit of spirit our of the herb always risks combustion. Given enough patience, I can combust with any of the dozen cells I have. I have a gold cell with excellent internal resistance but only holds 1000mah. Pull that cell from the charger to finish the trench and I'm monitoring temp on my tongue while modulating the 'switch'. I'll suck that cell dry but it performs throughout this most difficult vape-tease. I've combusted a few times this way, but not to any particular power supply method.

Bottom line, I can blacken a trench and never feel I'm waiting for -anything-. The LB is finally ahead of me. This has got to be breaking records in warmup as well. I can't even count to 5 and it's ready to draw all the way into brown. Getting from brown to dark is an exercise of your best ferreting instincts. I don't know that casual LB users ever goes dark unless they know to deploy the PA. I had a lot of trouble getting to that stage up to now. Turns out a blackened trench can suck 1800mah from a cell. And yes, although I've stated this is constant power, I should be clear that you are riding on a discharge curve for voltage output. It does weaken as you draw this much power in one sitting. I also didn't notice a significant knee towards the end of the charge so it could be a fairly steep slope compared to modern Li-Ions. If you want to finish a trench to the utmost extent, this solution will do that.

If you want consistent, that will be a MOD. It needs to be capable of dumping into 50 milli-ohms. Set your desired current and off you go with absolute consistency. My little MiniVolt can only to 200 milli-ohm coils. Personally, still not sold on MOD use with LB only in that the fire button really should be relocated to the tether.

Starting revolutions is something I seem to fall into but be sure I have no intentions to lead one. I'd love for MF to weigh in here. They could do so freakin' well with this on design and sales. But until then I want a steampunk unit worthy of being matched to the Launch Box.

...and I fixed the reach problem of the wand. Put a plastic washer on the end and it is working like a charm now. Also noted that 5000mah Tenergy's sub-C cell with tabs are still on the costly side. And I don't want to do tabless at this juncture so we'll wait on that to see if the market settles. There is also the well established 4200mah cell which is more than reasonable at $4.50/cell compared to the nearly $12 for the 5K.

See... I can't write short posts when they get informational. I need to go get vake'd!

Edit: just to confirm, the cell voltage at peak charge drops very quickly (1-2 seconds) to 1.25V when the LB load is applied.
 
Last edited:

TommyDee

Vaporitor
48964805056_58f96e6db9_z.jpg


Yea, this is doable. Glass fuse site hole. Braid wire captured in the second hole just outside the box. End-cap for normal charging along with a place to showcase the Glyph.
 

TommyDee

Vaporitor
And some additional prototype work;

48969523128_3ba559843d_z.jpg


For the "Industrial Design" I am using the short fuse (7/8") while this standard size fuse works well for this implementation.

This is prototype #3. I am awaiting 2 new Tenergy 4200mah sub-C cells that I ordered direct from Tenergy and that is why I hadn't wired this up yet. Proto #2 is performing its duties so I won't disturb that one either.

I'm curious to know how many of you are both LB enthusiasts -and- have the wherewithal to follow a build such as this. Essentially I am throwing functional ideas out to the DIY crowd for the time being. Please do remember that you are working with a lot of energy in these cells. And I welcome questions and I am perfectly willing to share data.

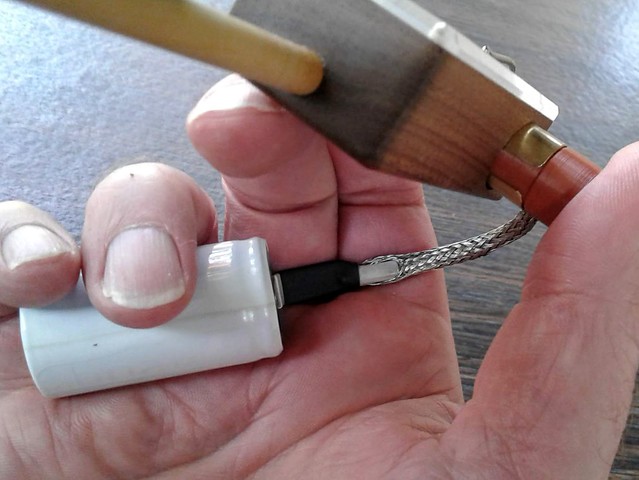
As to the evolution implemented in proto #3, we have a good solid barrel contact although it is brass (polished stainless would be cool here). It is not soldered and it is not a continuous tube. The cell diameter is .56". The brass tube is a 1/2" OD standard hobby tube (.014" wall). I slit the tube. The gap is on the farside and is probably .18" wide when installed. The tube is exactly 1" long. All the edges are cleaned up and treated with chambers and such to remove snags.

The fuse I will be using is an AGC 30 amp. The one I implemented has two 22 awg stranded Teflon wires attached with solder. Bad idea, I know, because you can blow the fuse soldering it. The fuse's end caps also don't take solder readily (bright nickel) but it does get there eventually with enough flux and abrasion. My fuse got a bit cloudy inside but I did test it against the LB load with the other cell and it still works fine. I do think the fuse should remain unsoldered. This can be done with a small copper disk soldered to the wires and heaved into the back of the fuse's chamber where it cannot be pulled out of the wire-hole. Since we are pushing on the end of the housing, the disc also makes sure it always makes good contact with the fuse. In this case, the fuse would be trapped between the 2-wire contact and the rail in the LB. Shrink tubing is added to go all the way to the fuse/contact and is to be buried in the braid-wire as it leaves the dedicated wire hole in the body of the wand.

The braid measures .18" wide and .025" thick. This matters as between the brass and the housing is the spring tension of the brass tube, which is much stronger than one would first expect, to clamp onto the braid making many points of contact. The tube is very workable once installed. For preparation, the braid gets the end folded over. That end is placed and trapped in the pocket in the leading edge of the housing so it can't just be pulled out from under the tube. You want to start the two wires into the braid ASAP so as you dig for a location for a hole to bring those wires inside the braid, be sure to keep in mind all that you are aligning here. You want and exit hole for the wires about 1-3/4" when the braid is pulled 'long' on the opposite side from the entry access hole. This is where the positive cell's tab will be. I'll walks through the shrink wrap insulation of attaching the cell when they get here. Bottom line; make sure you keep insulation in mind and where to add shrink tubing.

The 3D print is PLA this time. The fuse is a snug fit and I modeled it based on my 3D printer's particular idiosyncrasies. A very quick deburr on the ID and the fuse is a snug fit. I've included an 1/8" hole in the thumb-end so you can push the fuse out when needed. The hole for the fuse is slightly barrel shaped so only a small move on the fuse will make it easy to remove if it is not wired in place. I did not bother with a sight hole for the fuse. Just wasn't worth the extra effort yet.

I am still enjoying the ability to charge the cell on the Opus charger. But this also means the unit is not pocketable. Both ends of the cell are exposed. This is easy enough to fix with end-caps and shrink tubing but then we're back to how to charge the unit. Maybe a cell-sock? Obviously a little more effort and we can put a contact on the housing for the stock charger. I'm not there yet.

Although I am printing these using a 3D printer, I am very much keeping in mind fabrication of this type of device from wood. Drill through for a 'push-hole'; drill to depth the fuse hole; turn the OD and contact OD; switch or move to the mill for the tough, pocket, and cable hole. Break sharp edges.

Assembly of this type of unit is a little involved I will admit. However, I can see the process of building these would be quite simple as long as all the parts met spec. Proper fit of the fuses and careful wire management could really make this solution a stunning offering. And if you have much less patience than I do, which is hard to imagine, then I support anyone taking on this type of LB portable power solution as a product. Again, I am not dying to get into yet another production venture from home. This type of development work is fun for me. The rest just boils down to actual work.
 
TommyDee,

Abysmal Vapor

Supersniffer 2000 - robot fart detection device
https://www.aliexpress.com/item/330...chweb0_0,searchweb201602_2,searchweb201603_55
Check those out @TommyDee. I use one of these for my TUBO PSU but in 18650 size and i remembered there are those for AAA to AA.With very little work one can do a decent connector for the MFLB :). Maybe wrap it in nickel foil or copper foil for better connection and looks.
HTB1XKwyb2Bj_uVjSZFpq6A0SXXaa.jpg

Edited:
Just saw your 3d print for some reason photo didnt load the first time i visited the page,anyway looks pretty decent :).
 

TommyDee

Vaporitor
Thanks @Abysmal Vapor . The cost of those adapters are worth it for the button alone.

I need to stop by the hobby store and get some of that cellophane-type shrink wrap for the sub-C cells. Then I can make some wooden disks and cap off the ends of the sub-C cell. I might even peel off that cover just to be more "MF" about things.

Setting up Proto3 to charge on the AA/AAA charger could be an add-on for now. Just a puck with a pin and a light duty alligator clip I think is sufficient. That way you just attach the adapter to the end and connect the alligator clip to the braid. Whallah! adapter :spliff:

Speaking of adapting...
 
Last edited:

TommyDee

Vaporitor
Time for an update. Got the new cells and prep'd the one wire I had ready. This is the fused version. I put the wooden disks on the ends of the cell but quickly found no way to charge it yet so I pulled them.
This version has advantages and downsides but it is quite functional. As stated before, I wanted to move the wire to the 'backside' to give more variability to hand-size. That part worked. The robustness of the wire junction is somewhat dubious. That needs work. But overall, this is nice. I did note the little extra resistance from the brass.

This solution has two modes believe it or not. One is the 'peak charge' and the other is 'normal charge'. There really is a difference! Normal charge will work as any other well charged Glyph cell. Peak here is enough to really cook the first trench and to finish off that last harsh bit of vape just before all goes black.

It's comfortable to hold and shake and futz with the box and if needed, easy to detach.

MF... I hope someone there is watching this :suspicious: I don't want to have to make these :rant:

48996345703_ec2bab0423_z.jpg


And as analytical data goes... it turns out that a full trench can take as much as 2000mah of energy. That is 2 amps of power being consumed for 60 minutes. Or 20 amps of power for 6 minutes. These cells are rated for 4200mah but that is at a lower current. At our draw rate, you are lucky to get 2500mah out of these cells. I did ask for that data but the only thing they could tell me is that these cells are rated for a 30 amp draw continuously.

Still lovin' the LB! Got the VapCap for education purposes and it has its place even in my collection. But for shear volume, taste, control, and convenience... I find myself asking "...what happened?". Why is the LB a vape people love to hate? I still see the LB as having the densest screen of any of the offerings I've looked at. It is my sincere belief that this option can bring a lot of LB's from the closets. Anyone interested in giving it a try and take on manufacturing of something like this? eBay is still hot on the LB and MF in general. Happy to collaborate to a final design.
 

OF

Well-Known Member
New here, just seeing this. Absolute LB devotee. Will dig through the posts here for context but the idea is brilliant.

First of, welcome to the Forum. Great product, good people with lots of useful advice to share once you get 'grounded'.

By way of background the project started with the 'Launch Tube':
http://fuckcombustion.com/threads/magic-flight-launch-tube.581/

The humble box has had a few changes along the way. The light bulb (not really a LED) got added as a useful aid. Constantly improving battery technologies has provided several updates worth considering. Exotic woods were (and still are) offered as were stems in plastic (actually quite useful), glass and woods of various sorts. Guys have also adapted hoses and other accessories from other vapes. MF has offered a WT and a couple of Power Adapters (to eliminate batteries).

Treat it well and you'll get years of solid service, if not MF has Customer Support like you wouldn't believe. They want you to own, use and enjoy their product.

Lots to like, hard to pick a favorite. A very personal vape that stands the test of time.

Good spot to stumble into, I predict good times ahead.

OF
 

bassguy

New Member
Thank you very much for the warm welcome! I've actually been rocking the LB since 2011 or so, when my 8 year old Aroma Zap finally kicked it. Never used a Power Adapter for the LB, too expensive for my tastes and I don't like the idea of being tethered to a wall--negates the whole freedom of Magic Flight IMO. BUT I am keenly interested in these wizards making more powerful battery DIY doohickeys. Onwards!
 

OF

Well-Known Member
Thank you very much for the warm welcome!

Never used a Power Adapter for the LB, too expensive for my tastes and I don't like the idea of being tethered to a wall--negates the whole freedom of Magic Flight IMO.

You're welcome for the welcome.....somehow that doesn't sound right?

You might reconsider the PA, cost aside. The wall is not the only way to get 12 Volts DC from. I often enjoy mine in the garden with the larger version of this unit in my pocket (or on the table if I'm there):
https://www.amazon.com/dp/B01M7Z9Z1N/ref=twister_B00ME3ZIJY?_encoding=UTF8&psc=1

It has the capacity of a couple dozen freshly charged NiMH cells and doesn't 'taper off' over time making changing necessary. A whole pocket full (and then some) without having to mess with cases and such.

A key feature with the LB, lots of ways to enjoy it.

Regards to all. And sympathy to those who face work tomorrow.....I really recommend retirement, you should try it.

OF
 

TommyDee

Vaporitor
A M-F power adapter of any version is easy enough with a portable pack. A 3S 18650 pack is more than enough. I have a small IMR14500 3S pack that will drive the PA V1.0 for a trench. The PA's can deliver max power consistently. They draw right at 2 amps at full load.
 

OF

Well-Known Member
A M-F power adapter of any version is easy enough with a portable pack. A 3S 18650 pack is more than enough. I have a small IMR14500 3S pack that will drive the PA V1.0 for a trench. The PA's can deliver max power consistently. They draw right at 2 amps at full load.

Agreed, A modest pack can set you free. My first was home made, 3 18650s in series for 2500 mAh or so with the best cells at the time. Ugly, but effective, saw a lot of use. Started life as a power pack for my Purple Days. Also useful with a 12 Volt to 5 Volt buck converter to make a pack to recharge vapes that don't use the 12 V available. I had to recharge as individuals and had to be careful not to drain the pack too far down lest one cell drop to too low a charge (say 3 Volts or less).

This 5 Volt USB charge port is built into the unit I got from Amazon to replace my home made one. It has six (individually) protected 18650s in series/parallel for 6000 mAh. The packs are common gear with the guys that do LED lighting for shows and such. Very robust and compact. My current one (pun intended.....) will run a LB several hours, much longer than needed for sure. Given a fresh AA NiMH will give you sixty seconds (?) or so of serious power compared to two hundred or so minutes of unrestricted power, the pack becomes attractive over a shoe box full of AA cells to charge.......

Depends on your definition of portable, of course, but it's more convenient that an extension cord.

Useful tool for gardening......or just enjoying same.

Thanks for the post.

OF
 

TommyDee

Vaporitor
So it is time for another update. First of all, the LB duties are now shared with a VapCap '18M. Such nuances! Now I am understanding why VAS is hard to shake. And of course, why would you want to shake VAS. My VAS is only heightened by seeing my project box grow with parts. Got another IH in the mail for instance... Woodworking skills are getting honed... Lots happening but the wallet isn't shivering in fear any longer.

As to the LB and the Sub-C adapters; Setback! The fuse idea is a bust. The junction resistance is significant and the fuse gets quite toasty at the positive tip. I also think I am loosing a lot through the brass clip. I hadn't confirmed a resistance value but any lost energy from the available 1.25V is a loss of performance.

The good news is that the original prototype is still functioning like a champ. No heating issues and no unwanted wear. I went back to see what the braid was actually made of and it turns out to be tin plated copper, Alpha Wire #1230.

This latest version includes a means for charging in the MF charger. It's not pretty yet and I had a brain fart on the shape but it worked out. I'll have to get back to you on how well I like the added length.

As in the 1st proto, I trapped the braid around a 'bridge' were on the far end there is a 'knot' that won't go back through the internal slot. Something that can be backed out of if desired but will remain if not futzed with. I opted for 3x 22awg solid wire this time. I find that flexibility is not needed here. There will be a very definite 'set' in the way you end up using it. For best contact in my case, having the wire exit toward the rear of the box is advantageous. As I had commented before, I reversed the intended direction of the wire by design forcing again the 'crossing' of the leads. I made use of the tubular nature of the braid again but for a much shorter distance. I also went stupid with a lot of different pieces of shrink tubing making the most vulnerable connections triple insulated. There is a 'floating' lead-wire that you see making contact with the negative end of the charger. That wire is simply stuffed into the cavity where the braid is. Incidental contact along a good length. This needs some work, but it too works for now. At least i get my charging capabilities back without having to rely on the noisy Opus charger which is in isolation.
I made sure the contact would be momentary as per required. I wrapped the 3rd bare 22awg solid core wire 3 times around the middle of the other two leads (single wire w/ insulation pulled back in the middle) and spun the group into an "S" shape to make for a good solid chunk of copper contact. It pulled nearly snug with the button printed in the white bit. To finish it up, trim the braid such that when attached, it becomes the strain relief. That positive lead needs to remain flat at the cell and under no strain. Remember to solder the braid to the backside of the tab for cosmetic reasons. In this case, I put a 2-mil clear sleeve over the cell to maintain the negative lead-wire. The run between the cell and the wand is around 3" depending on what you need.

49045964233_e3a0fb9689_z.jpg


Order of assembly is to get the braid locked in place and the 3-22awg wire making a reliable contact. Add small heatshrink to the 3-wire bundle at least 3" along the protruded wire set. This is barrier #2 where the wire insulation is barrier #1. Over this put another piece for barrier #3. now use a pointy stick to make a tunnel about a 1/2"-3/4" long about a 1/2" outside the wand. You will be poking the shring-wrapped wire set through this 'sleeve' coming out the opposite side. It's a bit tricky but a calming draw or two will help here. This is merely meant to keep the bundle gathered. Just be sure it exits at least a 1/4" before the upturned positive tab. Now preload two more lengths of shrink tubing and push them all the way to the wand, through the braid. You don't want this shrinking as you are soldering. Next, lay out the positive cell tab and tin the tip of it. having things oriented properly, cut the wire set, trim to ~1/8" of copper exposure and solder the 3 leads to the tab on the 'inside' of the tab (top surface). Let cool and bring each of the two shrink tube pieces back. Properly joined, there are now 5 layers of insulation at the end of the wires; 2 layers of shrink tubing at the positive tab. No insulation is stressed on any edges. Now pull the braid tights. Size up the end of the braid to just overlap the the negative tab. If you pull the braid, the positive tab should see no tension from this action. If you get this after soldering the braid to the tab, you got it right. If however the positive tab lifts, redo the negative braid by shortening it slightly. Complete the process by adding 37mm minimum wide shrink tubing over the cell. If you want to pocket this unit, cover the positive end with a plastic protector before adding the cell wrap and use the MF cell cap. In this way, only the negative side of the cell is exposed anywhere.

Remember, no solder used anywhere except the cell which is well away from the box. I 3D printed this with PLA material. I will try this with ABS as well. All 3D printers have their own nuances. Of your print gets stuck or feels too loose, just scale it by some percentage.

I haven't touched a glyph cell or the PA V1.0 since I got the first prototype working. Also know that the braid is optional. I made this work with just 22awg solid wire as well. I'll see if I can link up this new model...
... and there it is https://drive.google.com/open?id=1sNDfL72AgVw10DPBlzKXbihlQdgs2QjR
 
Last edited:
TommyDee,

TommyDee

Vaporitor
It is high time for an update here. I've been sharing medicating duties between the VapCap and the LB. Last night I had to face a stark reality... VC's don't work well in very cold weather! ...Last night I had to face a pleasant reality... Launch Boxes don't really care how cold it is when vaping outside.

I also learned that if you use VC's with IH, you are a lot bulkier than a Launch Box user, even with my new cell mod. Speaking of which, the cell mods are still working perfectly. There is no need to go further. With 2 each 4200mah cells, you're set for the day. I recommend saving the peak charge for a fresh trench. Topping off the cell between draws does risk combustion similarly to the power adapter at higher settings. Portable, reliable, and some serious clouds. I still love my Launch Box :leaf:
 

vapirtoo

Well-Known Member
I dug out my old beta tubular power unit and vaped some most excellent strawberry short cake that was cured well. The buds fell apart into a light dust that suited the fine mesh of the LB. Great effect and taste.
Love this unit especially in harsh outdoor conditions. Oh yeah the P.A. was at its max setting.
 

scy123

Trusted Member Don't Worry
Hello, I see that their is interest in alternative ways to power the mflb. I do have commercial interest and have gotten approval for this post. I am actually just gauging interest to see if it's worthwhile to make and sell.

I made a vape mod adapter awhile ago for personal use. Was now thinking I can make one for a little extra money.

Here is the one I made for myself. https://i.imgur.com/icCIf39.jpg

The one I plan on making to sell would ideally be 3D printed out of aerospace grade ULTEM 9085 (body) and 316L surgical grade stainless steel (Connections). This will be an adapter that connects to vape mods people use for e-cigarettes, so you will be able to adjust it from 1 to whatever watts/volts and will be fully portable. I would be able to 3D print the whole thing around the connections, so it would be pretty much bullet proof.

I suspect the mflb would be able to do temp control since it has a stainless steel screen. Been playing with it and seems promising. Here is a video of it holding 380f or so. I have watts set to 25w max and it never reached 5w even so it is for sure temp limiting and not just holding 380f cause of watt limits.
https://i.imgur.com/cNx9dzG.mp4. I used a generic stainless steel tcr for this. If can get the tcr (Temperature Coefficient Of Resistance) of the mflb, I don't see why it can't hold temp within a few degrees. I could get this but requires resources.


Was thinking of making a few models if interest is high. It will of course have all safety features I can think of (fuse and permanent warning label is all it should need) For the adapter I was thinking around $50usd with same warranty the mflb had. If stop working you can get a new one and can refund for xx days. Open to price though.

If interested or not please let me know.


btw: have to admit I didn't really read most past post and skimmed a lot. Will be reading it later when I have time.
 
Last edited:
scy123,
  • Like
Reactions: muunch

TommyDee

Vaporitor
I was doing something in the gauging department as well. The needle barely glitched. Box mod solutions would be great but I don't have the experience with them. The one I have requires holding the fire button and it times out. Not helpful in the least. And you need 0.05 ohm capability.

The screens appear to have a very consistent resistance value. I ran the Muad Dib with the mod and the resistance value remained the same at elevated temps up to glowing.

Please answer a question...
Are there box mods that just push power without a fire button? Basically a hot wire that we can modulate as the original cell does?

My take on the modification was simplicity and I found it. Without the fuse, it is not a commercial application. And direct drive on this is working beautifully. But circuit impedance must be minimized in this application as every micro-volt counts for the LB when you only have limited voltage. I am now running 3X 22 AWG solid for 4" max and an equivalent of 15 awg braid of about a 5" effective length. No junctions except the LB-rails.

Because of that limited voltage, box mods will have a distinct advantage. The screen resistance should be of no concern. Just the "how do you manage this with the LB connection and firing the box mod" dance.

I also invited the good people at Magic-Flight to weigh in. We're gone round and round on cells. They are standing behind the current cell offering. And the power adapter is their brute force alternative. I'm not counting on them to step in at this point. And Muad Dib is well covered with Ni-MH cells and PA's.

Watch those lifetime warranties. Sure, beat the trend by offering a year or 2, but lifetime is a dangerous venture. Just my thoughts.

Anyway, now you see why I dropped the box mod alternative. You may need to provide a list of qualified mod boxes too. That should boost your collection :)
 
Last edited:

feralcomprehension

Qualified Observer
Hello, I see that their is interest in alternative ways to power the mflb.
<snip>

Here is the one I made for myself. https://i.imgur.com/icCIf39.jpg

<snip>


Was thinking of making a few models if interest is high. <snip>

If interested or not please let me know.

Potentially interested but your image doesn't work. What form does the connection between the mod and the LB take? Needs a cable, IMO; I'd like it if it was long enough to keep the mod in-pocket while the LB was in use.
 
feralcomprehension,

scy123

Trusted Member Don't Worry
Sorry, if stepping on toes. I actually did make this exact model 2 years ago and was planning on selling before seeing this post when I seen interest on reddit. Can check my post history I even posted how to make it.

A lot of "high feature mods" have adjustable timeout settings. Could actually program one to never time out. And the ohms at which the mflb is @ around .2ohm give or take is nothing for mods.

If the ohm's on the mflb don't change then no way of that video holding 380f. It regulated itself at 5w when I set 25w max.

I do plan on making multiple models.... made even make it modular.

Edit: also pics and video works I tested on my phone to see.
 

TommyDee

Vaporitor
No toes to step on so no worries.

Your video actually shows the Muad Dib modification. The LB resistance is right at 0.056 ohms. Yes, I got just over 0.2 ohms on the little trench screen. Again, original Ni-Cads work fine on these.

Nice to know on box mod options.

Last question, what makes the contact on the 'tip' if you don't push on it? Restrictive?

One word on 3D printing - if you get elevated junction temperatures you will get out-gassing. That is why I dumped the fuse. The LB draws about 15-16 amps when you add in the remaining rail losses. The air path is a little closer than I like for this issue.
 
Last edited:
TommyDee,
Top Bottom