Best Of Dynavap VapCap

Status
Not open for further replies.

Archaicrevival

Well-Known Member
I find the Vapcap to be one of my tastiest vapes! I never heat up past the click, so the first "cycle" is always dedicated flavor town for me! It tastes good the rest of the time too, but the start of it is always nice, it's not a 1-1 comparison but my logs give me an awesome flavor punch, but I'm not temp stepping (my log stem is cleared in a hit). It's definitely not as tasty as the Vapcaps first cycle!


I have tried to test temps of heat cycles with an ir thermometer, the cap clicks around 400°F, but the material inside seems to heat up in the following ways:

1st cycle around 325°F

2nd cycle around 360°F

3rd cycle around 380°F

4th cycle gets approximately 400-420°F(risking minor combustion and harsh taste)

Note: the temp drops rapidly however, after reaching these peaks. I wouldn't recommend touching the flame tip to the cap or going to heat cycle 4.

bofc.png
 

Copacetic

Somewhere North of The Wall
Please somebody on here please post the measurements of the bodies, stems, XLS, S, mps, hell if you got it measure the damn thing and post it. Maybe then I can wrap my head around what can be done with this little vape. I'll click like or give you ten "atta boys" if it helps.
Everytime I go to order something, I wind up ordering the wrong thing because I have called it the wrong name. I'm sure I wouldn't be the only one that prints it up and tapes it to the wall for future reference.
Folks I would do this myself, but I'm in the "IDKS Club" (I don't know shit). I learned a long time ago if you don't know what you are doing, leave it alone. So that's what I'm going to do with this subject.
Please clear up the confusion. Doc
Well, it isn't what you asked for, but it's what I've got!:
jlP1SCN.jpg


Please note that although I drew this, and have permission to post it here, the image belongs to George @VapCap

I realize there aren't any dimensions on the drawings, but at least you can see which stems and condensers go together.

If anyone spots any errors please alert me and anyone else who I may have misled!
bofc.png
 
Last edited by a moderator:

Squiby

Well-Known Member
Everytime I go to order something, I wind up ordering the wrong thing because I have called it the wrong name.

The Ti Vapcap 101

There are very few parts to a Ti Vapcap:

- The Bowl (refered to as a TIP). This holds your herb.

Here is a handful of love.
IMG_20160226_225756422_HDR_zpsophdqcgq.jpg


- The stainless steel CAP. This covers the tip and it is the area you heat with your lighter.

Here is the cap beside a Blackwood Ti Woody.
IMG_20151021_193754947_zpsasgntpub.jpg


- The CONDENSER. It connects into the tip, through the midsection of choice and through the mouthpiece, if there is one. The length of the condenser determines the overall length of the VAPCAP. It is what ties the Vapcap all together and provides a dedicated air stream for your vapour.

This is an exploded view of a Cocobolo Ti Woody. The condenser is on the bottom.
Hr9jdo9m.jpg


- The MIDSECTION. This is the part you hold onto. There are straight tube like ones and those that have a turned sculpted profile.

The straight midsection are offered in two different lengths. Their girth is 10mm.
- BODIES are the shortest midsection available, measuring up at 45mm.
- The longer midsections are called STEMS and are 62mm in length.

Below is a Ti Woody with a Burl STEM and mp, a Ti Woody S with a Blackwood BODY and an Omnivap. The Omni and Ti Woody S are the same length.
rdQ07Qk.jpg


The turned midsections are called VONGs. They have the added functionality of being able to connect with water devices.

The VonG BODIES are 45mm long just like the straight bodies. However, they fit into either a 14mm or 18mm female connector on your water pipe.

14mm and 18mm VonG BODIES.
IMG_20160519_213933702_zpsvfktqbz7.jpg


There are also VonG STEMS and they measure 62 mm, just like the straight stems. Their girth is 12mm at one end and 14mm at the other.

To VonG with a Blackwood STEM and Burl mp.
IMG_20160519_212604342_HDR_zpsbn86ur7n.jpg


- The Mouthpiece. These are tiny turned wood mouth pieces and come in a variety of wood species. They are 17mm long.

IMG_20160427_201330252_zpsihirfeco.jpg


the measurements of the bodies, stems, XLS, S, mps

A standard condenser fits a 62mm configuration;

- a body (45mm) and mp (17mm) configuration
or
- a stem (62mm)

If you add a mp (17mm) to a stem (62mm) you need the XL Condenser.

The assembled Ti Woody S is 3.5 inches long including the required mp. It has a short BODY

The assembled Ti Woody is 3.5 inches long. It has a STEM midsection.

The assembled Ti Woody with the XL Condenser and wood mp is 4.25 inches long.
bofc.png
 
Last edited by a moderator:

Copacetic

Somewhere North of The Wall
Hi all,

First post, but I've been reading a ton of info. on here. Just wanted to say thank you all so much. I found a lot of great information which has led me to this point.

So I'm pretty much decided on getting a Ti Woody S and a dynastash. Besides a torch lighter, is there anything you guys might recommend getting as part of a "starter kit"? Maybe some extra o-rings?

Also, I hate to ask, but if anyone has a dynastash handy, if you could please post the dimensions I would really appreciate it. I know the Woody S is about 3.5 inches in length, but I'd like to know the size of the dynastash before ordering.

Once again, thanks everyone!

Welcome to FC :cheers:
Getting a Vapcap is unarguably one of the best vape-purchase decisions a person can possibly make, so congratulations :party:

My Dynastash ER is 50mm wide, 107mm long, and 19mm thick.
It is a standard length Dynastash and will accept standard length VC's, but not XL's.
Mine is actually a very early production model and doesn't quite accommodate 14mm VONGS, but I believe that current Dynastashes do.
My Stash is ALMOST big enough to fit the girth of my 14mm Damascus body, so I think that current Stashes will also be 19mm thick, just drilled out with a fractionally larger hole.
Perhaps an owner of a recent example could confirm?
There is no Stash which currently accepts the 18mm VonG.

@VapCap, I wonder, are Stashes still available with both edges rounded off, or have you moved over entirely to one rounded edge/one 'squared off''?
I ask as I have become very fond of my Stash, and love habitually rolling it in my hand, almost like a bar of soap.

I hope to buy an XL dynastash for my Damascus soon (TOTALLY in love with this vape BTW, it's got to be the most beautiful object I've ever owned, and function is fantastic too), and am wondering if you are planning any burl-wood, or black & white ebony XL Stashes with both edges round?
bofc.png
 
Last edited by a moderator:

Squiby

Well-Known Member
So I am really liking the vapcap, but it is really bothering my chest though.

I have a very sensitive lungs (severe chronic lifelong asthmatic) and have found that mouth pulls and degummed hemp fiber filters create a very smooth, cool, non irritating vapour.

Take a few inches of degummed hemp fiber.
p7vVxSX.jpg


Moisten one end and wind it like you are preparing to thread a needle. Place it between your thumb and index finger and wind it round and round between your two fingers to create a flat round filter.
l70Hzpn.jpg


Stuff this into the bottom of your bowl. This filter will effectively remove any tiny particles that may otherwise get through your screen and into your lungs. It also keeps your condenser surprisingly clean and clear of debris.

The mouth pull technique provides a cooler fresher vapor inhale. Dial down to a tight air restriction and cover the carb for most of the toke. Pull the vapor into your mouth without inhaling, like you would when puffing on a cigarette or cigar. Near the end of the pull, open or feather the carb to bring the last of the vapor into your mouth along with that pulse of fresh carb air, then open your mouth, remove the Vapcap and inhale the vapour and fresh air into your lungs. Exhale. Repeat.

Use a filter. Take short mouth pulls versus long tokes and incorporate fresh air.

This technique, for me, gets me where I want to be with no lung irritation. It is the smoothest, coolest vapor I have ever experienced in a vape. Because of this and all the other inherent characteristics of this ingenious device, my VAS is now only focused on Dynavap parts and accessories.

I have zero desire to try out any other vape. The Vapcap checks all my boxes and then some.

If you experience lung irritation, try this technique.
bofc.png
 
Last edited by a moderator:

Squiby

Well-Known Member
what is the difference between the Ti Woody and Ti Woody S?

The Ti Woody and the Ti Woody S are the same length at 3.5 inches long. They both have a regular condenser.

The Ti Woody has 62mm STEM and NO mouthpiece. It looks like this:
Woody.
IMG_20151021_193754947_zpsasgntpub.jpg


The Ti Woody S has a 45mm short body plus a wood mp. It looks like this.
XM58poe.jpg


@cwheezy

Your question - does the DynastashXL fit the 14mm VonGs as well?

Yes. All Dynastash/ERs will accomodate a Vapcap with a maximum diameter of 14mm.

The XL Dynastash/ER will house a Vapcap up to 4.25 inches long:

- Ti VonG S - 3.5 inches long. Has a short body and mp.
- Ti VonG - 3.5 inches long. Has a long stem, NO mp.
- Ti VonG XLS - 4.25 inches long . Has a stem and mp.

The regular Dynastash/ER will only accommodate the 3.5 inch models:
- Ti VonG S - 3.5 inches long. Has a short body and mp.
- Ti VonG - 3.5 inches long. Has a long stem and NO mp.

NOTE: The 18mm VonGs do not fit into any current Dynastash.
bofc.png
 
Last edited by a moderator:

Squiby

Well-Known Member
perhaps someone would include an explanation of this [mouthpull technique] for us late arrivals?

I have consumed weed for over 40 years to one extent or another. Now, although I've always enjoyed the effects, it always came with a price; I just hated the inevitable coughing, sore throat and lung irritation.

Then I discovered vaping and although the vapor was less harsh, the unpleasant coughing and irritation remained, dampening the pleasure in getting stoned.

Three things changed all that; the device, my toking technique and filtration. Now, getting stone has no downside. No negative effects. Just pure smooth cool vapor.

First, I discovered the Vapcap. It magically delivers the smoothest vapor of any vaporizer I have tried. I LOVE THIS THING!

Second, I read about @natural farmer 's mouthpull technique. Once I tried it, I just couldn't believe that it took me so long to discover HOW to toke weed with no irritation!

So, this is it. Toking often is done by simultaneously drawing in vapor while inhaling it into your lungs. The classic joint toke.

Instead, try pulling the vapor into your mouth first, similar to puffing on a cigarette. Cover the carb of your Vapcap to restrict air flow, pull some vapor into your mouth but do not inhale, yet. Imagine that you are sucking up a thick milkshake through a straw. Once the vapor is in your mouth, near the end of the toke, uncover the carb momentarily, then open your mouth and inhale the cooled mouth vapor along with fresh air into your lungs. No need to hold in the vapor endlessly, it enters your system instantaneously, so you can exhale in a reasonably normal way.

This technique has been a total game changer for me and the pleasure of vaping weed is now JUST THAT; pure pleasure!

The third and final element has been filtration. Someone here on FC got me on to this. Sorry, I can't remember who. I found that by adding a tiny disk of degummed hemp fiber to the bottom of my bowl, effectively filters tiny particles that otherwise escape into the airflow. Again, this cuts down on potential irritation and keeps your Vapcap condenser surprisingly clean for an extended period of time.

I have a bowl several times throughout the day, every day and I clean my Vapcap maybe every three months or so and it doesn't even really need it. I mean it just doesn't get clogged up. The screen needs the most frequent cleaning but the filter keeps the condenser relatively clean and when you look through it you do not see any tiny particles stuck to the sides. Just a light layer of perfectly smooth reclaim. No particles in the condenser means no particles in your lungs either.

That's it. A simple technique that only adds to the blissful joy of using a Vapcap!

I hope you try this and that it heightens the experience for you as well.

Here is a link to making a degummed hemp fiber filter.

http://fuckcombustion.com/threads/dynavap-vapcap.18853/page-295#post-1034430

Enjoy!
bofc.png
 
Last edited by a moderator:

Squiby

Well-Known Member
Can you please tell me what is the difference between the Ti Woody S and the Ti Woody XLS? Thank you and apologies for my ignorance but the website is a little confusing.

There are three options for a Woody with a straight midsection (not talking about VonGs here).

- Ti Woody S
- Ti Woody
- Ti Woody XLS

The Ti Woody S is 3.5 inches long. It has a SHORT wood midsection called a BODY. Bodies are 45mm long. The S model has a regular condenser and a spinning 17mm long wood mouthpiece.

The Ti Woody is also 3.5 inches long. But it has a LONG wood midsection called a STEM. Stems are 62mm long. The Woody has a regular condenser as well and the stem covers the whole length of it. So, the Woody does NOT have a mouthpiece.

The Ti Woody XLS is 4.25 inches long. It has a LONG wood STEM midsection, just like the regular Woody. But, it has a longer XL condenser, so it accommodates a wood mouthpiece.

Forgive the poor pics. I'm having camera problems at the moment.

From left to right, we have the;

- Ti Woody S with Blackwood body and Cocobolo mp.
- Ti Woody with Black and White Ebony stem.
- Ti Woody XLS with Cocobolo stem and mp.
iyMbdon.jpg


Do not fret too much about which one you selected. They are all fantastic vaporizer. The system is modular, so you can always switch your Vapcap up with a different stem or body or condenser or mp. In fact, I'm betting you will. Vapcaps really are LEGO for stoners.

Enjoy!!!

Edit: you can convert your Ti Woody S to an XLS by switching your body for a stem and switching your regular condenser for the XL condenser.
bofc.png
 
Last edited by a moderator:

Squiby

Well-Known Member
this thread is 400 pages deep and I'm sure there are some great tips and tricks in here, but could someone provide me with the main ones?

Most or all of my observations have been mentioned here at one time or another or perhaps even many times.

Anyway, IMO here are 7 top tips for Vapcap success and a content and delightful life ...


Tip #1 - Respect the click.

BOTH WAYS. The cap really does know what it's doing. Sure, you can heat it past the click a second or so, but I have found that stopping at the click gets me three good hits per session with no worry over possible combustion. Leave that for later when you are more experienced.

The first cycle is a flavour hit and the next two are pure vapour. I am a microdoser and I only use a tiny amount of herb per bowl. I get three cycles per load and then bliss. Some may prefer to slightly overheat the first round for full vapour on hit one, but that will get you very dark ABV while I myself prefer more of a toast colour.

The cooling click is even more important because if you don't wait for it before reheating, you will combust. It's guaranteed, write it down, take it to the bank, count on it. It's easy to get lost; heat the cap, toke away, gaze with loving admiration at your Woody's yet undiscovered beauty and then, without thinking, you put the torch to it again. NO...STOP, don't do that. Wait for that cooling click. For me, this was the toughest part of the learning curve - learning to wait for the cooling click. Now, it's just habit. This alone should give you an indication of how incredibly easy it is to operate. I've never combusted, but I have come close a once or twice. Each time was without question, user malfunction.

When done correctly, the herb always comes out an even toasty brown. Perfection. Yes, you guessed it, it's true. The cap it IS magic.


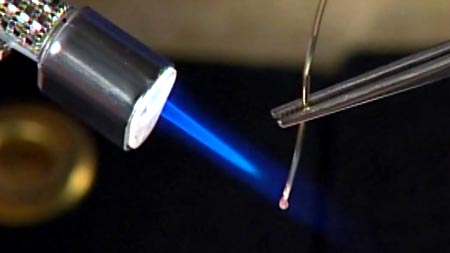
Tip #2 - Choose your fire.

The flame or heat source that you choose DOES effect your outcome. A four jet torch brings immediate, or in just a few seconds, perfect vaping temps. Dial down the fire and you add more seconds getting to the click. With a quad, triple or double jet, the time to temp is very short. A candle may take up to 20 seconds but it is heating that oven nice and slow. Easy does it..Yum...

A single flame with its pinpoint precision is more challenging to a new Vapcapper than multiple flames which cover a greater general area of the cap. A quad will quickly bring you to the click without overheating. Stick to multiple flames if you are a novice.


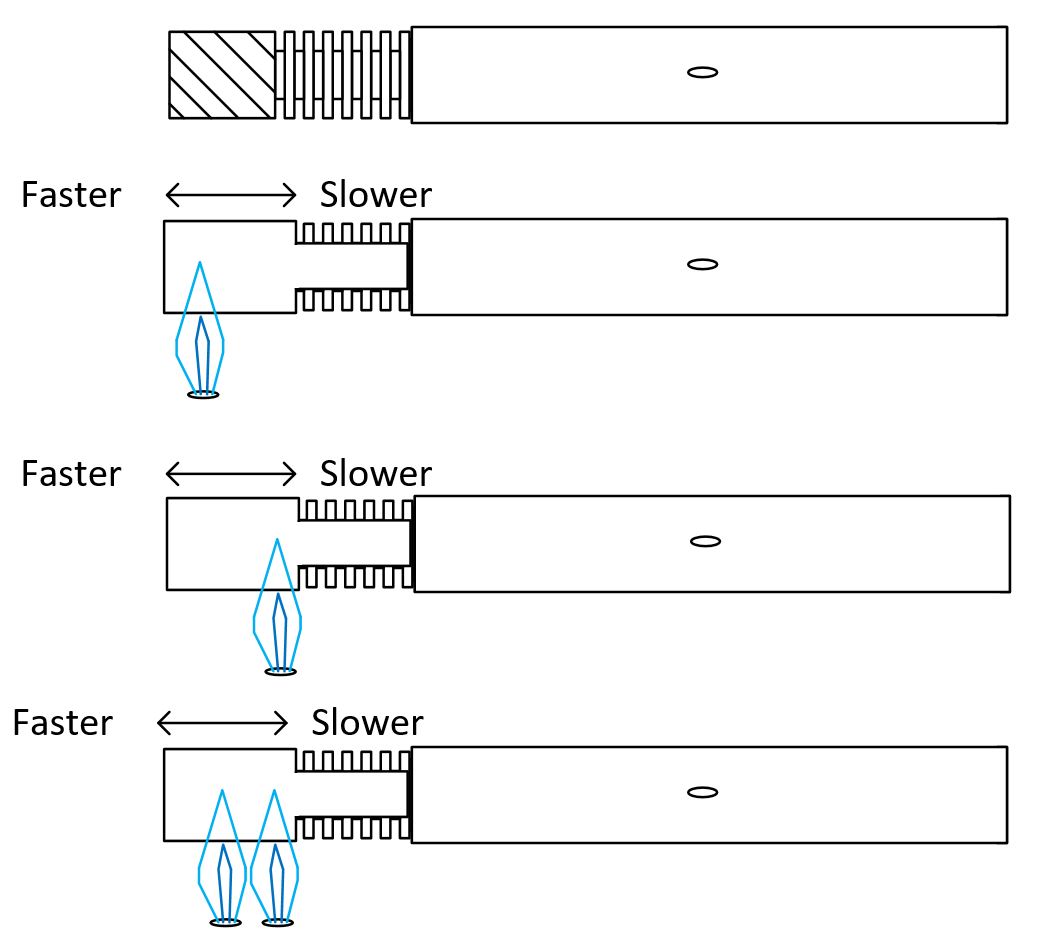
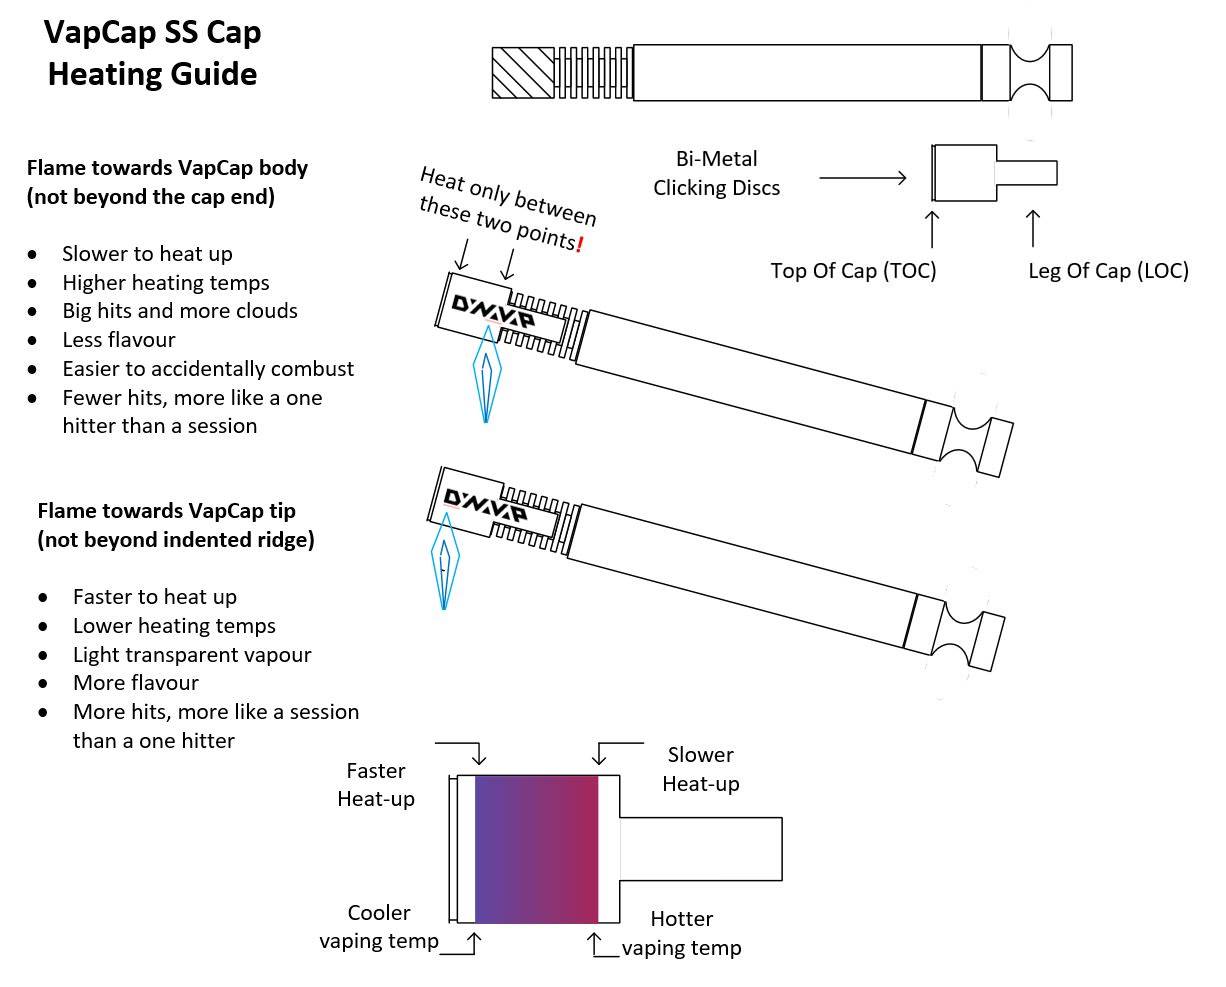
Tip #3 - Find your sweet spot.

Where you apply heat to your cap makes all the difference. Heat low on the cap and your bowl temps are higher than heating the tip of the cap. This adjustment fine tunes the temperature of your bowl and it contents. Infinite variability is possible through your heat source by how/where on the cap you apply it. Experiment to find your sweet spot.

I begin by heating the lower half of the cap, near the digger putter. This creates an initial burst of heat. The second cycle has the heat concentrated in the middle section of the cap and the final cycle is heated near the top. This gives me toasty coloured ABV every time.

Practice often to find your sweet spot.


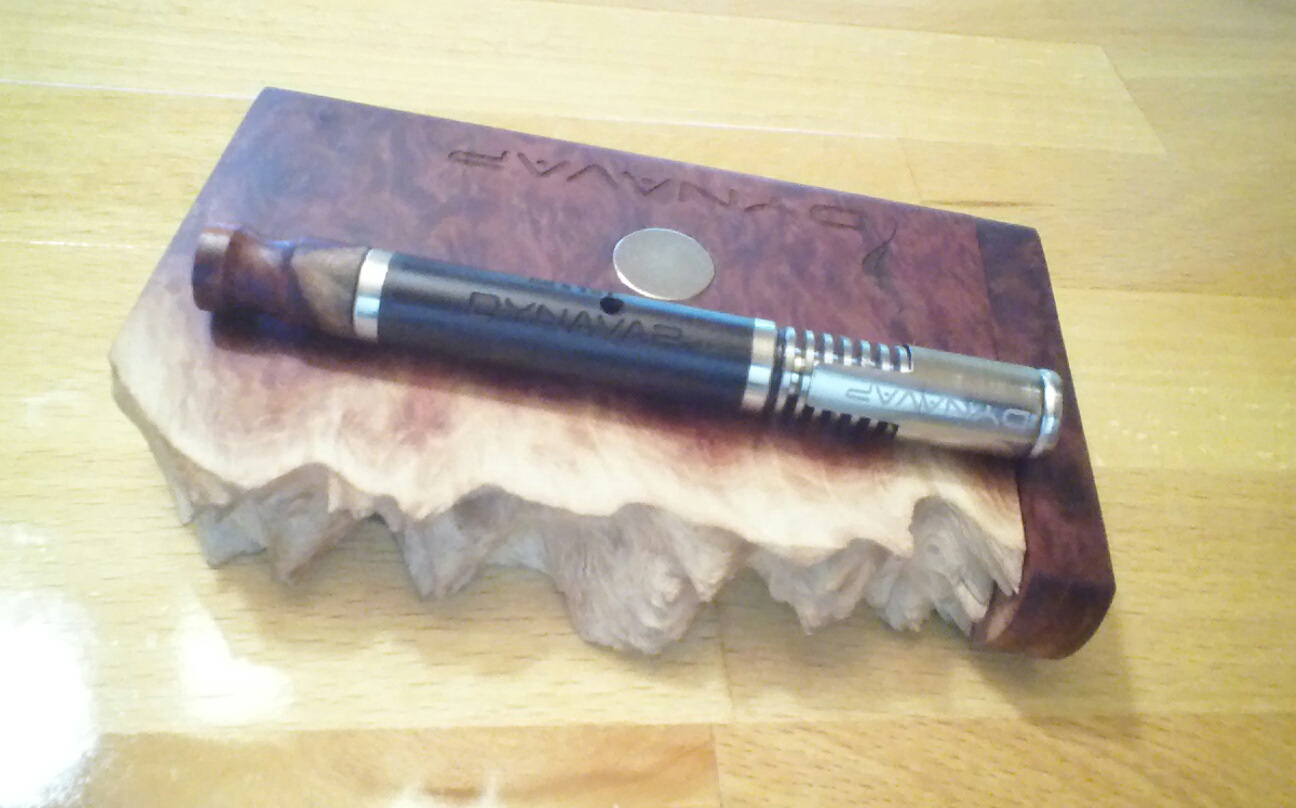
Tip #4 - Attract a magnet (or Dynastash/ER).

When I ordered my Dynastash and DynastashER, I really sort of expected them to be novelty items. Boy! Was I wrong. These tiny stashes are sooo cool and better yet, super convenient. They tuck away your vapcap and store your herb. They are small, dugout sized, fit easily in your palm and your pocket, are super attractive and just sooo handy. The ER has the added benefit of an extra silicone stash. It's meant for concentrate but I have been stuffing flower in it or you could use it for your ABV. Again, super handy. I haven't even mentioned the main attraction, the magnet. It keeps your cap stuck close by so it won't roll away. And it looks great doing it. It holds the cap for you when you're filling the bowl. Place your vapcap on it after a toke and it will cool the cap to the cooling click sooner. The Dynastash/ER just ties the room together so to speak and I don't feel like I have a bunch of random separate pieces cluttering the place up. Also, you can stash your stash by using the magnet to hold it to any ferris metal such as a table leg or your fridge. I hide a stash with its Vapcap on the back of a cast iron lantern that sits on my porch.


Tip #5 - Bigger is not better.

The bowl size is perfect; Small but not too small. Perfect and adjustable. I like to take a tiny nug and pop it in the bowl. No need to grind your herb or fiddle or fuss around when emptying the bowl.

The Vapcap taught me to microdose. You will save money on your herb. It will surprise you with its efficiency. Try gaping smaller and smaller amounts and you will find that less actually delivers the same effect.


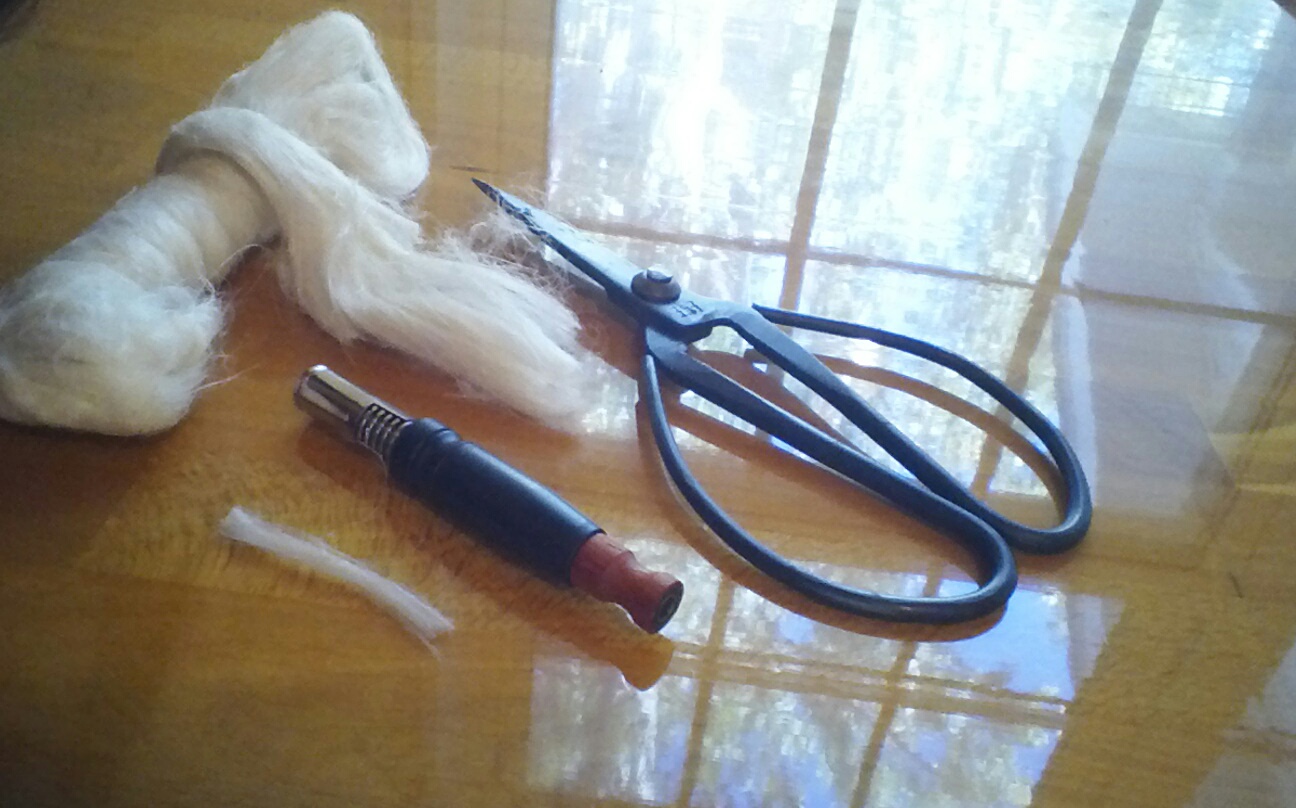
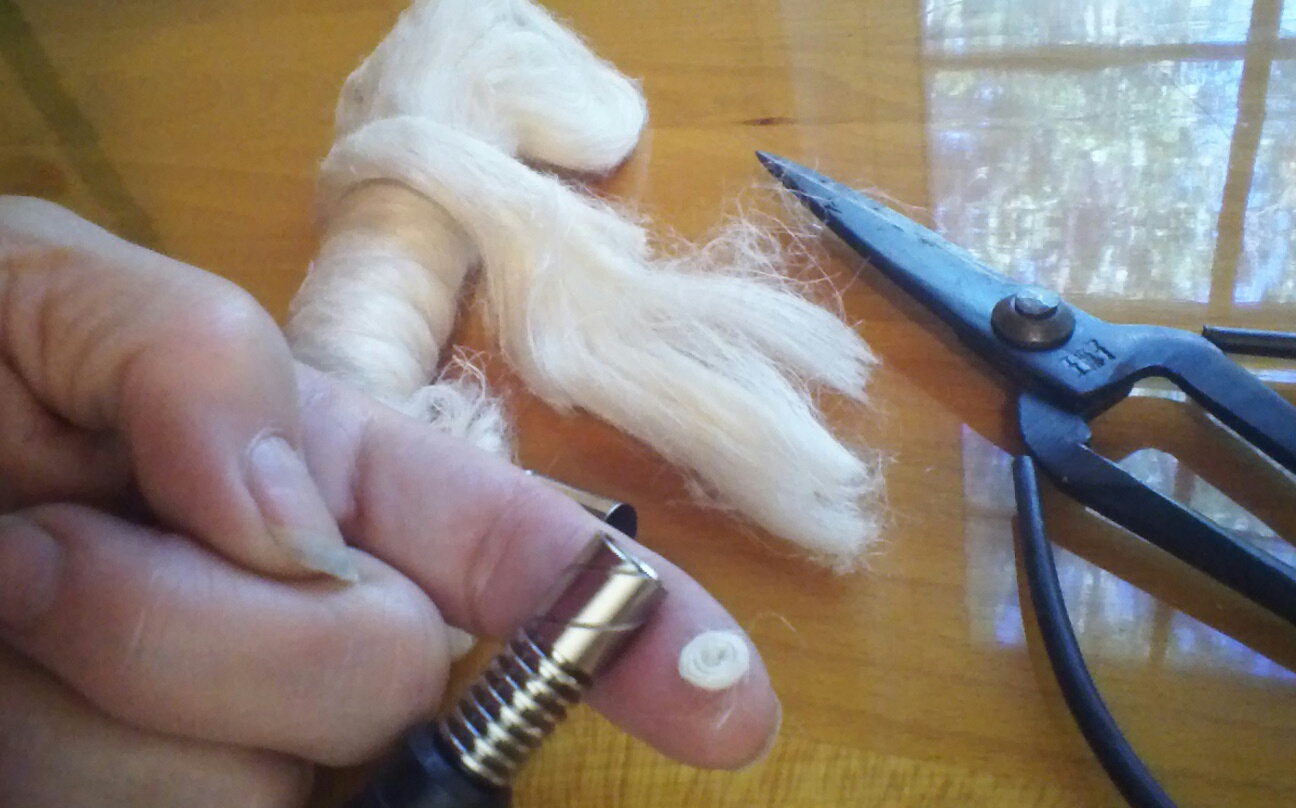
Tip #6 - Lose the Loose Particulates.

I was so thrilled when I found the Vapcap and the surprisingly smooth vapor It delivers. But, I still experienced lung irritation from the tiny bits of plant material that would get past the screen and into the condenser. Some would stick to the inside of the condenser but some would make it into my lungs. A short bit of degummed hemp fiber can be fashioned into a flat disk shaped filter and sandwiched between two screens. This stops all particulate bits from making its way to your lungs. It creates an even smoother pontificating vapor and as a special bonus, it keeps your condenser unbelievably clean for a very very long time.

Tip #7 - Read the Thread

If you are ever depressed or disappointed by some act from a fellow human being, read the Dynavap thread. Not only will you learn about the Vapcap and its rapid evolution from a tiny efficient vape to the stunningly beautiful and masterfully engineered device and collectors item it is today, but you will appreciate the good will that shines through in the stories told here. It's not just that Sativa that's uplifting, the Vapcap has a positive vibe all its own.
bofc.png
 
Last edited by a moderator:

GreenHopper

20 going on 60
Can someone re-post the "butane impurities chart" that was posted previously. I searched and cannot find. It was maybe 10 days ago so back about 150 pages ;)
And where can that go permanently, for easy to find viewing?

Resource created here:

The quality of the butane


The quality of the butane relates to how well filtered it is, the higher the quality the less contaminants are left to clog up the lighter jets during use.

Below is a table of the residual PPM contaminants in butane by brand, the lower the PPM the less contaminants there are to clog up your lighter.

Notice how much the PPM jumps when you get to 'Ronson', this is why it is best to avoid low quality fuel like 'Ronson'.

ZJuPF4q.jpg


The above table was captured from a Skunk Pharm Research article about BHO

*Mercaptans are odorants added to the butane to assist in its detection.

The correct technique for using the butane to refill a lighter


lighter_refill1.jpg


Step 1.
First locate the refill nozzle and flame adjustment screw (photo 1).

Step 2. Drain all existing fuel from the lighter using a pen, small screwdriver, or some other small pointed object by depressing the fuel refill nozzle (photo 2). I have found that turning the lighter right-side-up (with refill nozzle pointing toward the ground) helps get the last bit of air out.

Step 3. Turn the flame adjustment screw all the way clockwise to shut off all fuel flow (photo 3). You should see a plus (+) or minus (-) sign near the adjustment screw, which corresponds to open and shut, respectively.

Step 4. With the fuel refill nozzle on your lighter pointing up, press the can of fuel straight down into the nozzle. Be patient, a lighter does not become refilled in 2 seconds. Take your time. It will take 15-seconds or so to fill the lighter chamber. DO NOT pump the fuel can into the lighter. On some of the less expensive lighters, this could cause the tank to rupture.

Step 5. After refilling, let the lighter rest until it reaches room temperature. The fuel is cold when refilling and will expand as it reaches normal temperatures. You can also wrap your hand around the lighter to allow your hand temperature to warm the fuel.

Step 6. Turn the flame adjustment screw ½-turn counter clockwise(toward the + position) and try to light the lighter. Keep turning the screw open in small increments until the lighter lights and is at the desired flame height. Make minor adjustments as necessary.

How to Properly Fill a Lighter with Butane #Cigar101 - Famous Smoke Shop (YTube 3:03mins)
bofc.png
 

Squiby

Well-Known Member
What's the difference between 'xl' & 'xls' again? :freak:

XL = Extra Large. As in Omni XL

XLS = Extra Large/Spinning Mp. As in Ti Woody XLS

Both Vapcaps are the same length. The S has a spinning mp.

does the ti have some features that set the two apart except the fact that it the "m" cant change parts as easily?
i wanted to buy a vapcap and i dont know which to buy the "m" or ti woody, what are the differences, is there any difference in experience and features? and if so could anybody elaborately ?

The Ti Tip costs almost as much as an complete M Vapcap with a SS Tip.

The SS Tip on the M is an entry level device. The machining is kept to a minimum to keep the costs down while maintaining functionality. There are no bells and whistles on the M.

Here is an M next to a Ti Woody. This one has a Blackwood body and a spinning burl mp. The M has a stem integrating the mp into a one piece Stainless Steel design. They are both the same length. They both have the same temperature indicating cap.
NQFqX3j.jpg


But the tips are different...

The M has two air channels along the tip exterior. These channels bring air between the tip and the cap retaining before it is drawn through your bud.

The Ti Tip has 4 channels, twice that of the M.
The M has three orings to friction fit to the stem while the Ti Tip has four.

The M has five heat dispersion fins.
The Ti Tip has seven.

RZubanv.jpg


The Ti Tip has grooves that open up from the channels. The M tip has a flush end.

The Ti Tip has an upgraded, more open CCD screen that is crafted from titanium.
The M Tip has SS CCD screen with a tighter design.

The Ti Tip has an adjustable chamber with interior that allow you to set your screen depth and bowl size.
The M chamber is not adjustable.
9lLd5xd.jpg


These are all small differences that add up to a more refined titanium instrument and adds up to a higher convection experience with a greater air flow compared to the M.

Is the M a good vaporizer? Yes, it is. It's a fantastic vaporizer.

Is the M as good as the Ti Tipped vaporizers. No. Not quite. The Ti Tipped Vapcaps are premium vaporizers IMHO.

Are the Ti Woodies worth the extra cost? Yes, they are worth it. Plus they are fully modular so upgrading to other components, other models is fun and easy.

Which to get? Depends. The M offers an effective, durable, inexpensive introduction into the Dynavap line-up while the Ti Tipped Vapcaps offer a more finely milled instrument with full functionality and modularity.

Pick one. The one that appeals to you. Once you fall in love you can come back and get another. I think everyone should ultimately have one of each of the models; an M for out and about, a Ti Woody for the modularity and fun functional spinning mps and an Omni for an indestructible off grid, doomsday device that is the ultimate set it and forget it vaporizer that just loves water tools.
bofc.png
 
Last edited by a moderator:

Squiby

Well-Known Member
I've been enjoying concentrates with my Vapcap lately. My usual material had been flowers and hash. But after reading of @herbivore21 s love of concentrates and how convenient and efficient the Vapcap rose to the challenge, I dove right in.

I started with a S&B concentrate pad, a pair of flat nosed pliers, sharp side cutters and of course my beloved Omnivap.
SM9IoMV.jpg


I compressed the sides of the disk shaped pad until it became a cylinder shape with the diameter of the Omni herb chamber.
C0qLWKg.jpg


The cylinder ended up being about twice as long as the chamber is deep. So I cut it in half.
C2FyLh1.jpg


One pad is stuffed into the chamber and the other is put away for another day.
1RcYLBo.jpg


Top the pad with the concentrate of choice - here we have Girl Scout Cookie wax - and you have yourself set up in tokes for a good long while.

I find this super convenient. I'll take my Omni out while I work around outside. Every couple of hours I heat the Omni past the click for 2-3 seconds, take a nice full thick toke and carry on with hauling hay, weeding, planting, whatever. Yesterday I spent the day clearing tent caterpillars from the fruit trees and squishing them mercilessly on a rock. Yuck! I hate those bastards!

The concentrate lasts all day long. One toke at a time. An all day sucker. It's fantastic!
bofc.png
 

stardustsailor

Well-Known Member
Accessory Maker
For plenty of years I've been salvaging various parts
from various (old and/or broken ) electronic devices .
Apart from salvaging electronic parts like LEDs ,diodes ,transistors,MOSFETs and so on ,
many times I collect stainless steel parts ( especially from VCRs and printers ) as also rare earth magnets
(found inside CD /DVD/BR players /recorders ,sited near the laser diode ) ,sensors ,fans ,heat sinks and other cool stuff.
Anyway ,long story short :

Inside an inkjet printer I've found these stainless steel rods ,
actually being some sort axles of the printer's paper feeding system ) .
:bang:
I'm not quite sure ,though...
Maybe I've salvaged them from a CD player ...
:doh:
Can't really remember .
Anyway .


Then using a dremel and a fine cutting disc ,i've made a notch on one end .


With some pure organic cotton (vaping wick ) ...


I 've turned that printer axle into the finest cleaning tool for the VC !
With that I can push one cotton ball ( ISO dipped) through the condenser !


Or twist around the notch some cotton and clean the back end of the tip !


And those tiny rare earth magnets on the stand are very versatile !
When they do not pull a hot cap ,they keep the cleaning tool handy for use !


Cheers.

P.S.
I do not use the VC for vaping the reclaim -cotton balls.
Mainly I use the VC for herb.
I've found that the Arizer Air is a more appropriate tool
for vaping those reclaim-cotton balls(@ 205 -210 °C ) .
The latter are the best treatment for muscle pain relief after a hard day of work.
Also they serve fine as a very effective medicine against some types of insomnia .
bofc.png
 

GreenHopper

20 going on 60
Man, I would love something like this for my Vapcap. How long before they make an official one? ;)

Checkout this thread: 'VapCap Induction Heater for Desktop and in Car Use'

And this FAQ

Synopsis:

There are 3 models plus a custom option:
  • Skeletor - pre-built bare bones unit for you to install into whatever housing you like
  • Jar head - Home plugin unit, 12v
  • Portside - Home or portable unit, 3x 18650's
  • Custom - speak to @Pipes
I think he makes them in batches so you'll need to PM him for availability.
bofc.png
 

Squiby

Well-Known Member
Thinking about getting an omnivap XL TI. Is there much of a difference between the TI to the M?

Well, the Omni XL measuring in at 109mm is longer than the M at 92mm.

The M is the entry level, all stainless steel Vapcap. The Omni is the top of the line all titanium Vapcap.

People often suspect that performance must incrementally change from model to model. I don't think choosing one model over another is about performance so much. All Vapcaps are wonderful efficient vaporizers. I think it's more about budget, function and aesthetics. The basic M stainless steel tip and build vs the precision milled titanium tip, condenser and mouthpiece.

The M is the least expensive Vapcap at $50. It has a stainless steel construction, including the tip. It is a great vaporizer but is basic in its design and engineering compared to the titanium tipped series of Vapcaps. Although you can switch out the stainless steel stem for other stems or Body/mp combinations, it does not have full modularity. For example, the Omni condenser will not function properly with the M tip. The ss tip is not quite as nimble as the ti tip with fewer, more shallow air channels. It likely has a greater conduction ratio. The M is a fantastic economical adventure into the land of the Vapcaps. Everyone should have one. Take the M fishing...if you do drop it in the water, you will likely deeply mourn its loss BUT, it won't be the absolute end of the world.

The ti tipped series of Vapcaps offer full modularity. Buying one will take you on a deep dive into accessory bliss. LEGO for stoners. You don't have to buy all the models, but with parts you can have any one at any time. The titanium tip is more finely crafted and precision engineered than the stainless steel M tip. It has an more air channels and they are wider and deeper and has finely milled fins. There is an addition oring to create a tight fit onto the condenser and into the body or stem. I think that the 5th gen ti tips offer a higher convection ratio.

The full modularity of the ti tipped Vapcaps mean that you can switch up bodies and stems, straight or VonGs, mouthpieces and condensers. You can add an Omni condenser and achieve full dialled customized air flow.

The all titanium Omnivap is the top of the line. It is a beast. The build is very tight, beautifully engineered with incredibly tight tolerances and should be considered a work of art. The Omnivap is beautiful. The Omni condenser/mp is not only a precision milled component which offers a set it and forget it airflow, perfect for use with water pieces, but it's robust core offers additional strength to the overall device. You can run over your Omni with your car but I don't think the M may not fare so well.

Cautious folks should start with the M IMO. Those that have been hooked by the M or those that want to own finely crafted piece of indestructible precision workmanship might dive headlong into the Omni.
bofc.png
 

Squiby

Well-Known Member
Boy! I was away for a few days and came back to find that I had a lot of pages to read to catch up. Love this thread! Welcome to all the new Vapcappers. You have just ventured into the land of LEGO for stoners. Enjoy!

Could someone please help me out on what the difference is between a body and a stem? I know ones longer but is that it? I've been trying to find out by using their comparison chart and its all becoming clearer except that detail.
There is a 17mm difference in length between a body and a stem.

A body is 45mm long and uses a standard condenser which accomodates a 62 mm configuration; 45mm body + 17mm spinning mp = 62mm.

A stem is 62 mm long and can use either a standard condenser or an XL condenser. Using a standard condenser the stem will cover it's length without an added mp. Using an XL condenser, which accommodates a 79mm configuration of a 62 mm stem + a 17 mm spinning mp = 79mm.

Vapcaps that use a standard condenser will fit into a regular Dynastash/ER.

Vapcaps that use an XL condenser will fit into an XL Dynastash/ER.

Which length of Vapcap to choose? If you have large hands or are less nimble you might find the XL Vapcaps fit your hand better. If you are looking for stealth choose a regular length Vapcap. Vapcaps sporting the spinning mp can be easier to twirl. If you have a water tool with a short joint you might want a Vapcap without an added mp. Beyond these few elements, it is all personal preference and asthetic. Choose the one you like the looks of.


What do you all think about the size of the bowl in the titanium tip? Did you ever use a scale to check how much herb you can fit inside it?

Do you grind fine or coarse? Do you pack tightly or loose?

Is one bowl enough if you want to get somewhat blasted? Or do you have to reload? I'm just curious.

My tip can accommodate the following loads cured bud stored with a 62% rh bodeva pack. This is according to my scale so it could vary +- depending on other more accurate scales and the amount of moisture in your bud.

Screen in bottom groove - .07 grams

Screen in middle groove - .05 grams

Screen in top groove - .03 grams

These are the absolute max amounts that I can stuff into the chamber. In practice, I never fill the Vapcap to capacity. I like to pop an unground nug in there and let it float freely. My average load is .015 grams, just a tiny nug. I vape several times per day.

Obviously I microdose and absolutely love the effects! The highs are cleaner and far more enjoyable compared to a heavier dose. It took some effort to get down to lower doses, but if you load a tiny bit less each time, a tiny bit less, you may find that you get just as high but a cleaner high with far less weed.

The Vapcap is not only fantastic for microdoses and is astonishingly conservative with your weed.

Is the "m" convection or conduction? I currently run a davinci iq, awesome vape being conduction.

The Vapcap is a hybrid device. The oven is heated and air is drawn between the cap and the tips exterior channels and heated before passing through the bud. The M tip would likey have a slightly higher conduction ratio compered to a Ti tip IMO.
bofc.png
 

phattpiggie

Well-Known Member
Accessory Maker
@Squiby, trust you're well and caught up on this steamroller of a thread, just no stopping it, I don't even bother trying to keep up anymore. 17,472+ replies and 1,267,870+ views.

My M video,again, for anyone who likes visual stimuli. No doubts about performance.

M tip mod, I've also filed mine a bit, flows a bit better. Round needle file, an easy job.
73vks25.jpg

bofc.png
 

Pipes

Addicted DIY Enthusiast
Accessory Maker
Nice, very nice!!!

So I put together a video of how to remove and insert the height spacer.

@goodpunk6, I'm afraid your best option is to get a friend over with a big roach clip.... How do you live without tools? I'd die.

Careful not to drop the small pieces, if your like me that stuff disappears to an alternate dimension never to be seen again. :suspicious:
Sand the spacer down by 2 mils and re-insert. Test, oh and don't forget to be beside a strait wall. :p
bofc.png
 
Status
Not open for further replies.
Top Bottom