
This resource covers two aspects relating to the butane lighters.
The quality of the butane relates to how well filtered it is, the higher the quality the less contaminants are left to clog up the lighter jets during use.
Below is a table of the residual PPM contaminants in butane by brand, the lower the PPM the less contaminants there are to clog up your lighter.
Notice how much the PPM jumps when you get to 'Ronson', this is why it is best to avoid low quality fuel like 'Ronson'.
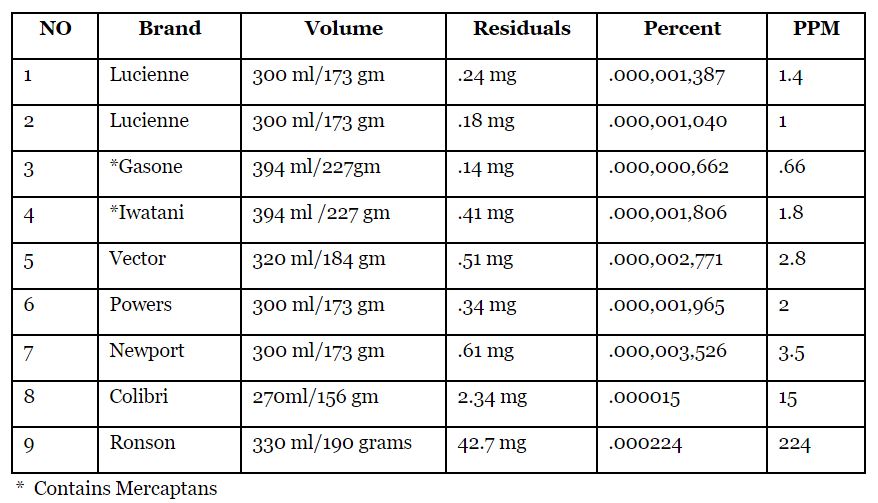
The above table was captured from a Skunk Pharm Research article about BHO
*Mercaptans are odorants added to the butane to assist in its detection.
The correct technique for using the butane to refill a lighter

Step 1. First locate the refill nozzle and flame adjustment screw (photo 1).
Step 2. Drain all existing fuel from the lighter using a pen, small screwdriver, or some other small pointed object by depressing the fuel refill nozzle (photo 2). I have found that turning the lighter right-side-up (with refill nozzle pointing toward the ground) helps get the last bit of air out. ENSURE YOU DO THIS OUTSIDE OR IN A WELL VENTILATED AREA and ensure the refill nozzle is directed away from your body or face.
Step 3. Turn the flame adjustment screw all the way clockwise to shut off all fuel flow (photo 3). You should see a plus (+) or minus (-) sign near the adjustment screw, which corresponds to open and shut, respectively.
Step 4. With the fuel refill nozzle on your lighter pointing up, press the can of fuel straight down into the nozzle. Be patient, a lighter does not become refilled in 2 seconds. Take your time. It will take 15-seconds or so to fill the lighter chamber. DO NOT pump the fuel can into the lighter. On some of the less expensive lighters, this could cause the tank to rupture.
Step 5. After refilling, let the lighter rest until it reaches room temperature. The fuel is cold when refilling and will expand as it reaches normal temperatures. You can also wrap your hand around the lighter to allow your hand temperature to warm the fuel.
Step 6. Turn the flame adjustment screw ½-turn counter clockwise(toward the + position) and try to light the lighter. Keep turning the screw open in small increments until the lighter lights and is at the desired flame height. Make minor adjustments as necessary.
How to Properly Fill a Lighter with Butane #Cigar101 - Famous Smoke Shop (YTube 3:03mins)
Troubleshooting Options(thanks to @flotntoke for these additional directions):
If you are having trouble with your lighter then there are a few further steps that can be taken.
Igniter Issues (There is fuel but no flame when the button is pressed):
Electric Igniters
To check for the igniter spark you should first empty the lighter (for safety). In a dark environment, activate the igniter by pushing down on the lighter button. Check to see if the igniter is producing a good spark. You should see a good blue spark with every click. If you don't it's probably time to replace the lighter - or the ignitor if you're up for that sort of thing.
Flynt Wheel Igniters
If your lighter uses a flint wheel but you are not seeing any sparks when rotating the wheel then check to see if there flint needs replacing. Each lighter will have a different mechanism for replacing the flint so check with the lighter manufacturer for the correct procedure.
Spluttering Flames
When refilling it is better to turn the flame all the way down for, then readjust back to where it works best for you before lighting.
Some lighters need more burping/purging than others - as in both different models and different lighters of the same model. Some lighters require a good purge of all air before every fill. If you perform a purge and are still having problems working the lighter allow it to settle from refill for about 5 mins, this can help work out issues. Just light repeatedly for a few seconds, get it going well for 4 or 5 lights in a row. Let it cool for 5 minutes and repeat. 3 or 4 of these short sessions can make a big change - especially if you were using low quality butane. This helps to clear out every bit of residue from whatever problems are in the tank and it burns off any light deposits on the jets.
If you are still experiencing issue you can try cleaning the jets. Use a small brass brush (like a toothbrush). It doesn't take much, but you want to concentrate on the ends of the jets themselves and try to stay away from the little ignitor. They usually won't hold up to much abuse so go easy and go dry. Work the brass brush back and forth in small movements towards each direction, then little circles around each jet, then in and out to try to have the bristles clean the little holes. Tamp on to a paper towel or something on a hard surface. Continue until you don't have any black bits (carbon) while tamping.
WARNING ON FREEZING THE LIGHTER
It is advised that you do NOT stick your torch in the freezer in order to get a little more butane into the tank. It is best to have 10-20% of air in the tank - whatever a fill from a good can of butane gives you after purging.
If you overfill with pressure beyond what the seals on the cheap lighters can hold, it can lead to all sorts of problems besides the simple ones like leaks and premature lighter death. If you're freezing to fit in more butane then letting the lighter sit at room temp or higher you're overfilling/over pressurizing the tank!
A leaky seal when lighting could lead to anything from an unexpected handful of flames to a full explosion. Unlikely, but why make things more dangerous and put more stress on your torch to top off with a bit more butane when you are going to be refilling soon anyway?
WARNING ON USING ALCOHOL WITH PLASTIC LIGHTERS
Be very careful when using alcohol to clean plastic torch lighters.
Alcohol may cause the plastic to decompose which can lead to dangerous leaks and explosions.
Further discussion is in this thread. http://fuckcombustion.com/threads/w...-lighter-to-use-with-the-vapcap.23318/page-14
- The quality of the butane
- The correct technique for using the butane to fill your lighter
The quality of the butane relates to how well filtered it is, the higher the quality the less contaminants are left to clog up the lighter jets during use.
Below is a table of the residual PPM contaminants in butane by brand, the lower the PPM the less contaminants there are to clog up your lighter.
Notice how much the PPM jumps when you get to 'Ronson', this is why it is best to avoid low quality fuel like 'Ronson'.
The above table was captured from a Skunk Pharm Research article about BHO
*Mercaptans are odorants added to the butane to assist in its detection.
The correct technique for using the butane to refill a lighter
Step 1. First locate the refill nozzle and flame adjustment screw (photo 1).
Step 2. Drain all existing fuel from the lighter using a pen, small screwdriver, or some other small pointed object by depressing the fuel refill nozzle (photo 2). I have found that turning the lighter right-side-up (with refill nozzle pointing toward the ground) helps get the last bit of air out. ENSURE YOU DO THIS OUTSIDE OR IN A WELL VENTILATED AREA and ensure the refill nozzle is directed away from your body or face.
Step 3. Turn the flame adjustment screw all the way clockwise to shut off all fuel flow (photo 3). You should see a plus (+) or minus (-) sign near the adjustment screw, which corresponds to open and shut, respectively.
Step 4. With the fuel refill nozzle on your lighter pointing up, press the can of fuel straight down into the nozzle. Be patient, a lighter does not become refilled in 2 seconds. Take your time. It will take 15-seconds or so to fill the lighter chamber. DO NOT pump the fuel can into the lighter. On some of the less expensive lighters, this could cause the tank to rupture.
Step 5. After refilling, let the lighter rest until it reaches room temperature. The fuel is cold when refilling and will expand as it reaches normal temperatures. You can also wrap your hand around the lighter to allow your hand temperature to warm the fuel.
Step 6. Turn the flame adjustment screw ½-turn counter clockwise(toward the + position) and try to light the lighter. Keep turning the screw open in small increments until the lighter lights and is at the desired flame height. Make minor adjustments as necessary.
How to Properly Fill a Lighter with Butane #Cigar101 - Famous Smoke Shop (YTube 3:03mins)
Troubleshooting Options(thanks to @flotntoke for these additional directions):
If you are having trouble with your lighter then there are a few further steps that can be taken.
Igniter Issues (There is fuel but no flame when the button is pressed):
Electric Igniters
To check for the igniter spark you should first empty the lighter (for safety). In a dark environment, activate the igniter by pushing down on the lighter button. Check to see if the igniter is producing a good spark. You should see a good blue spark with every click. If you don't it's probably time to replace the lighter - or the ignitor if you're up for that sort of thing.
Flynt Wheel Igniters
If your lighter uses a flint wheel but you are not seeing any sparks when rotating the wheel then check to see if there flint needs replacing. Each lighter will have a different mechanism for replacing the flint so check with the lighter manufacturer for the correct procedure.
Spluttering Flames
When refilling it is better to turn the flame all the way down for, then readjust back to where it works best for you before lighting.
Some lighters need more burping/purging than others - as in both different models and different lighters of the same model. Some lighters require a good purge of all air before every fill. If you perform a purge and are still having problems working the lighter allow it to settle from refill for about 5 mins, this can help work out issues. Just light repeatedly for a few seconds, get it going well for 4 or 5 lights in a row. Let it cool for 5 minutes and repeat. 3 or 4 of these short sessions can make a big change - especially if you were using low quality butane. This helps to clear out every bit of residue from whatever problems are in the tank and it burns off any light deposits on the jets.
If you are still experiencing issue you can try cleaning the jets. Use a small brass brush (like a toothbrush). It doesn't take much, but you want to concentrate on the ends of the jets themselves and try to stay away from the little ignitor. They usually won't hold up to much abuse so go easy and go dry. Work the brass brush back and forth in small movements towards each direction, then little circles around each jet, then in and out to try to have the bristles clean the little holes. Tamp on to a paper towel or something on a hard surface. Continue until you don't have any black bits (carbon) while tamping.
WARNING ON FREEZING THE LIGHTER
It is advised that you do NOT stick your torch in the freezer in order to get a little more butane into the tank. It is best to have 10-20% of air in the tank - whatever a fill from a good can of butane gives you after purging.
If you overfill with pressure beyond what the seals on the cheap lighters can hold, it can lead to all sorts of problems besides the simple ones like leaks and premature lighter death. If you're freezing to fit in more butane then letting the lighter sit at room temp or higher you're overfilling/over pressurizing the tank!
A leaky seal when lighting could lead to anything from an unexpected handful of flames to a full explosion. Unlikely, but why make things more dangerous and put more stress on your torch to top off with a bit more butane when you are going to be refilling soon anyway?
WARNING ON USING ALCOHOL WITH PLASTIC LIGHTERS
Be very careful when using alcohol to clean plastic torch lighters.
Alcohol may cause the plastic to decompose which can lead to dangerous leaks and explosions.
Further discussion is in this thread. http://fuckcombustion.com/threads/w...-lighter-to-use-with-the-vapcap.23318/page-14
