DIY Bulli Vaporizer

Pipes

Addicted DIY Enthusiast
Accessory Maker
I would also like to say thank you for posting your journey through this.

so these airstones are kinda like what's used in the vapor genie and the healthstone? (or maybe that's an assumption because I don't know how they react to flame...did you try torching these airstones?)

Your very welcome. All fun for me.
I'm not sure if the formulation is identical or not but seems to have many similarities. I picked up from Pet's Mart for like $4.

P1050215_zpsb5e4c7da.jpg


This is the video which got me turned onto it.


Oh I torch it alright. Got it as hot as I could with my propane torch. The ecig guys use for wicking ejuice in Genesis style atomizers. Apparently the blue colour stone is a no no. Stick with the grey stone colour. I played with some white colour stuff which seemed good for some possible uses.

Best technology is when people think there is no technology at all.;)


Ain't it the truth....
 

vape4health

Well-Known Member
I read the thread lastnight but was a bit foggy. Something I keep thinking about, when used as a ecig the hot wire taste is amazingly disgusting, I'm talking about a dry hit or hot top wire for genny/RBA/DDA. You don't get any funny taste from the red wire? Maybe the taste I assumed was coming from the wire was actually just the ejuice burning off. I dry burn my atties and the smell continues for as many cycles as I have done so far.
 

Pipes

Addicted DIY Enthusiast
Accessory Maker
I read the thread lastnight but was a bit foggy. Something I keep thinking about, when used as a ecig the hot wire taste is amazingly disgusting, I'm talking about a dry hit or hot top wire for genny/RBA/DDA. You don't get any funny taste from the red wire? Maybe the taste I assumed was coming from the wire was actually just the ejuice burning off. I dry burn my atties and the smell continues for as many cycles as I have done so far.

I think I know the taste you refer too. Dry burning the silica wick to clean off the ejuice? Not in the cards for this application. I think you are correct in that its the juice smell while in "open air" burning mode. Once the top is put back and ejuice added the taste is correct, no?
Nevertheless, I have never had any bad taste in the herbal modes of set up.
As for the taste in concentrate mode, I can not really tell as the taste is just potent and hot with the stuff I use. A bad taste could hide in there pretty easy.?

Reading the whole thread would make me a bit foggy as well. :D
 

Olympus Mons

Probation Officer
Nothing like that first vape in a nicely primed and fresh unit for the first time -- I hear Madonna singing Like a Virgin. Every hit after that is downhill and tastes like my Uncle Eddie's cigar ashtrays. Lol, not really that bad, I just hate cleaning them like everybody. I find I gotta strike a balance between how much I load and how often I clean, to get the tastiest hits, and that depends on how much I use (lots) I guess.

Though here we fight a never-ending battle for Truth, Justice, and the Evaporative Way. Glad I'm not the only one who gets a little foggy.

Yeah, bad taste is really like kryptonite to my buzz and e-cig enjoyment. My eVod vapes good but a dry hit, if I forget to fill it, tastes worse than dry hits off my cheaper carts. Just not meant to run dry, but then which of us is?
 
I've just received this little guy:
Pheonix%20A-7%20mini.jpg

Phoenix A-7 Mini for $20. Measures just under 2 inches tall.

Been using it with the pre-built coil (3 included) for a day and a half now. Functionally it works similar to the Dabbler/Skillet type atomizers - the coil is exposed to dab directly onto. Pulse the heat at 3 volts just to met the concentrates directly onto the coil. The airway is wide open so I never experience the 'pop' in suction that I do with so many other concentrate pens. Running it at 3/3.1 volts produces the tastiest vapor, still with bigger clouds than I can generally handle.

Trying to source some ceramic bits to build the coils around.

I wasn't really planning on sinking too much time into this, but after getting the results I did... I can see this becoming my new daily driver oil cart.

edit: Hot damn. Remove the drip tip, and this thing fits perfectly snug into my Pinnacle WT 14mm joint. Fits so well that one-handed operation is easy and my preferred method.

Oh yeah, and vapor is instant or at most within 3 seconds.
 

Olympus Mons

Probation Officer
.... Trying to source some ceramic bits to build the coils around.


Cool, I got a so-called Phoenix clone that doesn't look much like that at all but works good enough, and I wanna play around with ceramics too. Please keep me updated.

Curious: How close is the coil assembly to the bottom of the well, and ya know how deep the well is? Mine is a little high off the base and the well is nothing much to speak off, totally meant for dripping.

I rebuilt the coil with less wick, but doubled the wick-thickness and coiled that - a monkey Mickey Mouse job and Pipes would shoot me but it works okay - holds a dab of oil better than out-of-the-box - and I first prime a new wick with a dab or two and give a couple clicks to melt it in. Then another dab for the hit, and I try not to burn it dry. Get one or two huge hits off a dab. I use small pulls with my mouth and inhale every 3 or 4 and keep the batts burning for 8 or 10 seconds or until they begin to flash Don't Tread On Me. Also try to keep the pen horizontal and turn it a little while power-on. Sometimes the rush is even a little much for a bald old hat like me.

Tons of vape, but I only use small amounts at a time. Not too convenient for portability because of reloading often, but that doesn't bother me. So far I'm liking the hits off mine and it's easy to clean and get reclaim with alcohol, even with darker cheaper oils.

I still just want Pipes to come over some day and leave his personal rigs behind. That would pretty much solve all my problems.
 
There's maybe 1/4 inch between the coil and the bottom. Too much imo, but it seems okay if I keep the cart upside down from time to time. I have to stick it in my bong/bubbler downstem from time to time - it's a real chore </sarcasm>.

My method is the same as yours. Dab on the coil, let it melt in a bit. Add more as needed. Never let the coil dry out.

It's very conservative, because as you said you can only load a small amount at a time. Still, the amount I'm adding to the coil for each dose (I don't know the exact weight - about the same as the TV Revolution DART - .01-.02 perhaps?) gives me about 5-7 hits before I start to taste the need to reapply concentrates. The downside is that it's not great for a long day out and about. Short little trips or to extend your level of medication, sure. At home all day vaping is definitely this atomizer's strength, at least as I have it configured. Maybe once I figure out the bottom wicking, but I really like the idea of this as my dabbing atty. Especially once I figure out the ceramic. Perhaps Pipes has some ideas.

edit: btw I find it runs best on my L-Rider Robust VV tube. dail the voltage down to about 3.0/3.1 for the tastiest hits. I find the flavour lasts quite a bit longer at this level also.
 

Olympus Mons

Probation Officer
.... Perhaps Pipes has some ideas....

I am holding my breath .... no, literally, I'm holding in a vape .... wooosh .... Ah, there we go.

Now, when Pipes runs out of ideas, Vaporization will enter the Dark Ages, Man will go back to vaporizing off of Franklin Stoves and branding irons, and the "Edison Cigar" will be a thing of myth and legend.
 
Olympus Mons,
  • Like
Reactions: Pipes
I am holding my breath .... no, literally, I'm holding in a vape .... wooosh .... Ah, there we go.

Now, when Pipes runs out of ideas, Vaporization will enter the Dark Ages, Man will go back to vaporizing off of Franklin Stoves and branding irons, and the "Edison Cigar" will be a thing of myth and legend.


I suppose in a pinch a ceramic soldering iron/core would work?
 

Olympus Mons

Probation Officer
That is a brilliant and cheap idea! Off and on yesterday I was thinking of stuff I already had that I could use, I have an old mercham (spelling?) pipe my wife got me from Turkey. It already has a slight crack in it and is only for show (packed away in a box), so maybe I'll try busting that up some day - it is really beautiful though. I have an old soldiering core though! I'm gonna go dig it out and play around, let me know how it goes with yours. Great idea! If I can find that pipe I will post a picture of it.
 
I was also thinking of using stainless steel mesh as the core, it would probably also do a decent job wicking concentrate.

It seems some e-cig attys also use porous ceramic wicks... Shouldnt be too hard to adapt one of those either.
CW18-2T.jpg

http://www.tankecigs.com/FC-2000-Porous-Ceramic-Wicks-p/cw18.htm

http://tasteyourjuice.com/wordpress/2013/02/11/a-night-with-the-fc2000-ceramic-wick/

There's also this ceramic fiber wick:
IMG_0021-500x500.JPG

http://sngvapor.com/RBA/XC116.

Which I assume is similar to Nextel?

edit: apparently you can torch this wick clean!
 

Pipes

Addicted DIY Enthusiast
Accessory Maker
Hey guys, great stuff happening here. Glad you guys have taken the plunge in the DIY direction. Kind of cool ain't it. Getting to know your devices with the stock wicks is a good start and give an idea of what the concentrate of choice does inside the unit.
Getting the coil as close as possible to the bottom will allow you to add some more. This is where I just wrapped more wick around and under to keep the element from shorting and provide some reservoir for the concentrate.

As for ceramic sources, they are found in many applications from ceramic washers to rods. Trying to just buy a couple inches is not economically feasible. I have found is insulated tweaking tools, insulating ceramic washers, fish filter cylinders, rod which the impeller is mounted in fish pumps, and the fish bubble stone for the ceramic sponge.
The impeller rod is one idea I had but never had to try but think is would be fine. While at PetsMart picking up the bubble stone (same stuff as the FC2000 ecig wick) look around the same rack for this kind of stuff. I just searched for the Fluval brand stuff but most of those type of pumps contain the same type rod. And most supply separately.:)

I have some of that silica braided rope and really don't find it that useful. I'd rather use 2mm twisted silica. Notice in the picture the ends have been taped off? Thats because the stuff unravels very easy. Kind of a pita but likely good some types of rebuildables.

My last comment for you guys at this point is finding some way of getting an upper shelf of porous ceramic to help guide the airflow somewhat and assist in loading and a staging reservoir. That bubble stone is not hard to work with at all. I used a hacksaw for the wafer type cuts. Dulls the blade quick so need a couple blades on hand. Also as in the video posted earlier a dremel tool works great. I did not have a diamond tip but found the tip for plastic worked better than the one for metal. You go through them quickly though. Once you have what looks like a round wafer of sorts, it's time to drill hole which is very easy, just start with a very small hole and make to your desired size little at a time. Now you can just use a file or even coarse sandpaper to fine tune to fit in you device. Can basically just sit on top of the coils or mounting screws. It needs to sit above the air intake hole(s) to help the airflow move from the intake and up the center.
This will likely get tricky with the A7 as there is no mid section so maybe the disk can be made with stand-offs? Or stays with the lid when removed? Going to be fun to see what you guys come up with.
Keep up the great work. I can make some :popcorn:.
 
Pipes, I still dont really understand the need for the porous ceramic disc, other than for loading more oil. I don't seem to have any issues with the vapor direction, nor do I find concentrates coming up from the mouthpiece.... Sorry I'm so dense on this...

Also, not sure if you noticed, but that wick isn't silica - it's ceramic.
 

Pipes

Addicted DIY Enthusiast
Accessory Maker
That's the great thing with DIY. No rules, what works, works. No need to apologise at all, this is new territory for us here and the work is part theory, part logic and much luck. Learning curve is never ending.

Not 100% if I follow on the wick thing. The 2 pictures are silica braided rope and the other of the FC-2000 porous wick. no? I have had the FC2000 wicks and can confirm it looks and responds the same as bubble stone. In fact would not be surprised if that is indeed what it is made from.

Let the fun continue. :clap:

http://www.omega.com/pptst/XC_XC4_SLEEVING.html
http://sngvapor.com/RBA/XC116.
The braid is made of ceramic fibers. It's stable up to 1200-1500 degrees. It can be torched clean. It supposedly unravels less after torching.

On another, related topic: Pipes, did you ever try to make SS mesh wicks?
 

Pipes

Addicted DIY Enthusiast
Accessory Maker
http://www.omega.com/pptst/XC_XC4_SLEEVING.html
http://sngvapor.com/RBA/XC116.
The braid is made of ceramic fibers. It's stable up to 1200-1500 degrees. It can be torched clean. It supposedly unravels less after torching.

On another, related topic: Pipes, did you ever try to make SS mesh wicks?

Got it, the stuff I got from ebay looks identical. Going to have to give the ceramic a try as I use high wattage in my AGA-T2 and wicking is always a problem.
Have used the ss wicking for the AGA but again the wicking can't keep up. Even did a "U" ss wick which almost did the trick. Anyways, getting a little off topic. Like the idea of ceramic braid been able to torch clean. :clap:
 

Olympus Mons

Probation Officer
That wick looks excellent you guys. I don't want to mess around with a torch so I like the fact it is pre-treated to burn off most of the crap, just a short dry burn prep I think they say, very cool. Great find. Bookmark.

Will be trying the Fishstone Bubble Pipe method soon, sounds great, if I can shape it ... the sparks in that video are making me pussy out.

A little off topic? Uh, what was that again? (Edit: Hey Tweek, throw more smoke bombs.)
 

upsetter21

Active Member
Wassup? Back in after a very short lived intro... glad to see this thread is still alive because there is still much to be experimented with.

I'm an e-cig junky and consider smoking stuff to be a way of life and a part of my culture. Of course combustion has become obsolete. As a vaper, I have been seeking a convergence between my Nicotine replacement and my MJ Meds. Rebuildables IMO are THE WAY. Just like everything nowadays, we must fight the disposable pattern. Nothing on the Darts and Evo's out there tho - I may have never made it here if it wasn't for them. It's just that I don't like depending on TV when coils burn out.

I also just obtained the XC-116 for use as a wick for e-cigs. For my e-cig application (Golden Greek Odysseus Clone: The Terminator w/ a Polish Kayfun Conversion - best RBA I've used) it has been my favorite wick to date for an RBA.

I believe the XC-116 is essentially the same as "Nextel" but for some reason XC-116 can't be exported and so I hear the Nextel is a substitute internationally. It is a ceramic fiber, not described as "silica". My understanding is the intended purpose is to shield wires and lines from heat. It is chemically treated, so if you buy it raw it needs torching. Some e-cig vendors kiln it b4 sale. I use Map gas torch and heat it under my stove hood w/fan sucking as some fumes are produced. It glows white hot, yet cools amazingly fast. When handling it, taping the ends is helpful to prevent frays - once your coil's built clipping it with wire cutters is more effective than scissors.

I have not tried vaping any MJ Meds with this material, and frankly I'm not seeing much potential. It has amazing heat resistance, and killer wicking attributes, but I believe there is just too much surface area contained in those braids. Based on my flimsy experiments it seems the more crannies, the more gunk. I'm leaning much more towards the ceramic screw driver element, and will be obtaining one soon. Thus far I've used oxidized stainless mesh and bubble stones, and in each case there is a lot of build-up that eventually mucks the coil or clogs up air passage.

I think the Pheonix clones are great for playing, since they are very simple to set up and there is a lot of room to play in. However, as I mentioned the last time I poked my head in, I'm seeing the most potential for this "Terminator Dripping Atty". Although I'm afraid the availability is dwindling since they may have been discontinued - but as the remaining stock clears I've seen some rock-bottom prices. The advantage they offer is the inclusion of a ceramic cup. I see other benefits as well, but much will be too hard to describe with words, and I'll have to return with some photo material.

I have two of these atties to play with, and have been brain storming quite a bit on converting these to med MJ. I've had one fairly successful run thru with amber oil, but it was a very crude setup just to check viability, and it proved viable. Amazing how much you can learn from one rough run. My latest idea might be capable of two modes: solid/leaf & oil/wax (by either removing or adding a ceramic disk). I need to order a ceramic screw driver tho for the heating element. Once I get rolling I'll come back here and post my findings.

The e-cig scene was stealing my attention (and money) from these matters in a big way, but I think I've horded enough, and am loosing interest in those forums... so it's time to hang out here more.
 

TrueNorthStar

Well-Known Member
WOW How did I miss this thread!!! Just finished reading all 7 pages! Great work being done here!

I have also been using my e-cig experiences for the greater good :)

Although, after reading through this thread, it sounds like I went off the deep end :p I seem to like the 0.2-0.4 ohm range with 22 ga kanthal in my RDA's. I actually started a thread about it in the concentrates forum. Its nice knowing there are like minded tinkerers out there :)

One day a while back, I was at a local vape shop/bar and there were a few guys there, doing what I can only describe as "vape drag racing". Armed with RDA's (Re-buildable Dripping Atomizer) with custom wound coils on their Mechanical Mods. As they sat there, they would see who could generate the biggest cloud of vapor.

I sat there in amazement at the amount of vapor they were producing, it was on par with my Halloween fog machine !!! lmao. Anyhow, I hit them up about their equipment and theories on coil builds, proper batteries air hole sizing and more!!! man it was a lot to take in lol. The whole time I'm talking to these guys, I'm trying to figure out how well these things would work for oil.

My attempt to document the sum of my findings are in the thread I created in the concentrates section HERE

Please take a look and see if there is any info you find useful :)

Now I love the work you are doing with the ceramics!!! Made my whole effen day!!

The compound you use, would it be easy to use in a metal mold? Like line the chamber of my geny and make a negative impression of it? Just the idea of being able to create different chamber volumes or airflow paths by filling the voids :)

One thing, I've tried that I love, that hasn't been discussed in this thread yet.

Stainless Steel cable wick!!!

The RDA racers I mentioned earlier put me on to it. I had explained to them that I didn't like the idea of a RDA as my main means of vaping e-liquid (they reload their coils for every hit lmao! ). One of them had a Genesis on them with the ss cable wick, he explained how it was the closest thing he had found to using an RDA and I will have to agree with him :p

When the SS Cable gets warm/hot, it draws oil up like a straw! On one of my extreme atomizers (~0.15ohm) I use a short piece of 1/8" 7x7 316ss cable (oxidized same as mesh) then wrapped with 1.25 wrap of oxidized ss 500 mesh. When the oil level gets close to depletion, a 4mm buffer dry zone forms around the base of the atomizer right where the cable wick comes in contact with it.

Due to the mass of the ss cable, it makes a great thermal ballast as well.

Thanks again for all of the info!!
 

upsetter21

Active Member
Here's my latest work... a Terminator Dripping Atty. Joined AWG30 Nickle wire to AWG32 Kanthal using a capacitive wire welder. Wrapped a small 1.8Ohm coil. Threaded the coil into the hollow section of XC-116 ceramic braided wick. Wrapped #400 Oxidized Stainless Steel Mesh over the XC-116. Assembled the coil/wick low in the ceramic. Can put large balls of wax in this and blow yer head off! Cheers.


Uploaded with ImageShack.us
 

2clicker

Observer
so whats best? SS or ceramic wick? i would love to find a wick that wont burn when some yocal doesnt know what he is doin and nails the button a few seconds before ripping it. will SS accomplish that?
 
2clicker,
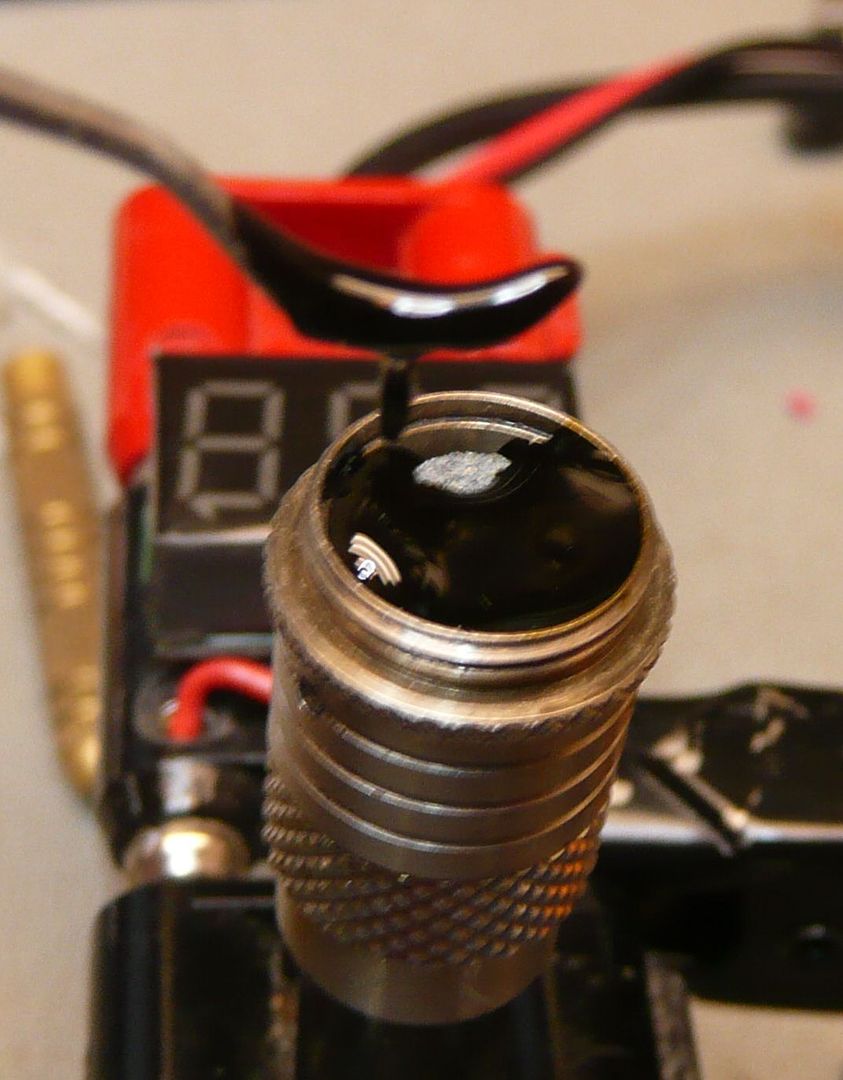
I know I was going to move on from using the Bull for concentrate, but took a step back and simplified things a bit.

Got away from a reservoir made from ceramic and layed two 2 ohm, 32 AWG (1 ohm end result) heating elements along the bottom on both sides of the mounting screws.
Making it a dual core unit. Used the hard ceramic for center of coils. The reservoir this time is simple silica wick pulled between the screws and wrapped around the underside of elements. The remaining length is wrapped around the outside while screwing mid section on.

Design5b_zps443120f4.jpg

Design5c_zps1504eb6f.jpg

Design5d_zpsfb2200ae.jpg


Note: Straitened and evened out the coil before finial assembly.
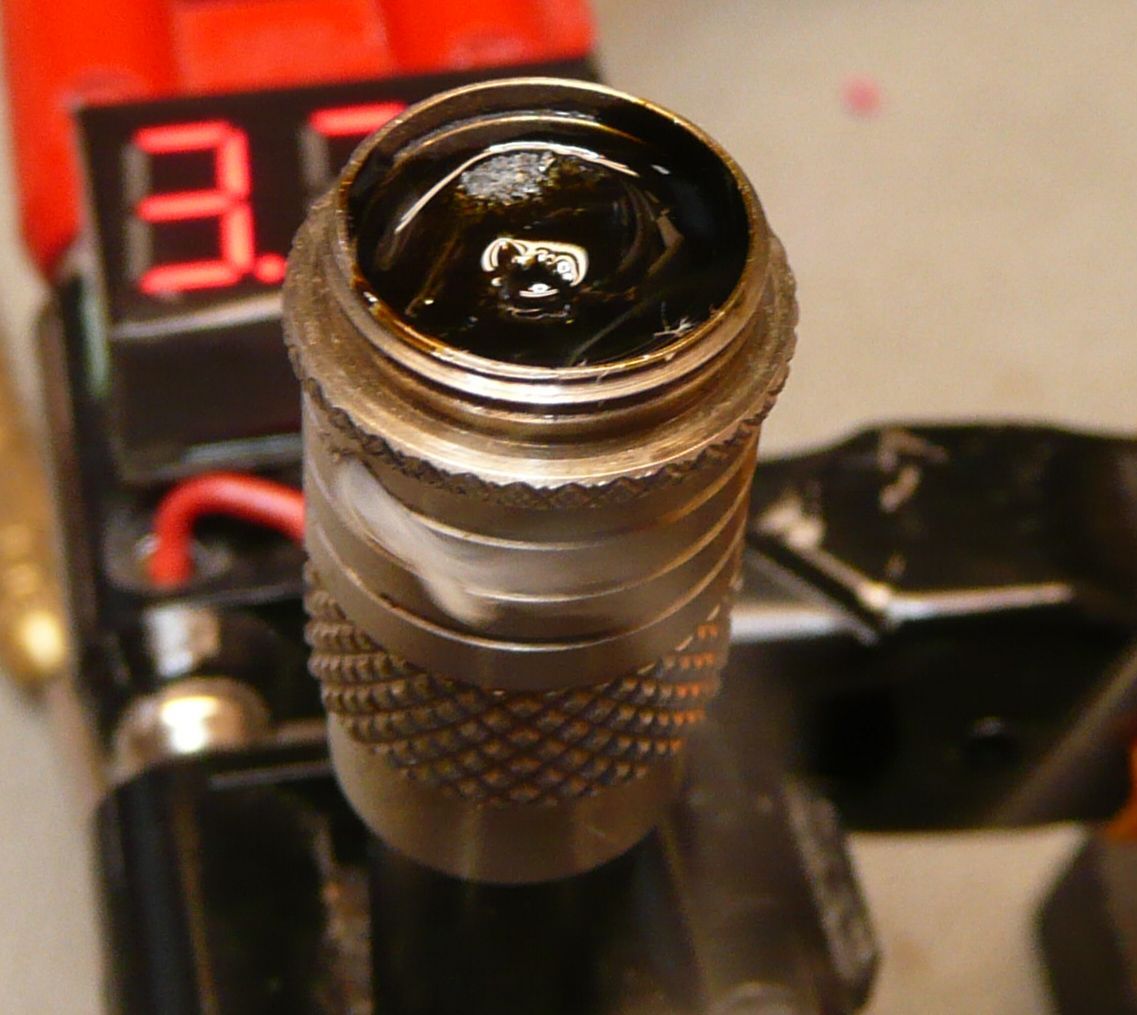
I still made a ceramic top disk with a hole in it which more or less rests on top of the screws and against elements. This is curved from the fish bubble stone. Fits under the inner lip of mid section.

Design5a_zpsb93eacca.jpg

Design5e_zpse1bf38c4.jpg

Design5f_zpseff06189.jpg


From here the fun began. Have to admit that I cheated a little in that I primed it somewhat before I put the ceramic in place and screwed the mid section on. I screwed this on as tight as possible and wrapped the remaining silica wick around the insides while screwing. I do not think it can be unscrewed once used as it will be mucked up too much inside.

Design5g_zpsdf19b335.jpg

Design5h_zps8af4ddd3.jpg

Design5i_zpse780b071.jpg


Pulsed it on til vape started and cycled a few times til it melted into the ceramic. Put it on my modded Bolt and wow.

Design5_zpsf7f33846.jpg


It hits with no restriction and sipping is just awesome. Way bigger clouds then I can handle. Been testing on and off for a week. Top er up way before it goes dry and it has not leaked one little bit. I was expecting it to but nope. The mid section I used has two holes in it. One it the off the shelf holes which was put in from manufacturer and the other is lower and was added by myself. Have been trying to determine which position is best for leaking but neither hole have leaked. Also, the mess has not even gone up past the ceramic meaning the top part has remained clean. The space at the top of ceramic and lip of mid section make for topping up easy as pie. I use a flat ss dental tool and it scraps clean across the opening. So far it has gone through roughly 3 grams and still going strong. Very promising for sure.

Happy modding....
Pipes
... that was me clapping awesome work
 
abstract XstracT,
  • Like
Reactions: Pipes
Top Bottom