'The Misty Log' - DIY wooden Log Vaporizer

Duck

Active Member
Sehr schön! Wirklich!
Da meine Medizin nun endlich bewilligt wurde, hoffe ich auch wieder mehr machen zu können.

Und pass am leben zufinden...

Da ist sinnvolle Bastel-Arbeit glaube ich genau das richtige..

Modnote translation:

Very nice! For real!
Now that my medicine has finally been approved, I hope to be able to do more again.
And find life alive ...
There is sensible handicraft work, I think just the right thing ..
 
Last edited by a moderator:

Lina María

New Member
Hello people! I hope you are well!
how long should I leave the cartridge resistance on for that soldering iron taste to be removed. I did some tests and the herb vaporizes well but I don't like that taste. I use a 24v-30w cartridge resistor and use it at 12v. Thanks in advance for your answers. Blessings.
 

blokenoname

DIY Log Dabbler 😁🪵💪💨💨💨
Great Idea from @Alan for better heat distribution and shielding the bulb's glare in the halo core units :clap:

Finally assembled a halogen light bulb based HI. @blokenoname and I had talked about it quite a while ago. A 10 watt halogen bulb and ceramic base are housed within a 7/16" ss heater cover. Found that a single screen was letting too much light out of the end, so I punched a 5/16" diameter disc from ss foil to form a deflector. The ss foil disc is held in place with an 8mm basket screen that fits inside of the 10mm basket screen in the heater cover. Only a ring/halo of light now escapes the end of the heater cover. This means that only a ring/halo of hot air escapes the end of the heater cover too. The roast is so even that there is no need to stir.

As my Walnut Halo Misty has the smaller 9mm heater port here, I used a 5mm diameter ss foil disk, instead of an 5/16" one.


Last edited:

Cheebsy

Microbe minion
Firstly, thanks for this thread, you all inspired me to have a go!

So I came across the bud eater posts and realised I had some old EQ parts I could use to have a play with. Using the shopping list @blokenoname posted also on page 30 for the halo core misty I collected together the parts I didn't have already.

I've had some success, and some failures, but mostly loads of fun.

The ceramic sockets linked to I'm unsure that they are still the heat safe (Teflon insulated?) ones so id like to check that I have the right ones. Chatter in this thread indicated that the safe ones usually have blue and brown wires, the ones I got had black and white wires. You guys talked about a flame test which I tried but I'm not sure how to evaluate the result lol. Using a cigarette lighter (not a jet flame) the insulation does not catch fire, it does char badly and turns brittle and sharp though within a few seconds. I've gone through a couple of the bulb holders, on one occasion I had a sharp piece of the heater cover cause a short, the other time was also a short, but it seemed to happen inside the holder itself when I moved the unit when it was hot.

I found these on Amazon https://www.amazon.co.uk/BlueXP-Holder-Ceramic-Connector-Halogen/dp/B07D3NVHDF they have Teflon in the description so I'm thinking these might be worth a try if the other ones are dodgy.

Thanks in advance
 

blokenoname

DIY Log Dabbler 😁🪵💪💨💨💨
The ceramic sockets linked to I'm unsure that they are still the heat safe (Teflon insulated?) ones so id like to check that I have the right ones. Chatter in this thread indicated that the safe ones usually have blue and brown wires, the ones I got had black and white wires. You guys talked about a flame test which I tried but I'm not sure how to evaluate the result lol. Using a cigarette lighter (not a jet flame) the insulation does not catch fire, it does char badly and turns brittle and sharp though within a few seconds. I've gone through a couple of the bulb holders, on one occasion I had a sharp piece of the heater cover cause a short, the other time was also a short, but it seemed to happen inside the holder itself when I moved the unit when it was hot.

Welcome to the thread :)

Nope! The colouring of the insulation itself is no indicator at all, for what type of insulation is used! That the 'good ones' in this case were blue and brown and the 'bad ones' black and white is purely incidental. Next time, they may be red and blue ;)
Also, most of this stuff comes from China and so the main theme when buying from Amazon, Ebay and the like is confusion, as most of these Chinese sellers do either not know or do not care, what exactly they are offering there, when it comes to the tech specs and so quality differs widely. Make sure, it says 'Teflon' or PTFE in the description at least, but always make a burn test yourself. Generally speaking, there are two kinds of insulation used:
Low temp insulation (probably low grade silicone) for G4 sockets intended for use with LEDs, which don't emit much heat at all.
And high temp insulation for use of G4 sockets intended for halogen bulbs.

German VDE norm for high temp insulation demands ETFE or similar. In short: 'Teflon' is just the brand name for PTFE, when it was discovered and there are a couple of PTFE derivates, like FEP, FPA and ETFE, which are nowadays commonly used for high temp insulation in electronics and also in part fall under the 'Teflon' brand name, like 'Teflon FEP' for instance. These derivates all have in common, that they are easier to process than actual PTFE in manufacturing and have better mechanical properties (PTFE is brittle as hell). On the other hand, they all have a slightly lower temp resistance than PTFE itself. Melting point around 250-270°C compared to the 320°C of PTFE. Working temp range is up to 204°C for ETFE and FEP, or 180°C with a safety margin, which should be all fine for our purposes, as we are miles away from these temps, where the wiring in the base cavity of the Log is concerned.
Both materials should not differ much from PTFE, when doing the burn test, in that they'll blacken and decompose eventually under a hot flame (your usual flame is about 1.300°C and PTFE melts at ~320°C already), but there should be no or very little flames visible. In short: no combustion!

Here's how that looks like. Soft flame or jet flame shouldn't matter much. Hottest (blue) part of the flame should be around 1.300°C for both. Take care, not to inhale the gasses from the burned Teflon! They're highly toxic at those high temps!


Safest way is simply to invest maybe a few quid more and buy from a renown tech and components outlet instead. There you can be reasonable sure, that you actually get, what it says on the tin :)
Look for the VDE seal.

https://sinolec.co.uk/en/low-voltag...s/1211347-g4-ceramic-ceramic-lamp-holder.html

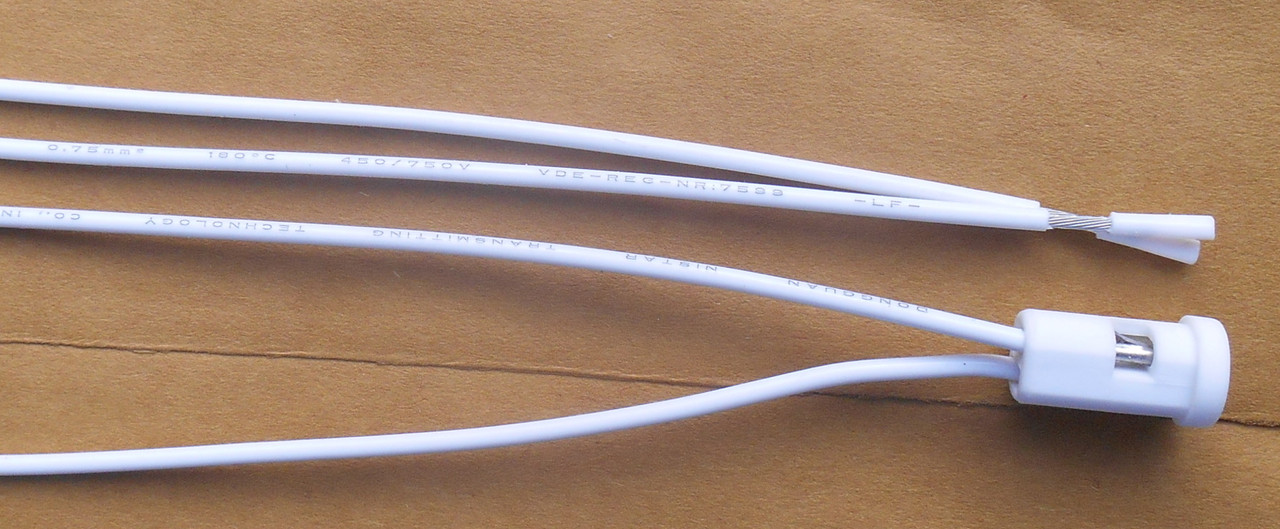
@brainiac got himself a batch and took a pic of the wiring. The VDE Reg Nr. is: 7599, which I looked up and that is indeed registered for Teflon-FEP high temp wiring, up to T 180°C. Click to enhance!
Teflon-wire.jpg


As for the short outs... well, shit just happens ;) Fought with a halo unit only yesterday here. One evening it would light up fine and work the whole night w/o issues; the next day it would remain dark and cold, after I plugged it in :(
Quick shake or a tap with my finger against the side of the body would remedy that, but only temporary.
Reseated the bulb, checked all the wiring and soldering points: all fine! Finally exchanged the bulb... but no cigar.
Took it apart again... and finally one of the wires slipped out of the ceramic housing of the socket, after a very slight pull. Contact inside the socket itself was broken!

Exchanged the socket and put it together again, set it to its usual 10.5V/8w... and was rewarded with the 'burning times' instead :rofl:
Jeez... must have combusted three or four times in a row. Whole flat stank, like back in the good old days of me long past youth :p

When I still combusted at a mere 9.5V... I finally sighed and took the little bugger apart again. Genius here had managed to accidentally push the bulb about 5mm further up into the heater cover, when reassembling the unit last, so that it was much too close to the load :bang:

ETA: Got my initial batch of sockets from the seller 'Blue XP' via Amazon too and they turned out ok (the one you see in the vid is from that batch). But note, what I said before re varying quality. This holds true, even with the same seller! One batch might be ok and the very next you order, turns out a turd :(
So better go with Sinolec or something similar.
 
Last edited:

brainiac

log wrangler
Chatter in this thread indicated that the safe ones usually have blue and brown wires,

Yeah, that was me I'm afraid. And it ain't necessarily so. As Bloke says batches can vary even from the same seller. I bought a batch of the BlueXP ones you linked to and was not entirely convinced that the wire coating is teflon. So I messaged the seller and he/she absolutely assured me that they were. I still wasn't convinced and bought the Sinolec ones in Bloke's post. These are the components that I'll be using in future halogen units. Not quite as cheap - I bought two and it worked out to £1.22p each and two quid on the postage. So in terms of overall log-building costs not a significant additional expense in return for the peace of mind.

My Rustic ash halo has an intermittent short, or more probably a poor contact. A tap on the side is usually enough to get it going but I'll have to strip it down and resolder it one of these days. I find that the bulb contacts seem reluctant to take a good solder. Is this just me? Anyway, less of a problem if one uses a bulb holder.

Best of luck with the build :tup: and keep us informed on your progress.
 

Cheebsy

Microbe minion
Wow @blokenoname that is one hell of a reply. Thank you very much.

I wasn't confident about posting here, there is a lot of overwhelming talent so the welcome means a lot.

I have had some experience of unscrupulous Chinese suppliers and tested the wires as soon as they arrived, no combustion, so I figured I was safe. After my issues I tested again and started second guessing my evaluation. I'll test again with a jet flame and compare it to your incredibly helpful video. In fact I just did it... The wire itself certainly doesn't catch fire but the fumes look like they do while the flame is there.

I think I'll get a few of the sinolec on order, they may be twice the price but are still very cheap as you rightly point out @brainiac

Also, thanks for your anecdotes about troubleshooting shorts or bad connections. I quite enjoy the whole tinkering aspect so that's all good. I'll keep playing and post back later. :tup:
 

TommyDee

Vaporitor
Yeah, that was me I'm afraid. And it ain't necessarily so. As Bloke says batches can vary even from the same seller. I bought a batch of the BlueXP ones you linked to and was not entirely convinced that the wire coating is teflon. So I messaged the seller and he/she absolutely assured me that they were. I still wasn't convinced and bought the Sinolec ones in Bloke's post. These are the components that I'll be using in future halogen units. Not quite as cheap - I bought two and it worked out to £1.22p each and two quid on the postage. So in terms of overall log-building costs not a significant additional expense in return for the peace of mind.

My Rustic ash halo has an intermittent short, or more probably a poor contact. A tap on the side is usually enough to get it going but I'll have to strip it down and resolder it one of these days. I find that the bulb contacts seem reluctant to take a good solder. Is this just me? Anyway, less of a problem if one uses a bulb holder.

Best of luck with the build :tup: and keep us informed on your progress.

The legs of the bulb are not the right material to readily take on solder. Recommendations would include getting access to a small spot welder. Have a look at 'supercaps' for spot welding solution on cell-tabs. Maybe that could be adapted to tossing the sockets all together.
 

blokenoname

DIY Log Dabbler 😁🪵💪💨💨💨
Last edited:

blokenoname

DIY Log Dabbler 😁🪵💪💨💨💨
.
Two small updates:

a) While the all natural ciggie holders from the first set I linked to are simply perfect for making stems/roasting tubes, the white, patterned ones from the second link are utterly crap :(
Apart from the fact, that the pattern is printed or simply painted on and then varnished over, they're simply too slim and also made from a very soft wood. The countersink is thin as an egg shell in most and will crack immediately, when you try to insert a tip.
So best go with the all natural set from the first link and avoid the patterned ones from the second!:nod:


b) Bulbs are fragile!

While a well built resistor- or cartridge heater Log unit, will simply shrug off the occasional drop from the table top and continue working... the halo core units don't take it so well in some cases!
While the halo unit might well be still working after a drop, strange things might happen with the bulb and heat output then occasionally. For instance, your halo unit might shine much brighter all of a sudden at the accustomed voltage level and when you check your vvps, you might then notice, that the 10w bulb is now putting out 12v, 13v or even 15w and more... until it makes 'poof' and finally dies :p

What happened there, is that the filament within the bulb got misaligned by the drop (windings touching itself) and is now running amok with the current, before it'll finally burn out.

So best always make sure to check your vvps for off the scale readings after you drop a halo unit and if so, replace the bulb immediately. Takes two minutes to do and a 10 pack of spare bulbs is only a tenner or so anyway, so that you should've always enough spares at hand :nod:


Alan

Master JedHI
Manufacturer
Nice find on the wooden cigarette holders. Those should work well.
The ability to change the bulbs is a nice feature if they should go out.

Wanted to share the method I'm using to eliminate the wire insulation on the G4 sockets. I cut the wire close to the fitting and then pry the tabs open holding the insulation which allows me to remove the insulation from the remaining wire. I cut the remaining wire from the fitting as close as possible. This allows me to install a solid heavier gauge wire to the fitting. I hammer the very end of the wire so that it flattens out and gets wider. This prevents the wire from sliding all the way through the tabs so that it stays in place while crimping and soldering. The new wires can be any length you like. I use the wires to support the socket/bulb. Here is how in looks. Getting ready to make up several socket assemblies.

g4ceramicbase.jpeg
 

blokenoname

DIY Log Dabbler 😁🪵💪💨💨💨
Wanted to share the method I'm using to eliminate the wire insulation on the G4 sockets. I cut the wire close to the fitting and...

Awesome, man! :clap: Thank you :tup:
The pic makes it look easy due to the magnification, but remembering how tiny and fragile those little connectors actually are... I see much filling of the swear jar ahead here, when trying to reproduce :rant::2c::lol:
 

Alan

Master JedHI
Manufacturer
I use the same tiny screwdriver that I use to remove the fitting from the ceramic base to open the tabs holding the wire/insulation. Stick the screwdriver blade in between the two tabs and gently twist until they spread apart enough that the insulation can fit through. I use some tiny pliers to the fitting mid section and some other pliers to grab the wire. Work the wire back and forth until it breaks just above the two bent tabs. It doesn't take much which means that the insulated wires are pretty thin and easy to break. Haven't broken any of the tabs yet. May have to play around w/ resistors/heaters cartridges plugged into the G4 socket rather than the light bulb. Would make changing them out much easier.
Best of luck w/ no swearing.
 
Top Bottom