
You are using an out of date browser. It may not display this or other websites correctly.
You should upgrade or use an alternative browser.
You should upgrade or use an alternative browser.
'The Misty Log' - DIY wooden Log Vaporizer
- Thread starter blokenoname
- Start date
blokenoname
DIY Log Dabbler 😁🪵💪💨💨💨
Thanks*adds another 510 vape to his shopping list*
")
I'm quite pleased with the results so far


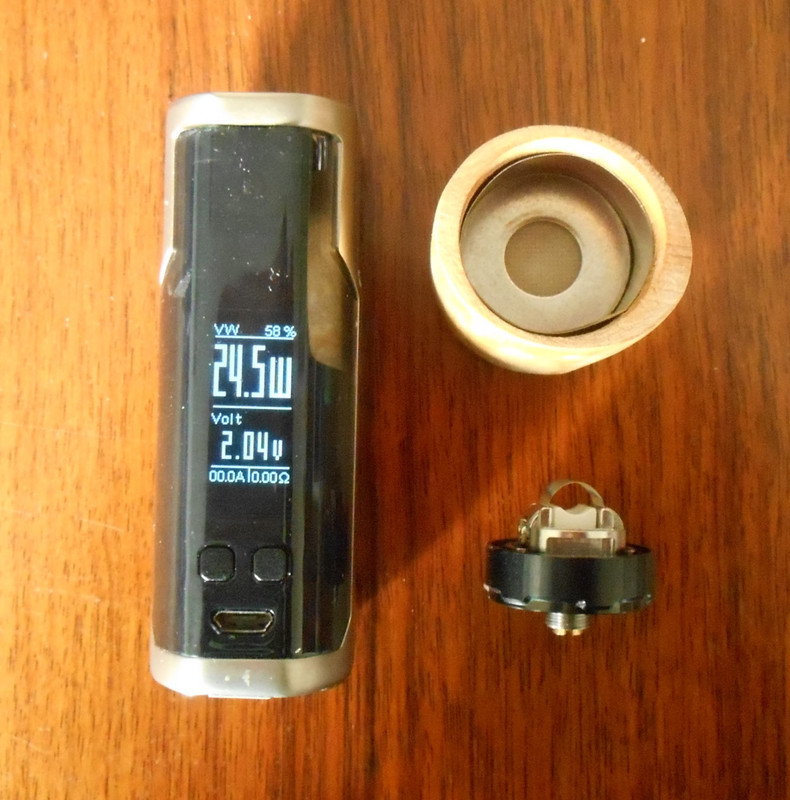
Of course, it'll need a nicer pod/body eventually, but have to get the fitting diameter wood for that first and until then, that reworked beech wood body will do well enough

The provided, precut 0,18ohm kanthal mesh heater blades seem very durable so far and do their job very well

I can get satisfying and dense vapor at a mere 26Wnow in VW/power mode, with a quite easy and natural draw, so that there isn't much of a learning curve involved, regarding any complicated or unintuitive technique

TC mode will not work with kanthal anyway, as I understand it, but it works quite well in wattage mode:
So far, the best and most consistent method of use seems a 6 sec preheat burst at 26W and then you switch more or less immediately to pulsing/feathering the vape from the get go, while taking draws at a quite natural speed. Just 'play it by ear/feeling' and really feel the heat building up in the bowl and vapor and then fire only short bursts successively, to keep the temp on the desired level and decrease firing rate, when you feel it getting too hot. You might want to increase the firing Intervall towards the end of a session (holding the button longer), to raise the heat a bit to wring the last puffs from the load

The draw resistance is also quite notable, at least when compared to 'wide open like a barn door designs', like the Splinter, Glow & similar 510 vapes, as the pod now features only a single, ~2mm air intake hole near the base of the pod. This reduction of air flow over the heater and compression makes vapor production more easy going and richer, while allowing you to take draws at a normal speed, and also helps keeping the required wattage well below the 30-45w, other 510 vapes need.
The mesh blade will glow when dry fired, due to its low mass and surface area but the glow subsides, the very moment you draw air over the heater.


Last edited:
blokenoname
DIY Log Dabbler 😁🪵💪💨💨💨
Conprehensive Friday night setup 


Cheers


Cheers
brainiac
log wrangler
Looks like a good Friday night to me 
I'm doing my best to keep up with bloke's latest DIY tutorial - the M2G 510 portable dry herb vape.
I love my Firefly 1 but at 4 years old it's begining to feel its age.
And with replacement batteries costing £25...
Anyway, here's the progress report:

Cherry wood pod drilled out to 25mm base well and 12mm for the stem well.

0.3mm stainless steel foil heatshield. Debris screens, atty with screen fitted and a 12mm OD glass dd stem.
Box mod set to ~the right wattage. Base well of the pod fitted with ss foil, debris screens and retaining washer.
There's a few more small jobs to get done but I hope to have it working soon.
The refinements can come later
I'm doing my best to keep up with bloke's latest DIY tutorial - the M2G 510 portable dry herb vape.
I love my Firefly 1 but at 4 years old it's begining to feel its age.
And with replacement batteries costing £25...
Anyway, here's the progress report:
Cherry wood pod drilled out to 25mm base well and 12mm for the stem well.
0.3mm stainless steel foil heatshield. Debris screens, atty with screen fitted and a 12mm OD glass dd stem.
Box mod set to ~the right wattage. Base well of the pod fitted with ss foil, debris screens and retaining washer.
There's a few more small jobs to get done but I hope to have it working soon.
The refinements can come later
blokenoname
DIY Log Dabbler 😁🪵💪💨💨💨
@brainiac
That looks terrific already!
Meanwhile, I'm testing out some stems for the portable

ETA: I like the one made from a test tube (2nd from left) best so far
Easy to build from a 12mm test tube. Bottom gets filed off and flame polished. 0,1mm ss foil lines the business end and holds a 10mm basket screen.
The wide inner diameter cools down the vapor somewhat, while the tiny mouthpiece opening limits airflow and provides some draw resistance for easier vapor production.


That looks terrific already!
Meanwhile, I'm testing out some stems for the portable
ETA: I like the one made from a test tube (2nd from left) best so far
Easy to build from a 12mm test tube. Bottom gets filed off and flame polished. 0,1mm ss foil lines the business end and holds a 10mm basket screen.
The wide inner diameter cools down the vapor somewhat, while the tiny mouthpiece opening limits airflow and provides some draw resistance for easier vapor production.
Last edited:
blokenoname
DIY Log Dabbler 😁🪵💪💨💨💨
Just discovered, that my Aegis Solo mod features s/thing called VPC mode. Allows to set a simple wattage curve manually, defining how the heater behaves over a period of a ten second draw.
Say, 30w is your preferred setting/temp, where you get good vapor. The max draw length is fixed at 10 secs, before the safety cutoff kicks in. You tell the heater for the first two seconds after firing up, to ramp it up fast and go to 40w, so that you can get down to business! As the heater would now usually only get hotter after that initial burst, ye longer it is engaged at 40w, you set the following values to form a gently descending curve, from that 40w max you just defined, down to the preferred vaping temp of 30w, for the remainder of the 10 sec draw, which will taper out naturally anyway, when you eventually overpower the heater. Goes also well with the natural breathing pattern, where you probably tend to draw faster at the beginning, than towards the end of a long draw.
Then simply take the next draw, which starts at 40w again
The Aegis allows for 5 wattage settings (P1 to P5), which define the wattage value over the first 4 seconds of a 10 sec cycle, while P5 defines the value for the remaining 6 secs. Sat it to 40,40,35,35,30 (w) respectively.
That way, you can now take as many satisfying 10 sec draws as you like w/out need for pulsing or fear of combustion. Just so
No further tricky fiddling or technique required
First hit is a bit slow, till the heat build up in the bowl;
Second hit gets things going
... and then it's hit after hit nice vapor
Nice feature
Much simpler to set up, than all the tricky TC/R & TC stuff or even custom software with cruise mode.
But doesn't seem so common, that power curve feature, if I understand that correctly? First mod, in which I stumbled across that
brainiac
log wrangler
Here's the Rustic version of Bloke's M2Go 510 dry herb vape.
Up and running
The pod's made from local cherry that has lots of interesting detail. Mesh heater RTA. 80w box.
All new stuff to me so I'm on at least two learning curves right now.
Still juggling variables, e.g. wattage, heating times, draw speed and length.
To put it another way - lots of testing to be done.
I'll make a few adjustments to the pod on the v2 in order to better control air flow but it's already a viable alternative to my gracefully aging FF1.
Up and running
The pod's made from local cherry that has lots of interesting detail. Mesh heater RTA. 80w box.
All new stuff to me so I'm on at least two learning curves right now
. Still juggling variables, e.g. wattage, heating times, draw speed and length.
To put it another way - lots of testing to be done
.I'll make a few adjustments to the pod on the v2 in order to better control air flow but it's already a viable alternative to my gracefully aging FF1.
blokenoname
DIY Log Dabbler 😁🪵💪💨💨💨
Sounds & looks all good to me
Good roasting
Good roasting
blokenoname
DIY Log Dabbler 😁🪵💪💨💨💨
Semi final glass stem design for the M2Go
It's basically a 12mm test tube with filed off bottom and then torched to form a 'nipple end' with a 9mm/6mm boro glass straw set in, but sparing out the bowl area itself. The inner glass liner is held in place by a basket screen, for which it also serves as a backstop
Makes for a nice tidy bowl.
The bowl diameter is 10mm.
You can also set in a 2nd basket screen, to reduce load size.
blokenoname
DIY Log Dabbler 😁🪵💪💨💨💨
Well, it's probably better suited for home use, than for out and about, as the test tube's wall strength is only 1,0mm. The 9mm glass liner inside has 1,5mm wall strength and so provides much more stability.Very ingenious stem design mate! I like it.
I wonder if there are any drawbacks in day to day use tho?
On the other hand, the test tubes and boro glass straws are inexpensive enough and the stem is easy to build yourself, so that you can make a couple of them for backup.
Also working on a wooden stem, but that needs the 12mm wooden dowels to arrive first. It'll get an 8mm bowel lined with 0,1mm ss foil and an 8mm/5mm glass liner
Last edited:
blokenoname
DIY Log Dabbler 😁🪵💪💨💨💨
Little Loggin' Feng Shui or so

blokenoname
DIY Log Dabbler 😁🪵💪💨💨💨
Bong building 101...


blokenoname
DIY Log Dabbler 😁🪵💪💨💨💨
Glass heater cover 3.0
10mm OD test tube (9mm ID) with 7,5w cartridge heater. Heater port torched and flame polished to form a ~9mm nipple end.
Tips/roasting tubes with an ID of 9 to 10mm will slip over; tips/stems with a smaller ID (like Vapcaps) can form a ball&socket connection/seal with the heater cover.

10mm OD test tube (9mm ID) with 7,5w cartridge heater. Heater port torched and flame polished to form a ~9mm nipple end.
Tips/roasting tubes with an ID of 9 to 10mm will slip over; tips/stems with a smaller ID (like Vapcaps) can form a ball&socket connection/seal with the heater cover.
brainiac
log wrangler
Another impressive batch of new ideas @blokenoname
And here's another one - which I'm definitely going to steal before you patent it
It's the stainless steel core halogen Misty.

Have been using it for about two weeks now and I'm very impressed. It's the smallest log in my
collection but it cooks herb along with the best of them - with half the heat-up time.
The diameter is 4cm and the height is 8cm. The heater well is 30mm diam and 40mm deep so it's not
just small it's also light (no pun intended).
The heart of this log is a 10w halogen bulb seated in a ceramic socket. The 10w bulb means that it can be run from a wall wart type 2a PSU rather than the brick type PSU needed by 35w bulb units. And the 10w is smaller than the 35 hence the 11mm x 0.3mm ss heater cover. A fine ss mesh cover, just below the debris screen, prevents the light output from becoming any sort of issue whilst allowing the ample heat output free passage. And that heat is generous indeed. It's probably advisable to use this log with a dimmer for full control of the heat output options. Bloke recommends ~11.5v as a starting point. I've managed without but my extension cord is over 3m in length which will tame it a little.
Heat up time is a mere 5 minutes. Extraction is rapid and efficient. It's size and weight gives it great versatility, it's ideal for use with a water pipe and easily used dd, with that 10mm glass stem Bloke kindly included.
In summary: this vape is brilliant (pun intended).
The benefits of the build are significant for both user and DIY'er.
So you won't be surprised to hear that there's a Rustic version quite close to completion
And here's another one - which I'm definitely going to steal before you patent it
It's the stainless steel core halogen Misty.
Have been using it for about two weeks now and I'm very impressed. It's the smallest log in my
collection but it cooks herb along with the best of them - with half the heat-up time.
The diameter is 4cm and the height is 8cm. The heater well is 30mm diam and 40mm deep so it's not
just small it's also light (no pun intended
).The heart of this log is a 10w halogen bulb seated in a ceramic socket. The 10w bulb means that it can be run from a wall wart type 2a PSU rather than the brick type PSU needed by 35w bulb units. And the 10w is smaller than the 35 hence the 11mm x 0.3mm ss heater cover. A fine ss mesh cover, just below the debris screen, prevents the light output from becoming any sort of issue whilst allowing the ample heat output free passage. And that heat is generous indeed. It's probably advisable to use this log with a dimmer for full control of the heat output options. Bloke recommends ~11.5v as a starting point. I've managed without but my extension cord is over 3m in length which will tame it a little.
Heat up time is a mere 5 minutes. Extraction is rapid and efficient. It's size and weight gives it great versatility, it's ideal for use with a water pipe and easily used dd, with that 10mm glass stem Bloke kindly included.
In summary: this vape is brilliant (pun intended
). The benefits of the build are significant for both user and DIY'er.
So you won't be surprised to hear that there's a Rustic version quite close to completion
el sargantano
Well-Known Member
Yeah!
I really like the halogen log theme is not forgotten...!
I really like the halogen log theme is not forgotten...!
blokenoname
DIY Log Dabbler 😁🪵💪💨💨💨
@brainiac
Many thanks for the kind review
Eager to see the first halo ss core rustic here
Morning all!
Though I liked the recent 12mm glass heater cover very much, due to its performance and flexibility in choice of your roasting tubes, after several weeks of use, laziness and practicality got the better of me and as I also very much prefer one handed use of a vape, I decided that at least having the larger roasting tubes safely resting on the heater cover is just soooo convenient.
So we're back to a 10mm OD glass heater cover now, which allows bigger tubes/tips to slide over and sit secure on the cover for one handed use, but with a smaller diameter nipple end for a heater port, that still allows to connect smaller tubes/tips to seal via a ball&socket connection in a two handed approach.
We've to forgo the 11,5mm ID Arizer stems is this setting, but the 13mm/10mm all glass 'slide-a-bowl' roasting tubes can cover for that loss easily
Performance wise, this smaller glass heater cover just rocks as well, as its larger predecessor


ETA some roasting tube porn

Many thanks for the kind review
Eager to see the first halo ss core rustic here
Morning all!
Though I liked the recent 12mm glass heater cover very much, due to its performance and flexibility in choice of your roasting tubes, after several weeks of use, laziness and practicality got the better of me and as I also very much prefer one handed use of a vape, I decided that at least having the larger roasting tubes safely resting on the heater cover is just soooo convenient.
So we're back to a 10mm OD glass heater cover now, which allows bigger tubes/tips to slide over and sit secure on the cover for one handed use, but with a smaller diameter nipple end for a heater port, that still allows to connect smaller tubes/tips to seal via a ball&socket connection in a two handed approach.
We've to forgo the 11,5mm ID Arizer stems is this setting, but the 13mm/10mm all glass 'slide-a-bowl' roasting tubes can cover for that loss easily
Performance wise, this smaller glass heater cover just rocks as well, as its larger predecessor
ETA some roasting tube porn
Last edited:
Megaton
Well-Known Member
I have been similarly enraptured by my SS core halo Misty as @brainiac (looking forward to seeing your rustic version mate!), it's been my daily driver since it arrived. I love this little loggy! The fact that it looks pretty lit up etc is all just a bonus, the thing is a deceptive little beast of a heater! I'm currently running mine at around 11.3v I think, and it works just as effectively with the slide in glass tip as it does with the larger slide in SS tip!
brainiac
log wrangler
The fact that it looks pretty lit up etc is all just a bonus
Yes, absolutely the case and I had intended to mention it in the review. This is not a novelty vape. The bulb is a viable alternative to the resistor and the cartridge and all three have their pros and cons.
Started work on a new blank for the halo today. The one I'd been working on had a 25mm heater well and it's not really wide enough to accommodate the wider heater cover required for the halo - and be fixed securely in place. The Misty halo has a 30mm heater well for a good reason
. I've got some ceramic sockets on order but might just do a direct solder on this one. Am also working on the 25mm well unit. Both are apple wood.
Great work on the glass core cartridge unit @blokenoname
It's on my to-do list

Last edited by a moderator:
blokenoname
DIY Log Dabbler 😁🪵💪💨💨💨
Morning, folks
@brainiac
Rustic plum and cherry blanks for making pods for the portable M2Go arrived safe & sound
Many thanks. Will put them to good use
The black glass stem you added, got directly designated to be the official pipe tobacco stem for the glass core units, as our Chinese friends and the rest of the world seem a bit at differences about what size 12mm OD constitute
But a fine tobacco stem it makes, nevertheless

After some serious testing, it turns out that while the nipple end for the Misty 10mm glass heater cover seemed a good idea, in practice it actually only seals half as good, as leaving the convex end of the glass test tube intact for a ball&socket connection. Nor did it provide enough stability for smaller sized steps/tips to rest secure on the cover for one handed use.
So we're back to utilizing the convex test tube bottom for a heater port, allowing 10mm ID stems to slip over and sit secure, while a better and more effectively sealing ball&socket connec is still possible for the smaller Vapcap tips etc.

Also pondering if it is maybe a good idea, to set the air flow reg/top collar part of the Profile RDA housing into the top section of the M2Go pods. Would have the advantage of providing a more secure fit for the 12mm stems/mouthpieces.

@brainiac
Rustic plum and cherry blanks for making pods for the portable M2Go arrived safe & sound
Many thanks. Will put them to good use
The black glass stem you added, got directly designated to be the official pipe tobacco stem for the glass core units, as our Chinese friends and the rest of the world seem a bit at differences about what size 12mm OD constitute
But a fine tobacco stem it makes, nevertheless
After some serious
testing, it turns out that while the nipple end for the Misty 10mm glass heater cover seemed a good idea, in practice it actually only seals half as good, as leaving the convex end of the glass test tube intact for a ball&socket connection. Nor did it provide enough stability for smaller sized steps/tips to rest secure on the cover for one handed use.So we're back to utilizing the convex test tube bottom for a heater port, allowing 10mm ID stems to slip over and sit secure, while a better and more effectively sealing ball&socket connec is still possible for the smaller Vapcap tips etc.
Also pondering if it is maybe a good idea, to set the air flow reg/top collar part of the Profile RDA housing into the top section of the M2Go pods. Would have the advantage of providing a more secure fit for the 12mm stems/mouthpieces.
blokenoname
DIY Log Dabbler 😁🪵💪💨💨💨


blokenoname
DIY Log Dabbler 😁🪵💪💨💨💨
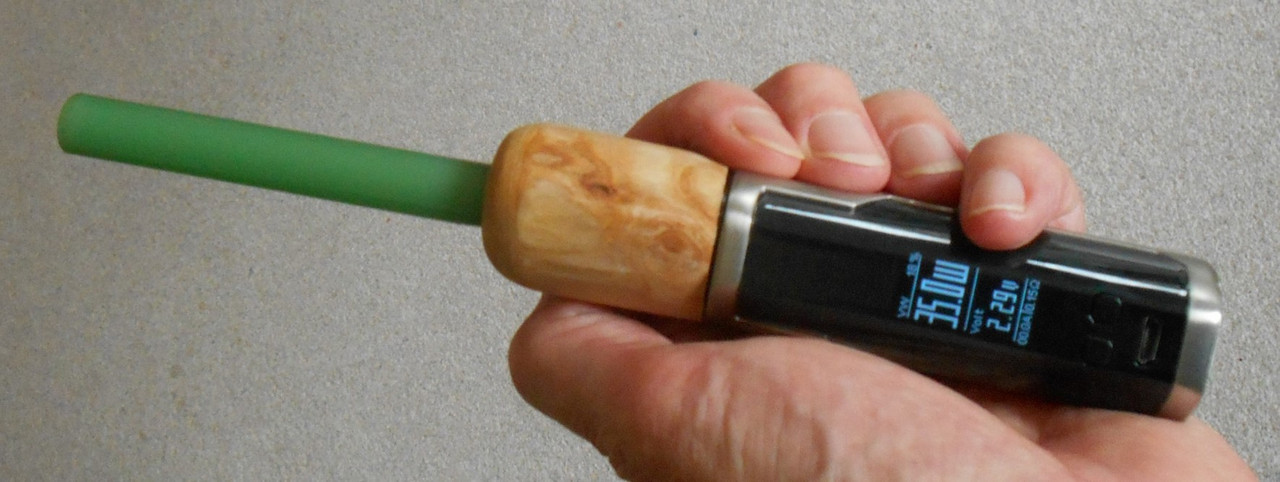
Some more shots from the plum M2Go, a.k.a 'The Knob'
Going back to a 10mm stem well, was a good idea
Guess, this is pretty much now, what I had in mind somewhere all along: still a little mini loggie on a stick... ah... box mod
And that's exactly how it works right now
Load up your Vapcap or my 10mm OD glass stem (cut from a 10mm boro test tube. ID is 8mm, just like the VC's bowl); set mod to 30w in power mode; stick in your VC or glass stem... klick the button and take your puffs, just like you'd do from your log
No pre heating. No fancy draw techniques. No TCR and whatnot.
Connect stem; klick button 0; get vapour! That's how it shoukd work in my book
I also really like the smaller bowl size.
blokenoname
DIY Log Dabbler 😁🪵💪💨💨💨
Made another one!
This one has a cherry pod (from @brainiac 's blanks).
This time I utilized the steel/air control collar of the Profile RDA's own metal housing, to keep the 12mm glass stem in place (thx for the idea, @Megaton). The collar is set with an o-ring into the top end of the pod. Another o-ring in the collar itself holds the stem secure.
Last edited: