'The Misty Log' - DIY wooden Log Vaporizer

brainiac

log wrangler
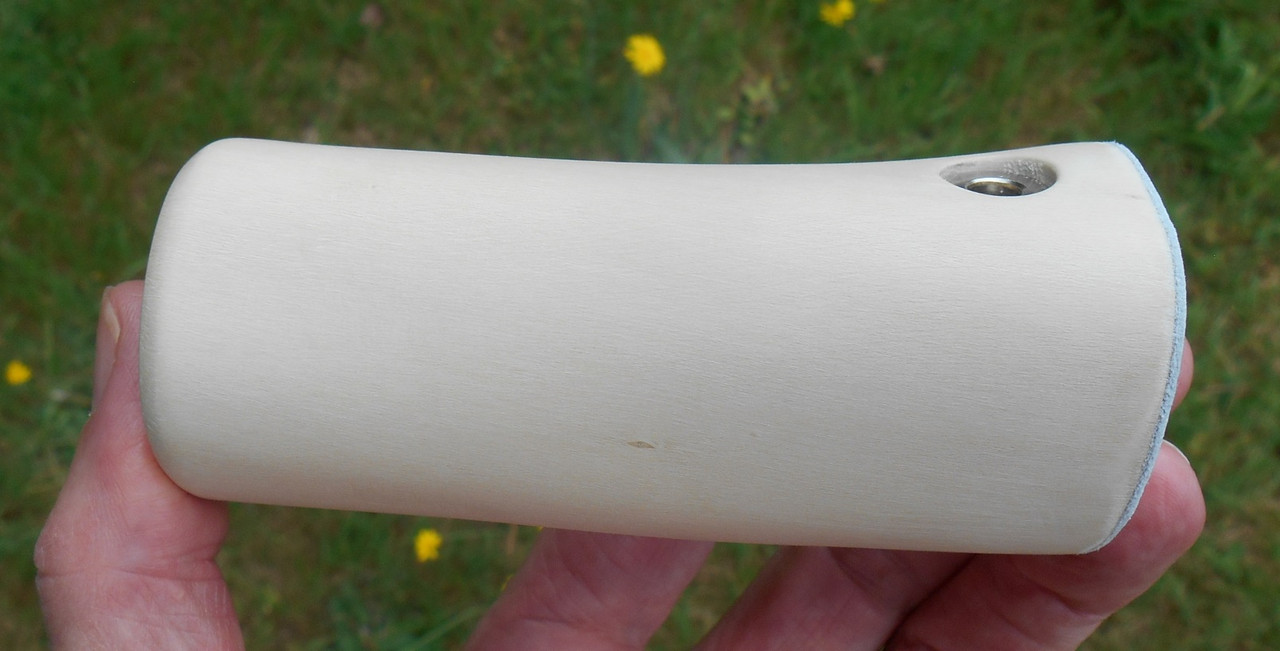
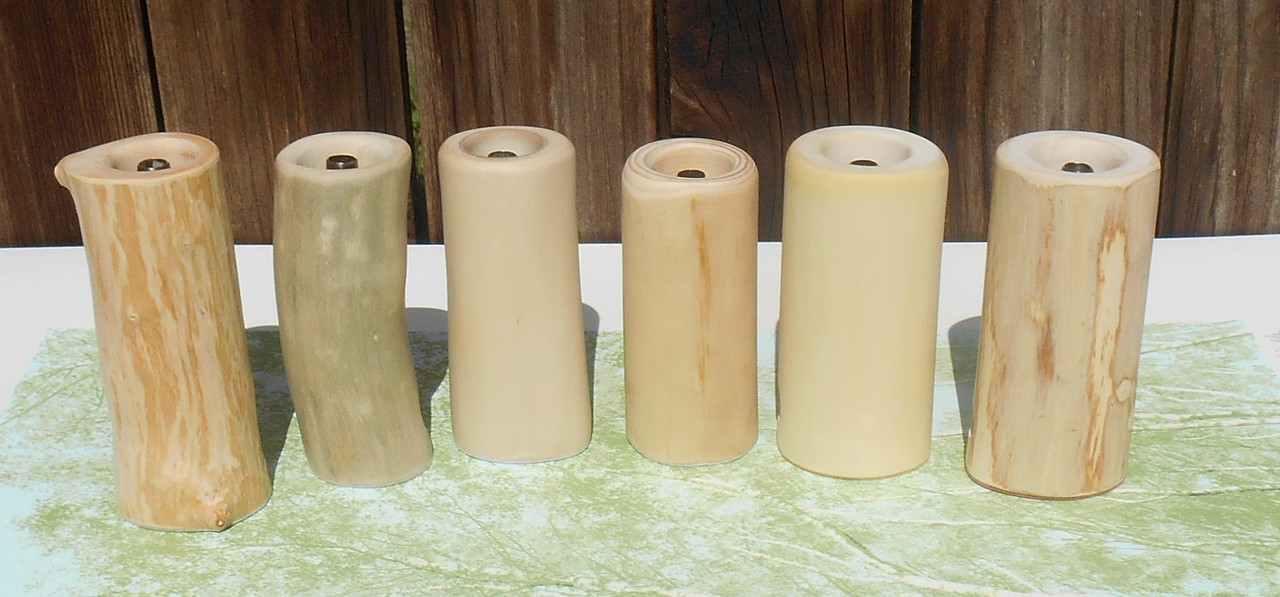
Here's the third unit in this set. A rustic holly.

I've had a couple of attractive holly blanks split whilst drying so it's great to see this one thro to completion. It has a pleasing egg-shaped section at the top with a flared base.

Holly-upright.jpg


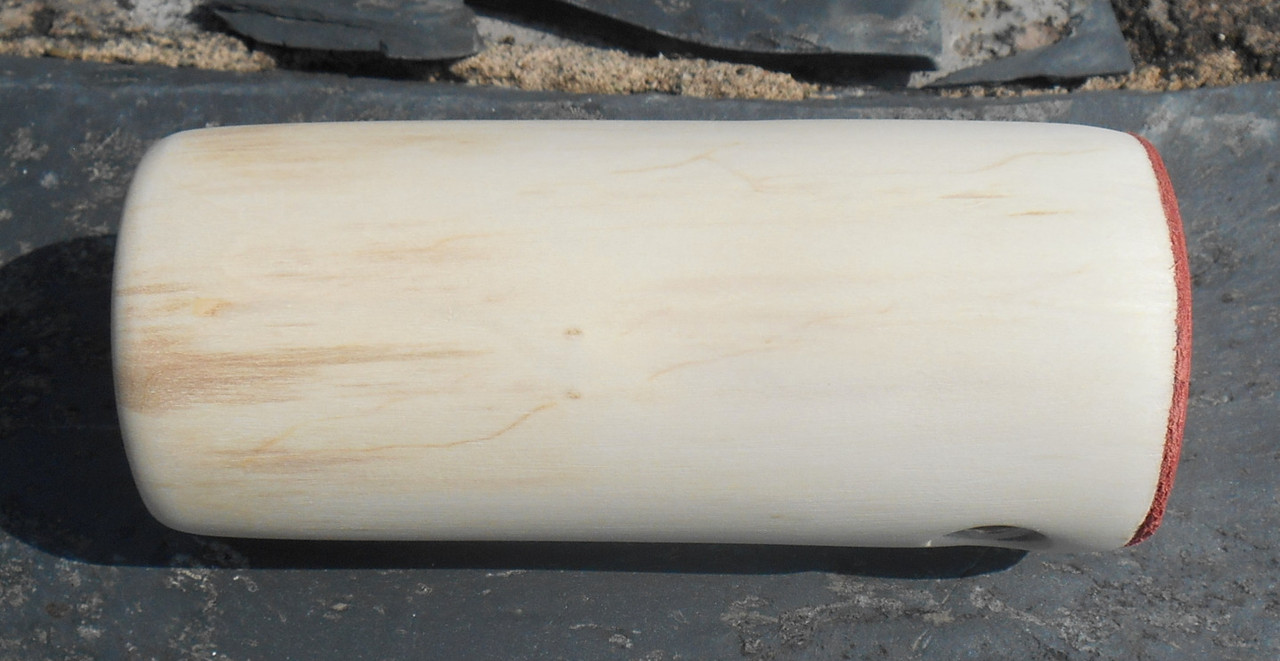
The colour is quite curious. In some light it's a buttery white and in some it's ivory.

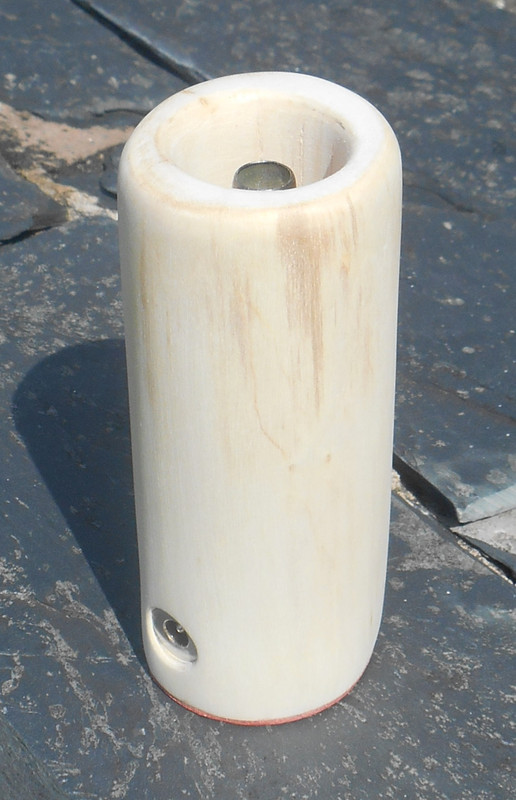
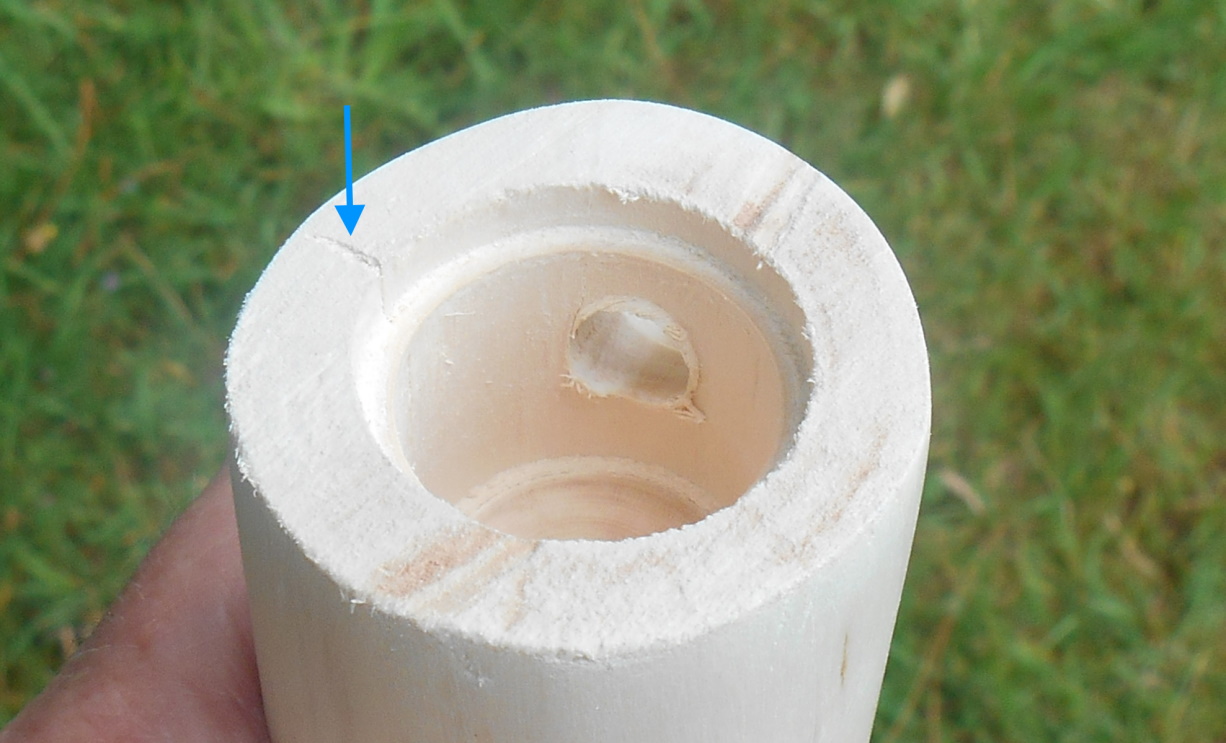
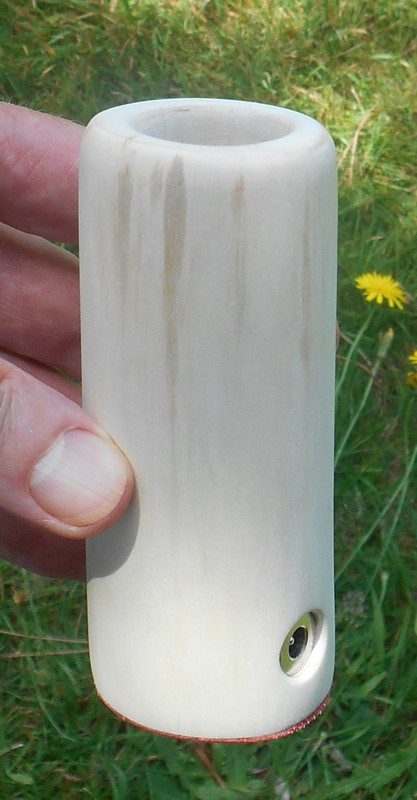
Here's a close look at the grain which seems to twist along the length of the wood - and one of the unit's four 'eyes'.


Holly-grain-detail.jpg


Also, the wood has different shades in different growth rings.

Holly-top-down.jpg


Fits comfortably in the hand. Fine and close grain allows for a very smooth finish.
Here it is looking ivory again with one of those eye details.

Holly-in-hand.jpg


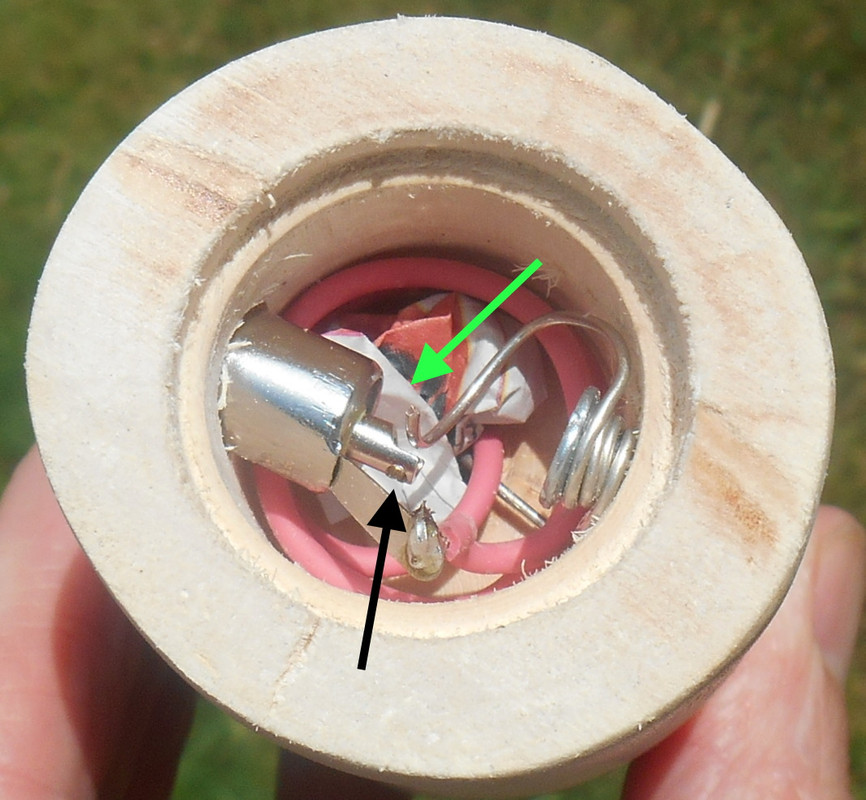
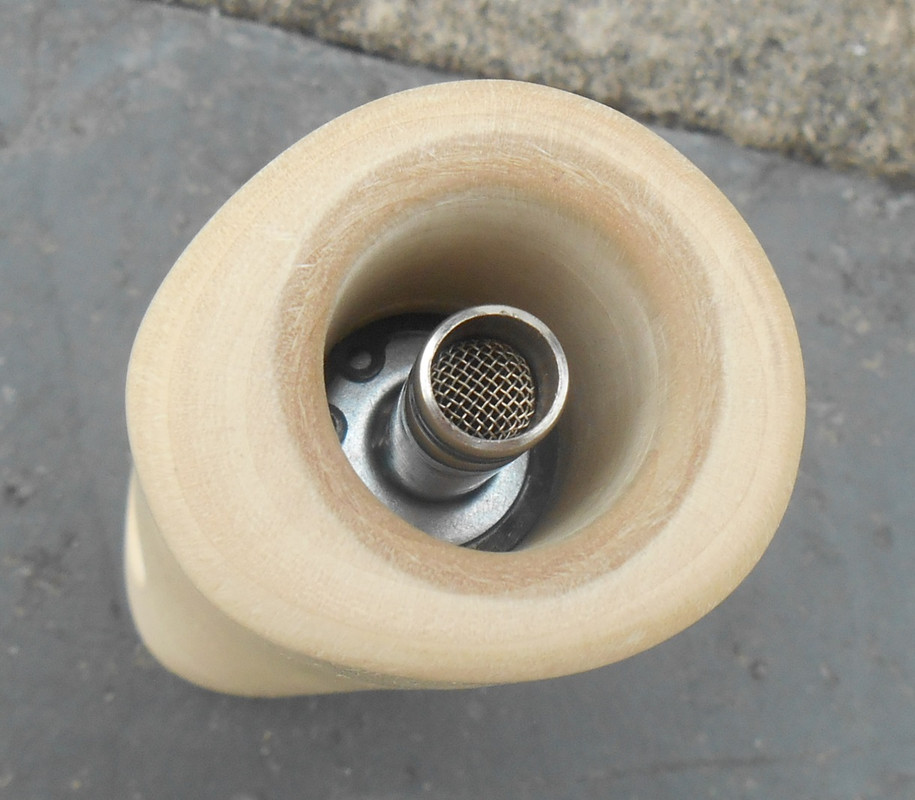
Connector recessed and screwed into thread tapped into the wood. Should last well with wood this hard. On previous units I've left an edge on the connector countersink, as on the ash above, but here I've sanded it down slightly giving it a softer edge which is more in harmony with the piece as a whole. Hybrid wiring again. The body of the unit gets noticably hotter than my other rustics - probably due to the wood variety - but the connector, whilst it is certainly warm, is not too hot.

Came across some cherry tree trimmings suitable for stems. Nature, inconsiderate as usual, didn't
provide straight sections of branch, but hey, on the bright side: they ain't gonna roll off the desktop :).

Cherry-stems.jpg


@ubardog Yea, that might be worth a go. I know a guy who makes sculptures out of tree stumps and
the like. Then he goes at them with one of those gas powered garden weed burners to char the surface. Produces an interesting effect and apparently, preserves the wood.

Good logging, ppl.
:peace:
 

underdog

shade-tree vapor engineer
Manufacturer
I really like the way Holly came out all curvy and smooth.. very nice dude! The stems are great too, I like them better that way than if they were totally straight. Dammit now you're making my VAS act up lol. :cheers:
 

blokenoname

DIY Log Dabbler 😁🪵💪💨💨💨
Completed an idea for a new glass core Misty, I already mentioned some posts back.

Cut the glass heater cover from a 14,5mm gg stem. It has the same hight as the ss heater cover, but is a bit wider (see pic for comparison. The gg male joint fits neatly with a standard 8mm or 5/16" ss tip, to slip in and you can also use it with any off the shelf 14,5mm GonG adapter :nod:
Tried a leaner 10+ mm plain end glass tube for a glass heater cover before, but was never able to create a fitting dd stem or GonG for that... because glass tolerances :rolleyes:
So the 14,5mm joint seems the better option here ;)

Originally wanted to wind some ss wire around the cartridge to create some turbulences in the air flow, but the 1,5mm ss wiring I've left from my early halo Log experiments is just too inflexible for that.

Recycled an older Misty Mahogany body for this and found an extant cork base, I could use. Air intake is via a small hole opposite the FC jack in the Log body.

29b12pw.jpg

Also want to try out, if I can keep the insulation of the cartridge heater. Had some bad luck with this, when I first tested cartridges, but that was a 40w heater back then. This here is a mere 7,5w at 12v applied. So we'll see, how that works out and if there's some bad taste.
2w2q5ic.jpg


Also... @brainiac s Sycamore Rustic arrived :clap:
Feels right at home next to my daily driver Walnut Misty and I'm already in love with it! :love: Seeing the pics is one thing, but holding it in your hands is really something else :D I think, the Rustic Log idea is a real winner :tup:
It looks, feels and works absolutely beautiful! :rockon:

2d13hnc.jpg


ETA: Looks fine so far :)
Up & running for an hour now and the insulation seems all good!
No taste or smell at all from the teflon & silicone insulation, after the factory stink burned off. No smell from the cork base so far :tup:

Performs absolutely fine with the direct draw stem and ss tip :rockon:
Have yet to try it through water, but sadly, all my OTS GonGs are 19,5mm :p . Will try one with help of a 14/19mm inline adapter, but also think, the GonG's the wrong shape. Much too wide, it seems. But we'll see :D
14,5mm GonG adapter is on it's way already and should arrive by Monday ;)

ETA2: Will of course make the heater cover longer later on and lead it through the wood, to secure it with a clip ring at the other end.
But for now, this will do :cool:
 
Last edited:

brainiac

log wrangler
Just when I thought I'd got enough to do making a halogen log with the glassware you sent me and now there's a glass core Misty on the to-do list :D. I've got a 14mm male/18mm female adapter which would do the job without modification - tho I guess a 14mm male/14mm male would be better, or slimmer at least.

Anyway, many thanks for the glass tubing and bulbs :rockon::clap:

Glassware.jpg


Plenty of scope for experimentation and, hopefully, a working halogen unit :tup:

Very glad to hear that you're happy with the sycamore Rustic.
It's the first rustic to go out into the wilds :) making your opinion of it the first 'hands-on' feedback
so I'm particularly pleased by your favourable impression.

Took a group photo of the rustics just prior to putting the sycamore in the post.

rustic-line-up.jpg


L to R: apple, ivy, holly, Scots pine, sycamore and ash.
Got a beech and a hazel in the works.

@underdog - thanks for the generous words, Dave. And apologies for causing the VAS flare-up :D
 

blokenoname

DIY Log Dabbler 😁🪵💪💨💨💨
ETA3: ok! This works exceptional well out of the box :) For use with anything with ss tips, 11-12v are sufficient. When using a 14,5mm GonG and going for bigger loads (used the 19/14 inline adapter itself as a GonG here, with a DIY bucket screen at the narrow end), ramp it up to 13v, though. But then you're in the land of plenty, man! :D Steam Engine :rockon:

This is a quite simple to do alternate version of the Misty. Does away with all the metal works for the core by replacing it with a glass tube and a disk of cork. That we also can utilize the native insulation and extended wiring, the heater cartridge comes with, makes installation a breeze and does away with some safety concerns re possible short outs. DC jack rejains stone cold, with the wiring seen above ;)
Wouldn't trust that insulation within a ss heater cover, though.

@brainiac
That collection is gorgeous :tup:
 

blokenoname

DIY Log Dabbler 😁🪵💪💨💨💨
Some more testing :clap:
The glass core Misty proves quite versatile and works well with all 5/16" ss tips and all female 14,5mm standard ground glass joints, be it GonG or direct draw :D

5vdwm9.jpg

dwfn5u.jpg

2w6e0xj.jpg
 
Last edited:

blokenoname

DIY Log Dabbler 😁🪵💪💨💨💨
Morning :)

Coming to think of it, there is no good way for creating a stop for the slide in ss tips within a glass heater cover, I can think of. This creates the problem of a flexibly wired heater getting accidentally pushed down and inwards by the tip, when used with a bong adapter, that uses a slide in ss tip, due to the weight of the Log. Clip ring inside the glass joint won't work, due to its conical shape.

Two possible ways to go here:
a) using a stiff heater again by stripping off the insulation and solder the leads to some stiffer wiring (like we do with the resistor heater), that then gets to stand in an right angle on the DC jack, so the heater itself provides the stop. Beware of a hot DC jack in this case. So better recess it.

2a7st9y.jpg


b) by making two smaller holes into the bottom of the heater well for each of the leads, instead of one big one. Heater then gets set in from the top, with only the flexible wiring entering the bottom cavity. Heater cover goes on top of that. That way, the heater can only be pushed down a certain way, before getting stopped by the wooden bridge between the two holes.

Or c)... you're a lazy bastard like me and just plug up the hole with a piece of cork, to keep the heater in place. Just see to it, that there's still sufficient air flow ;) For my own unit, this should do here.

29f8f1j.jpg


All set here meanwhile, to rework an older cherry resistor unit today, that had an older high mass core. Gets the updated standard ss heater cover now (have still to cut the notches for screws) and a cartridge heater. Want to test out, how its native insulation fares within a ss cover. The flexibility of the wiring is of no concern here, as the ss covers provide a stop for the slide in tips, so that the heater can't be accidentally pushed down.

ipv3gg.jpg


ETA: Ok! Let's burn the factory slime off the cartridge and give it a go :rockon:

2lxgowo.jpg


ETA2: running for an hour straight now at 12v, and all I can taste and smell, is the faint odor of heated steel. So this seems good to go! Probably not for the hardcore purist, who gets rattled by the mere thought of silicone, teflon etc., but technically this works fine :shrug:
Insulation was made for withstanding four times the used wattage/heat anyway.
 
Last edited:

Chopperdan

Well-Known Member
Blokenoname, I've used those 12 volt cartridges and the flexible sleeves just under the cartridge tend to burn at 400 F. Have you had that same problem?
 
Chopperdan,

blokenoname

DIY Log Dabbler 😁🪵💪💨💨💨
Blokenoname, I've used those 12 volt cartridges and the flexible sleeves just under the cartridge tend to burn at 400 F. Have you had that same problem?
Which cartridge exactly did you use? This here is a 24v/30w RepRap cartridge. When applying only 12v to this 24v heater, like I do here, it'll give you only a 1/4 of its power, i.e. 7,5w, which is sufficient to power a log.
Nothing stinking, melting or burning up here!

I removed the two additional red sleeves though, that are set directly under the heater, to cover up the metal crimps, that connect the cartride's leads to the insulated flexible wiring, as you can see in the first pic of the glass core Misty above.

In my earlier attempts though, I first used a 12v/40w cartridge heater (looks exactly the same), and running that at full power (didn't know at that time, that this was total overkill for powering a Log), it burned down the insulation within minutes :D
 

brainiac

log wrangler
OWZAT !
(Translation: how is that. A cricketing term often used when a fielder catches a batted ball).

Here's the latest Rustic iteration. This one's made from a length of local willow.
Willow is, ofc, the wood used to make cricket bats :)

Willow-upright-1.jpg


I almost abandoned this one when a small crack showed up in the base wall but went ahead with it
to see how suitable for logs willow would be - and simply for the practice. Here's the issue:

willow-flaw.jpg


It may never develop any more than that but it's still a 'lost' unit. A Lustic, perhaps?
We'll just have to see whether it has a good innings or if it goes out for a duck.

The bodyline has a gentle curve. It also broadens slightly to the base - indicating that to it's orientation
on the desk matches it's orientation during growth. Some of the cambium detail remains in place which
is interesting but not overwhelming. Gave it a bold brick-red leather base.

Willow-side-1.jpg


Willow-hand-held-1.jpg


It's a bit too white in that picture but it shows the soft edge on the connector recess which I first tried out on the holly unit and now prefer.

Anyway, had it plugged in for a while.. I think it's time for a test match :D


@caseball2051 you're never too old to learn and you may just find that log building is the most rewarding DIY project that you've ever undertaken - I did :nod:.
 

blokenoname

DIY Log Dabbler 😁🪵💪💨💨💨
@brainiac

Awesome work again :clap:
I like the smoothed edges of the connector recess. Very tidy :nod:
You're much better there than me, with taking care of details like this :rockon:

Lucky find at Aldi here! They had borosilicate glass straws at the WTF isle today. 10 pcs for just € 4,99 :D
About 25 cm long each and... with an outer diameter of 8 mm, which perfectly fit the 9mm/8mm OD/ID ss heater cover :cool:
Means, of course, they'll fit the new glass heater cover, too ;)

Means, we can do glass slide in stems/tips now. Can easily cut at least 20 stems from the set :D

t98kr5.jpg
 
Last edited:

blokenoname

DIY Log Dabbler 😁🪵💪💨💨💨
This is cool :cool:

Simple and cost effective way to do neat & solid direct draw glass slide in stems :)

They're easy to pre cut with the Dremel and then break very evenly. Give the resulting break a few turns with a 3 flame jet torch, till it glows orange to melt the glass a bit, rounding off potential sharp edges; done!
Used a small piece of fine mesh to form a tiny bucket screen (inverted) and pushed it in with a dowel.
Also really nice for micro dosing, due to the ID of the tube being only about 5mm, so holding even less material than the ss tips. Nice, even extraction to coffee brown. Bit more roasting time and more tasty, than the ss tips, but different from the more airy roast of the bigger diameter slide over glass stems.

1zcohvo.jpg


Also easy to make glass slide in tips from, to set into a WonG, GonG or Nong :D

Have yet to try them with the glass core Misty ;)
 

brainiac

log wrangler
Here's a useful bit of DIY modus operandi for that tricky little job of base well soldering.

Base-well-paper-arrowed.jpg

Drill a 1.5mm hole in the centre contact - indicated with the black arrow. Then the wire can be securely fixed into place prior to soldering. I've mentioned this before but it's so helpful that it's worth repeating.

The green arrow indicates some screwed up newspaper formed roughly into a plug. This goes into the through hole leading to the heater. Place it and remove it with a pair of tweezers. It's job is to prevent any errant blobs of solder or snipped off wire dropping down into the heater well. They can cause rattling and - even worse - shorts. I had to re-open a log to remove a rattling lump of solder and the leather cover was not reusable.

I'm off to Aldi tomorrow to see if they've got those glass stems. They look just the job :)
 

blokenoname

DIY Log Dabbler 😁🪵💪💨💨💨
Morning :)

Looked at @Alan s 'slide a bowl' solution to make adjustable glass roasting tubes for his HI Log and found the idea well suited for devising a combo glass mouthpiece for the 14/23 joint glass core Misty, that can serve as a dd stem and 14/23 GonG adapter simultaneously :clap:

Modified the idea a bit by using a shortened 14/23 socket for the outer tube and utilizing a shortened 14/23 cone tube, for the inner (sliding) tube, which holds the load. Tubes are held together by a silicone sleeve, which allows you to slide the load closer to the heater, while doing a session. Load is captured between the two basket screens, so that nothing can fall into the glass heater cover. Best leave a bit of space when setting in the 'lid screen', so that you only need to shake the mouthpiece a bit, instead of stirring with bigger loads.

Silicone sleeve can be replaced by a cork or wood sleeve later on, as shown with Alan's roasting tubes here:
http://fuckcombustion.com/threads/the-hi.4693/page-221#post-929132

vyq1j.jpg

dwaq2r.jpg

21booqg.jpg


@brainiac

Sound advice re the soldering, as always :tup:
Also want to add, that taking a bit of sandpaper to the DC jack's connectors and the stripped leads to rough up the surface, goes a long way in making the tin stick. I then usually 'tin' both the connector and the leads, so that when finally soldering the leads to the jack, I only need a drop of hot tin, which directly melts into the tin already sticking to both leads and connectors, establishing a solid connection within a second or two :)

ETA: added nicer pics ;)
 
Last edited:
Top Bottom