'The Misty Log' - DIY wooden Log Vaporizer

brainiac

log wrangler
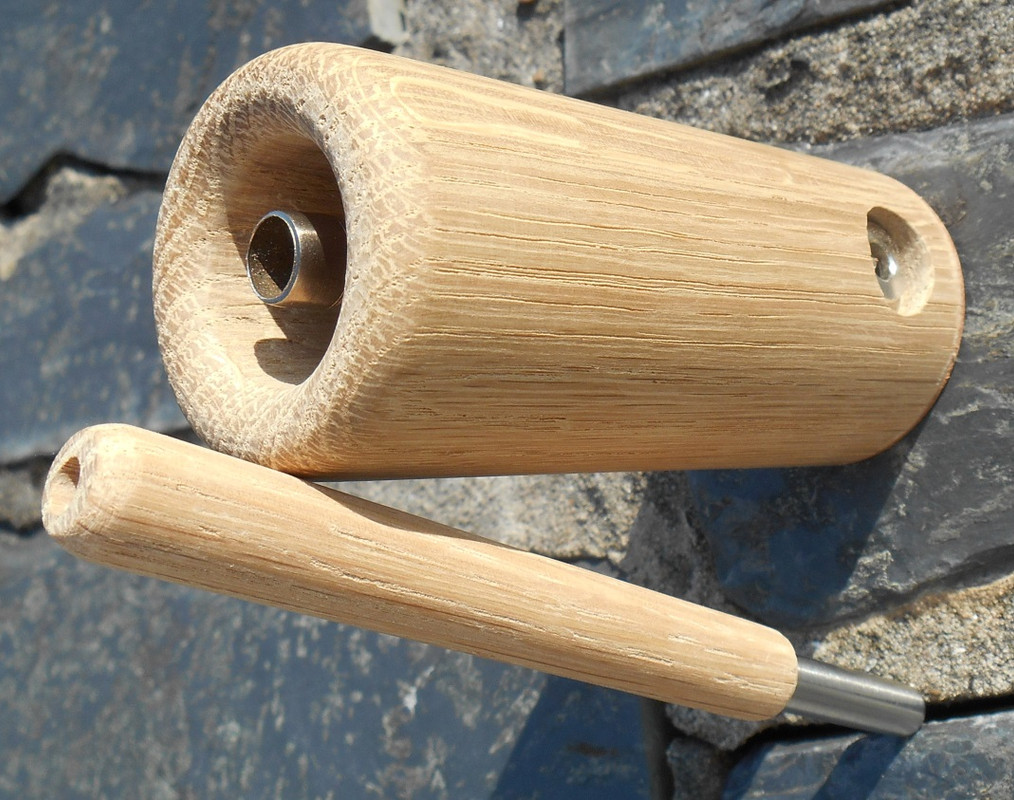
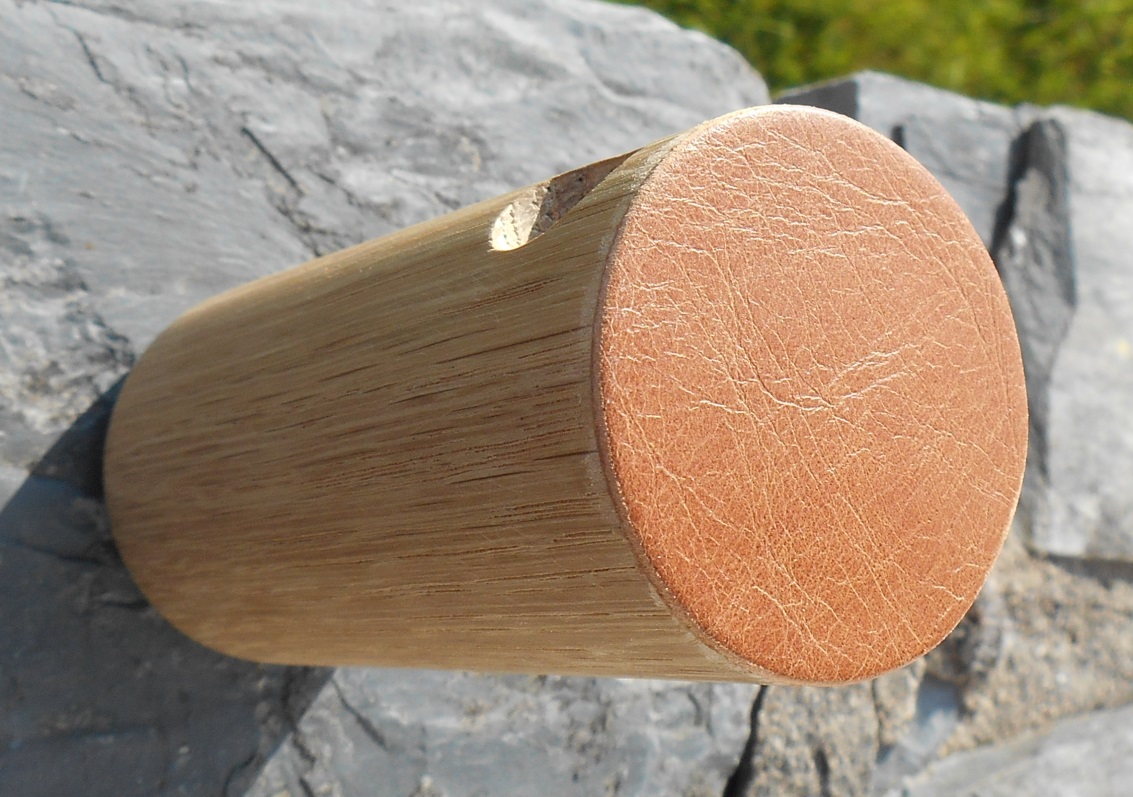
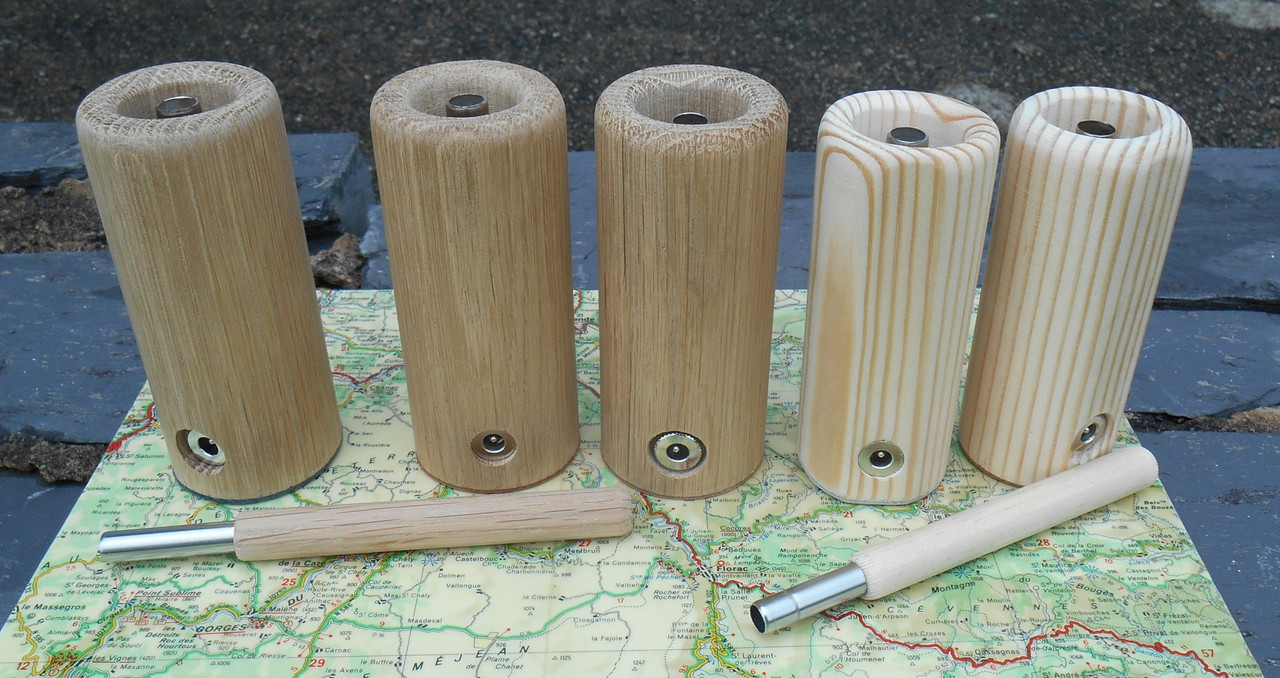
The oak handrail arrived on Thursday afternoon. 1.2m in length and 4.5cm in diameter.
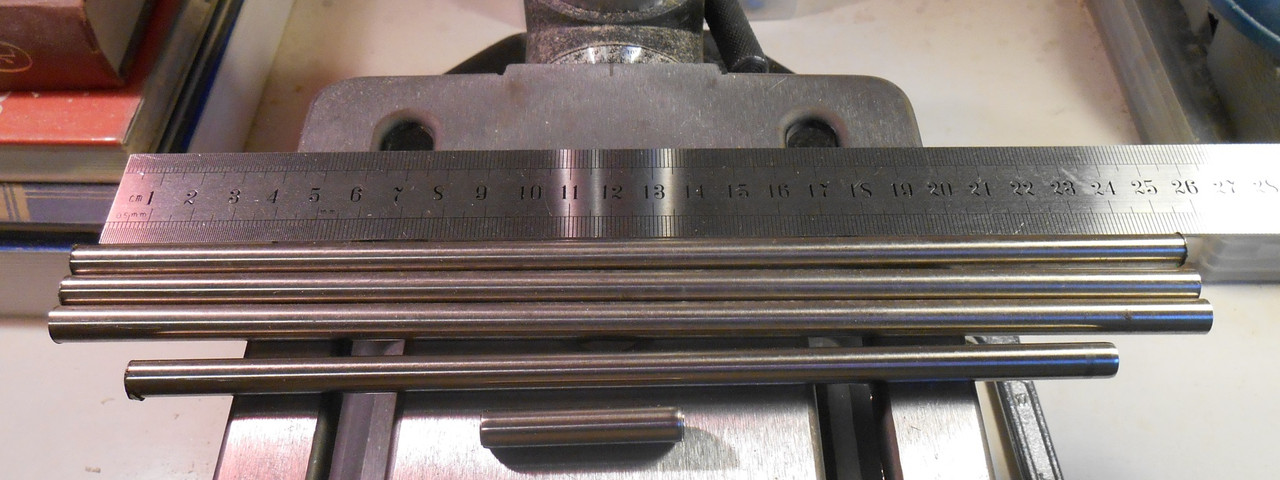
So about ten blanks if I want that many.
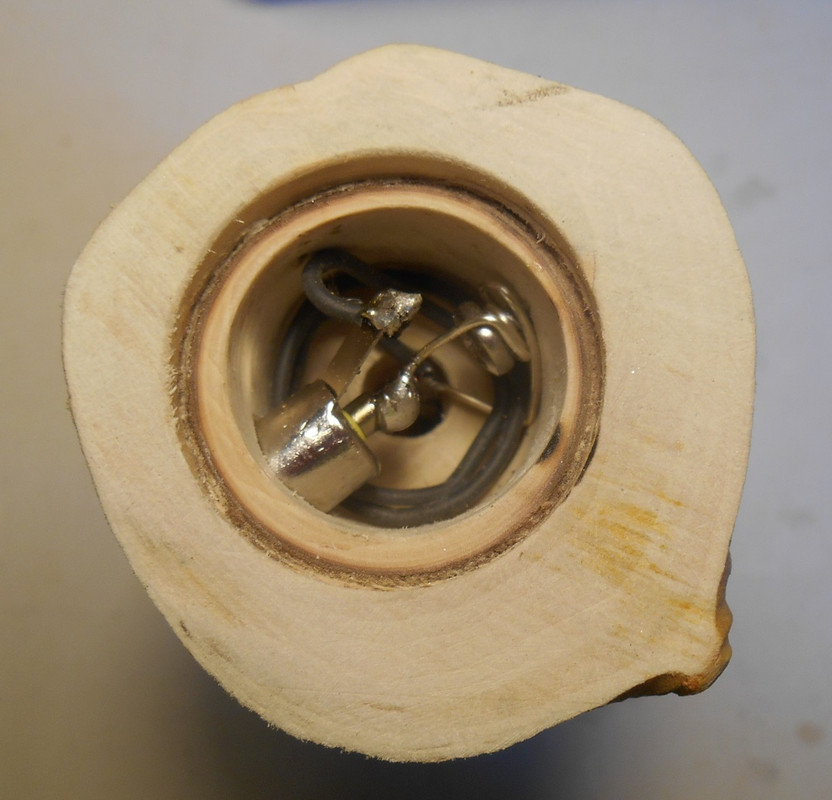
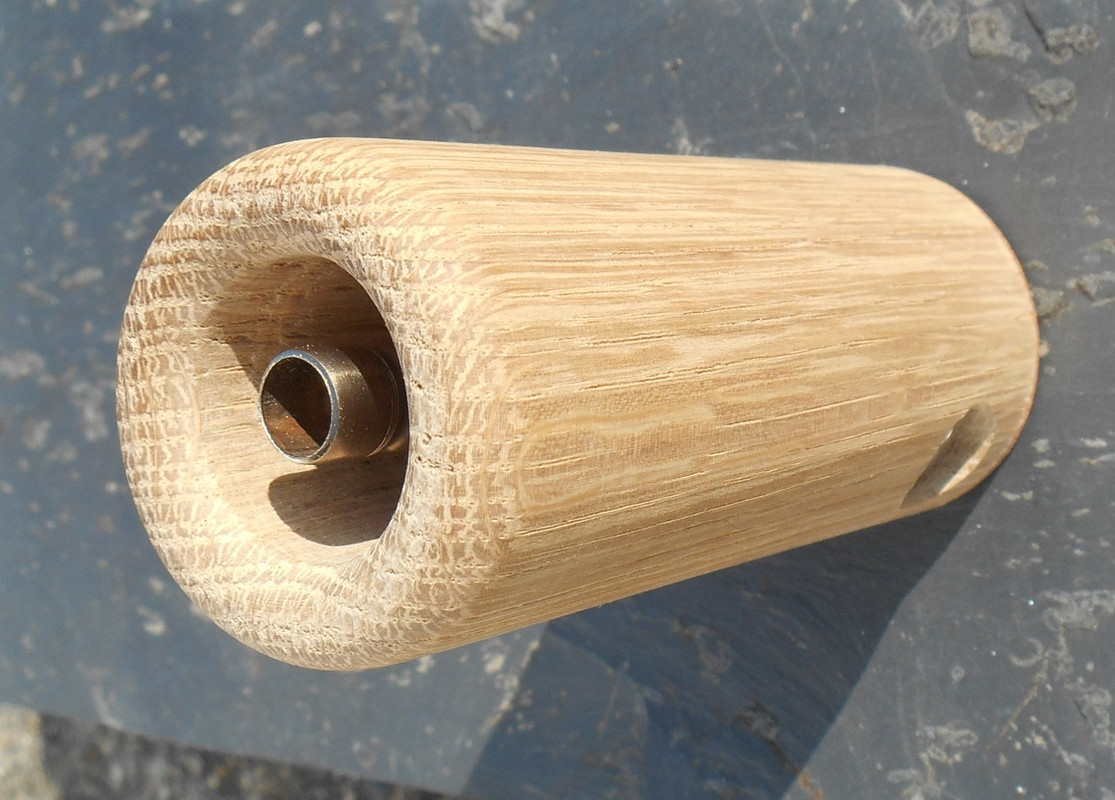
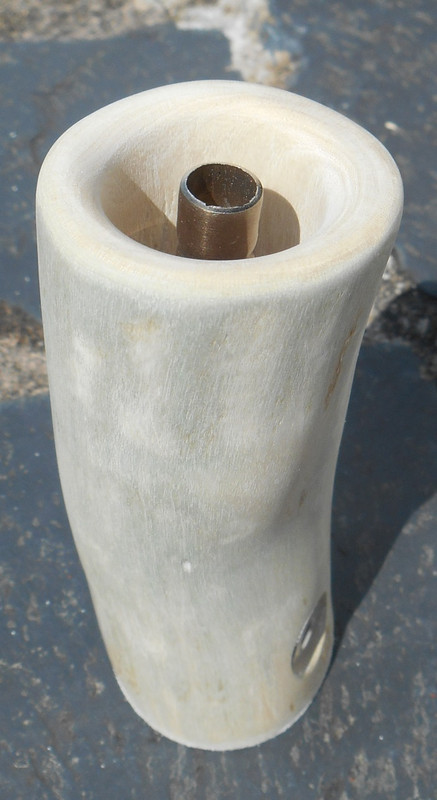
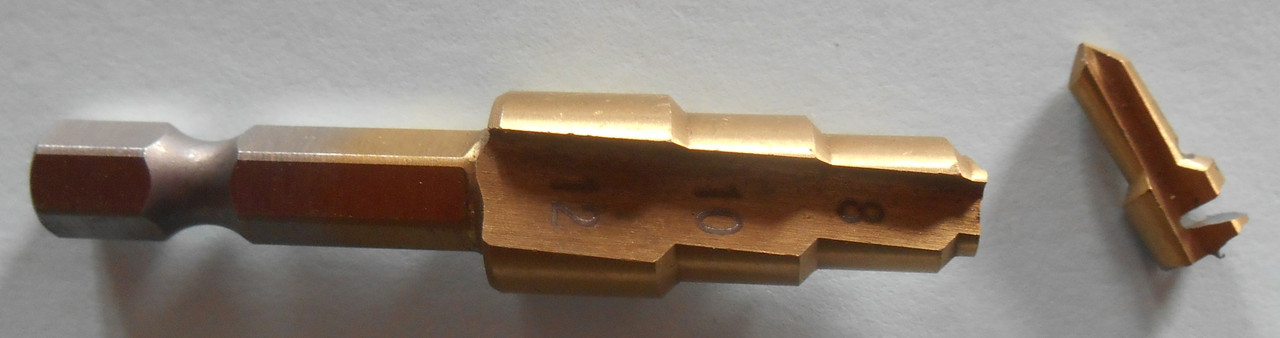
Had the first unit plugged in by yesterday evening (I'd already made a few heater covers)
and gave it a 10 hour test run before sealing the base today.

Oak-1-and-stem.jpg

Oak-1-top-down-2.jpg

Oak-1-leather.jpg

Oak-1-top-side.jpg


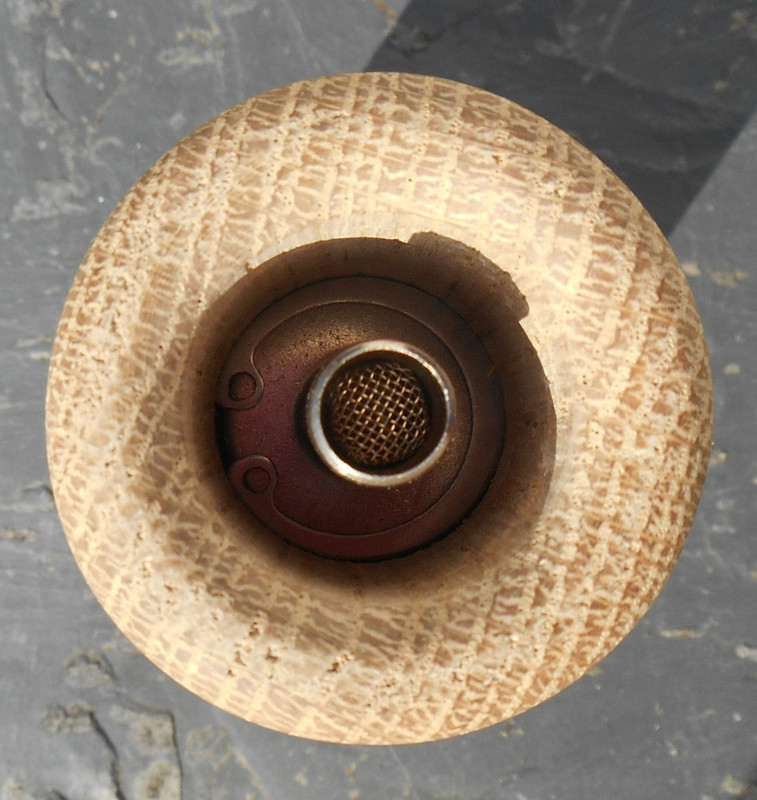
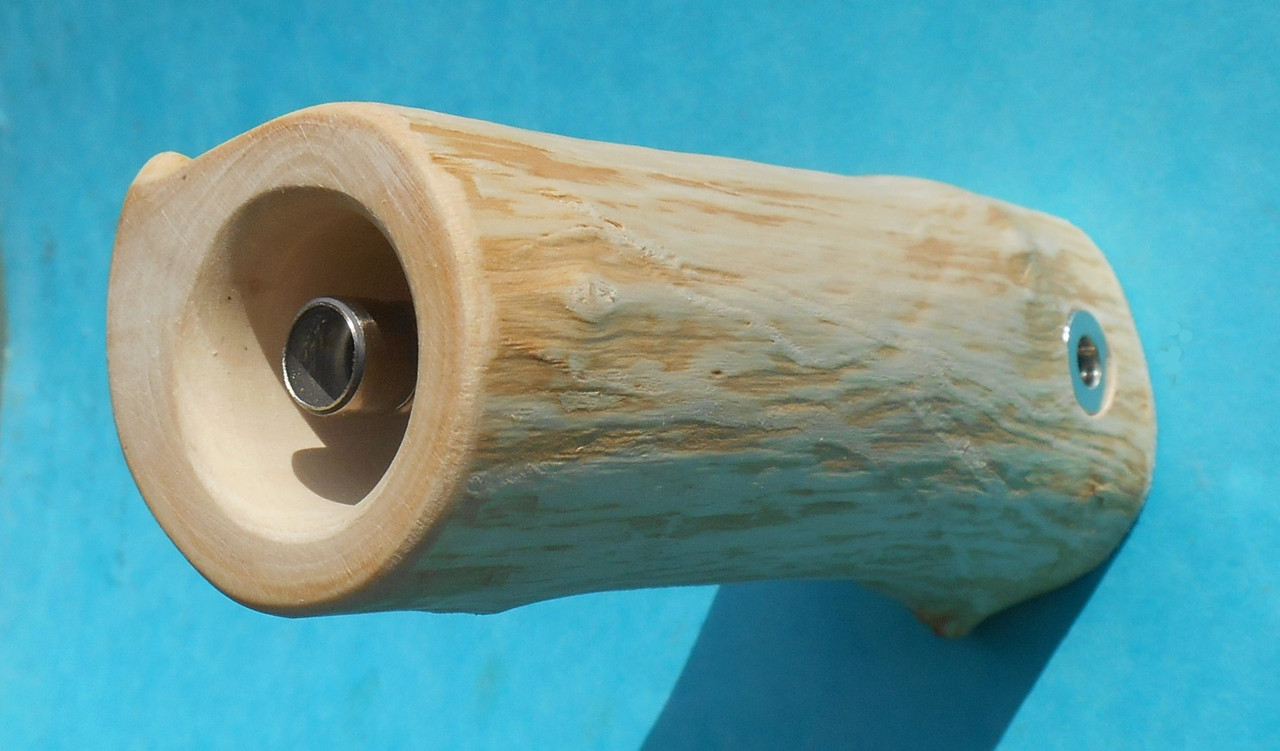
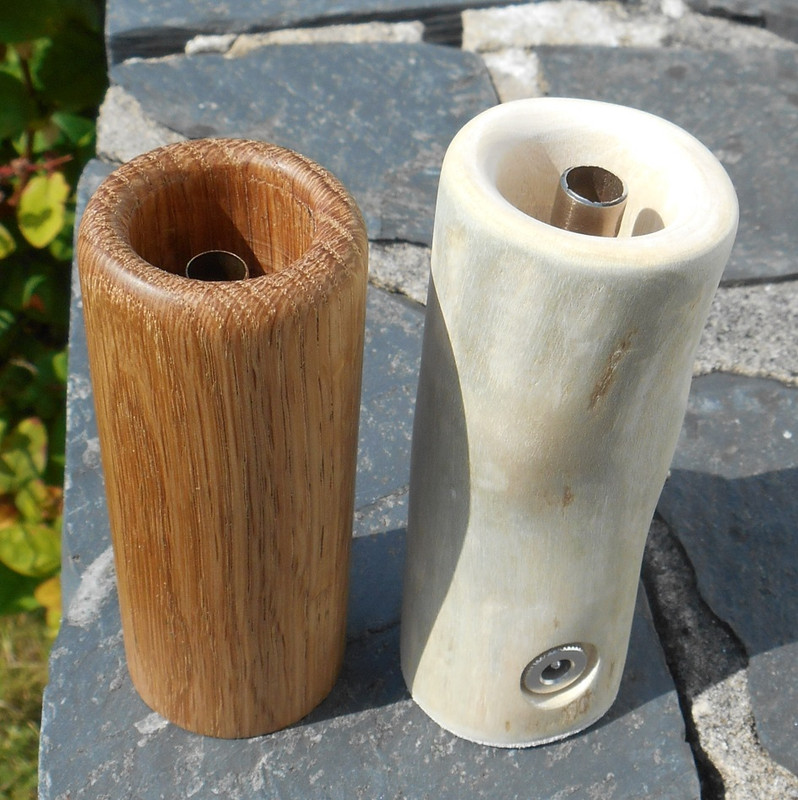
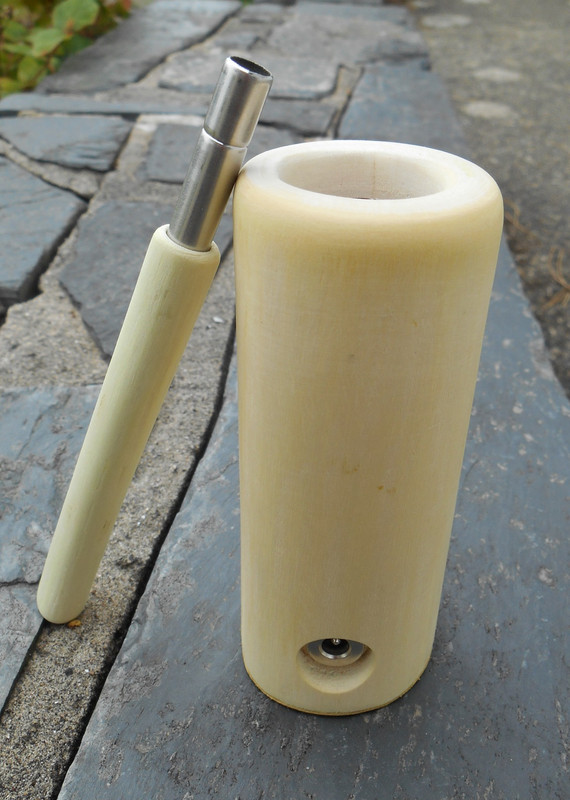
Used a stainless steel circlip for the heater well as you suggested, @blokenoname, and it does look
better. These's a satisfying heft to the oak that you just don't get with the lighter woods. It's
definitely a solid log :nod: Oh yes, and it works really well, too :tup:

Keep thinking I must have a go at a halogen log soon. Got plenty of blanks to mess up, anyway :)
 

brainiac

log wrangler
OK - hands up who's got a log made from a section of ivy stem, the shape of a lumpy, truncated banana
with the complexion of a medieval plague victim?
Hmm.. so that's just me then?

Ivy-6.jpg


They don't come much more 'rustic' than this :).
Here it is with one of @blokenoname 's handsome oak Mistys for comparison:

Ivy-and-Misty.jpg


As you can see the ivy unit's not going to win any beauty contests but it does feel very comfortable
in the hand...

Ivy-hand-2.jpg


... and rigorous testing has confirmed that it certainly does the job :nod: :science:

Have got a ton of other stuff on atm so it might be a while before I can get back into the workshop.
Must try to do something 'sensible' next time :D.
 

brainiac

log wrangler
Now this might be just me but centering the jack plug connector in it's recess has been a major PITA.
Other than sanding, it's the final part of the woodwork. So to mess it up at that point is especially annoying.

Up to now I've been drilling the recess with a 15mm forstner bit - then drilling thro into the base well
with the 10mm bit. But getting that 10mm hole exactly central to the 14mm recess has given me a load
of problems. And I've tried several of ways of doing it.

Anyway, here's the solution that I've come up with: use a step drill bit.
This allows you to drill both a 10mm hole for the barrel of the connector and, in order to
recess/countersink it, a 12mm hole for the head of the connector at the same time. Foolproof :)
One slight problem. The standard bit is too long and will drill a hole in the opposite wall of the log.
So I cut off the surplus part with a dremel.

Cut-step-bit-4mb.jpg


Here's a test piece. The connector looks tidy, snug and, importantly, central within the recess.
I tapped a thread in the 10mm section and screwed the connector in.
The stainless steel is, as usual, reflecting the colour of the camera.

plug-zoom.jpg


Still working on the rustics. Hope to get more done soon.
atb.
 

brainiac

log wrangler
Thanks Dave and Megaton.
The step drill bit method also works for stems. Even if the thro hole is accurately centred the countersinking for the ss tip can very easily go awry. This not only looks jarring but also
significantly weakens the stem on the 'thin' side.
I put a step drill bit to work on this one - the first ever Rustic stem :).
Decided to make a matching stem for the Sycamore unit and it came out OK.

Sy-stem7.jpg


Nature abhors a vacuum and she don't like straight branches much either. Took some time to find
a length straight enough and of the right diameter (half inch or 12.5mm when stripped of bark).
There's a slight bend in this one and it broadens out a bit towards the ss tip but it's perfectly
functional and compliments the log rather nicely.
 

brainiac

log wrangler
Here's the latest batch out of the 'Log Lab' as I like to call it (or 'the spare bedroom' as Mrs B calls it:shrug:).

I've got plenty of pine and oak handrail that needed putting to good use. The pine is shamfered, only 40mm in diameter and lightweight. The oak, by contrast, is properly round, 45mm diameter and as
solid as, well... oak.

log-pile.jpg


1st on the left's got mixed wiring. Tin plated copper wire - which is rigid enough to hold the resistor in place in the heater cover - and teflon coated wire at least double the length it needs to be with the excess coiled in the base. I've been unhappy about how hot the connectors have been getting on my units and this is an attempt to address the issue. Dave @underdog generously advised me on how to do something about it and I've incorporated as much of that advice as was practicable given my set up.
And it works :tup:. After running the unit for an hour I took the jack out and held a finger against the connector - it was just warm.
Many thanks Dave :rockon:

2nd and 4th from left both have the connector recess drilled with the step drill bit. Looks tidy and the connector is perfectly central.

That's plenty of handrail units for the time being. Now it's back to the Rustics :).
 

ubardog

Well-Known Member
Here's the latest batch out of the 'Log Lab' as I like to call it (or 'the spare bedroom' as Mrs B calls it:shrug:).

I've got plenty of pine and oak handrail that needed putting to good use. The pine is shamfered, only 40mm in diameter and lightweight. The oak, by contrast, is properly round, 45mm diameter and as
solid as, well... oak.

log-pile.jpg


1st on the left's got mixed wiring. Tin plated copper wire - which is rigid enough to hold the resistor in place in the heater cover - and teflon coated wire at least double the length it needs to be with the excess coiled in the base. I've been unhappy about how hot the connectors have been getting on my units and this is an attempt to address the issue. Dave @underdog generously advised me on how to do something about it and I've incorporated as much of that advice as was practicable given my set up.
And it works :tup:. After running the unit for an hour I took the jack out and held a finger against the connector - it was just warm.
Many thanks Dave :rockon:

2nd and 4th from left both have the connector recess drilled with the step drill bit. Looks tidy and the connector is perfectly central.

That's plenty of handrail units for the time being. Now it's back to the Rustics :).

Very Very nice. I bet every where you socialise has a Log there :D

Are you still using Tube sourced by Bloke or have you found a UK supplier ?
Also are they all Resistor log or have you tried with Cartridge heaters ?
 

brainiac

log wrangler
Thanks @Megaton . Did you try Bloke's screw heatsink method and did it work?
I should give it a go. An additional advantage of having one of the wires insulated is that there's
less chance of shorting and the thru hole can be narrower.

I bet every where you socialise has a Log there :D
Ha! They will have by the time I'm finished. Trouble is too many people still combusting :(

Here's the 10mm OD x 9mm ID ss tubing I'm using for heater covers:
https://www.amazon.co.uk/gp/product/B07BT1NLTQ/ref=ppx_yo_dt_b_asin_title_o05_s00?ie=UTF8&psc=1
and here's the 8mm OD x 7mm ID tubing for stems.
https://www.amazon.co.uk/dp/B07C126JST/ref=pe_3187911_185740111_TE_item
This hasn't arrived yet - I only found it last week - will update you when I get it. Note that the wall thickness of both of them is .5mm. A little thicker than that used by @blokenoname but still quite workable. Also, they come from China so delivery can take weeks. Still using only the resistors - they just work so well. I do have a cartridge lying around, tho, so I should try it out.
 

brainiac

log wrangler
@ubardog
Here's that OD 8mm ss tubing. .5mm wall but cuts easily enough.

8mmODss.jpg


It arrived this morning. Checking the dates I see that I ordered it on the 25th May. Very glad to have found a (cheap) supply as I was running out of the pipe that Bloke kindly gave me. The quality's good but watch out for the nasty jagged bits at the ends :o.
Good luck with the log building.
 

ubardog

Well-Known Member
Let me know when you have one up and running please. I have some Ti gr2 10 mm - 1mm thick wall That I used for dynavap stems. I have about 300mm spair but Things got in the way- spout of illness a move ect the DIY log took a back shelf for a while. Then I got a 2nd hand E-Nano and I kinda stopped with the log made my stand . Not even finished the stand yet either. Lazy days :D

L8z
 

brainiac

log wrangler
The toil continues here in the log lab at Brainiac Towers and here's Rustic #4.

Top-3.jpg


It's applewood with little more done to it than the removal of the bark.
Growth rings are just about visible at the top.

Base-well-wiring.jpg


Cut a step in the base well with the 30mm forstner for the plug and as you can see I've chucked the kitchen sink at the wiring. It's the 'hybrid' option with tin coated copper wire to hold the resistor in place and teflon coated wire coiled inside the base well. Additionally, there's the screw on the right with extra tin/copper wire wound around it. Just checking the connector to confirm... yep, it's barely warm :)

base-close-up.jpg


Closed up the base with some off-white leather. It's a tall unit at 11.5 cm. The wood is dense and heavy. The exterior is coarse but at the top, where I've sanded it, it's silky smooth.

@ubardog that 8mm OD ss tubing I mentioned is what I'm using for stem tips. The 10mm OD for the heater covers I've been using for a while now. Both have a 0.5mm wall.
Not sure if that answere your question - if not let me know. Btw, what are you using to cut the titanium tubing? I bought some 1mm thick ss tubing (against @blokenoname 's advice, it has to be said) and it's too tough for my tools.
 

ubardog

Well-Known Member
The toil continues here in the log lab at Brainiac Towers and here's Rustic #4.

Top-3.jpg


It's applewood with little more done to it than the removal of the bark.
Growth rings are just about visible at the top.

Base-well-wiring.jpg


Cut a step in the base well with the 30mm forstner for the plug and as you can see I've chucked the kitchen sink at the wiring. It's the 'hybrid' option with tin coated copper wire to hold the resistor in place and teflon coated wire coiled inside the base well. Additionally, there's the screw on the right with extra tin/copper wire wound around it. Just checking the connector to confirm... yep, it's barely warm :)

base-close-up.jpg


Closed up the base with some off-white leather. It's a tall unit at 11.5 cm. The wood is dense and heavy. The exterior is coarse but at the top, where I've sanded it, it's silky smooth.

@ubardog that 8mm OD ss tubing I mentioned is what I'm using for stem tips. The 10mm OD for the heater covers I've been using for a while now. Both have a 0.5mm wall.
Not sure if that answere your question - if not let me know. Btw, what are you using to cut the titanium tubing? I bought some 1mm thick ss tubing (against @blokenoname 's advice, it has to be said) and it's too tough for my tools.


You know what I think I prefer the natural wood with nub's and all! Even when I compare it to some of the top shelf logs of the top dogs of logs.

I was asking about the thicker walled tubing.
Does the resister cope with the extra thickness?
Does the Log still preform the same way?
My fear was it would lose to much heat to quick.

As for cutting the Ti. I used a hacksaw and file. I have also used an angle grinder on it no prob's.
 

brainiac

log wrangler
Hi @blokenoname
Big thanks for the kind words. That applewood unit wouldn't be there without the tutorials you've posted here and the advice and practical help you've given me personally :nod::clap:

Yep, that step drill bit idea might just earn me a brief mention in The Complete History of Log Making if
it ever gets written :)

@ubardog The oak and pine handrail units have their attraction but the Rustics are my favorites too.
That said, there's always room on my desk for a log thats been turned on the lathe by a real craftsman.
The rough and the smooth. Variety is not merely the spice of life - it is it's very essence.
I'll post some more pictures of this one over on the wood and log encyclopedia thread tonight or tomorrow.
To answer your question about the tubing: I havn't been able to detect any difference between
the .5mm walled tubing that I use now and the tubing Bloke gave me which was .3mm (I think) in terms of heat output. After considerable testing, tho, I can certainly confirm that the .5mm units roast the herb to my satisfaction :):science:
 

brainiac

log wrangler
More strangeness from the log lab at Brainiac Towers...

In a post from Jan 2016 @phattpiggie mentioned a wood treatment process called ebonisation.
Basically, you dissolve some wire wool in cider vinegar and then paint the resulting fluid onto wood.
Or in this case a drilled blank. I'm still far from sure that I like it but it's definitely different.

ebonised-and-stem-4.jpg


It reacts with the tannin in the wood and so has a strong effect on oak. Might try it on some other wood types but on scrap pieces first :nod:. Apparently, it was used a lot in Victorian times to make cheap wood look more expensive. Perhaps that's why it looks distinctively old fashioned. And Gothic.

The silicon coated wire is a bit thicker than the last lot so it's a bit crowded in that 25mm base well. Doing the soldering in there is tricky enough at the best of times. Note the wire wound around the screw, three loops. Also, by using the hybrid wiring, I've been able to narrow the pass-thro hole to 8mm without increased risk of shorting. All helps to reduce heat getting to the connector :tup:

ebonised-wiring.jpg


A hardboard plug sits on that step and black leather seemed the obvious choice to cover it with :)
The stem tip is made from OD 8mm x ID 7mm ss tubing fitted with, like the heater cover, a TTwisted screen.

Got an ash rustic in the works and a holly not far behind it.

Pity those old pics are deleted, phattpiggie. Might be worth reposting them?
 

ubardog

Well-Known Member
looking good Brain. If you looking for other effects Oak comes out looking really good when you burn it then sand the worst off , or just lightly scorch even make it patchy for a tiger bread effect ;p . It brings up the grain more. This process was an old treatment. I think its japaness. dunno for sure but i did it with a vapcap stem and it come out real good.
20190202-230111.jpg
 

brainiac

log wrangler
Was not particularly excited about doing a rustic unit in ash. There's plenty of it about but it's available as handrail and it's a fairly bland off-white wood. So it was a pleasant surprise when this one turned out to be quite interesting. I'm guessing that the markings relate to the cambium layer. They don't extend deeply into the heartwood but deep enough to allow the log to be sanded down to a glass-like finish thus giving it a strong tactile contrast to the previous, applewood, rustic.
Anyway, here's Rustic #5.

Ash-side-1.jpg

Ash-side-2jpg.jpg

Oval units permit a deep recess for the connector, tho an offset base well could achieve that on a round unit. Went with the hybrid wiring again. This time the silicone coated wire (24 gague, 0.5mm) was soldered to the 'top' resistor wire. Here's what it looks like in the base well. Pretty it ain't but the connector is cool to the touch :tup:

Ash-base-solder.jpg


Fits comfortably in the hand. 11cm in height, min width 4cm, max 5.2cm.

Ash-hand-1.jpg


Works fine, too :nod: but far more testing is required, ofc :).
 
Top Bottom