• Do NOT click on any vaporpedia.com links. The domain has been compromised and will attempt to infect your system. See https://fuckcombustion.com/threads/warning-vaporpedia-com-has-been-compromised.54960/.

VapCap Induction Heater for Desktop and in Car Use

Zoned89

Active Member
Already spoke with him, I’m gunna just get the jar setup next payday,
Seems like it’s what I need, I could always take it out of the jar and do a different housing, and I won’t gave to fiddle with anything.
Now I just gotta make due with smoking Becuase I gotta sent the xmax back and once it arrives they will send the vapcap.
 

Zoned89

Active Member
I have a Jarhead, and as long as you don't mind the plug it works just great. I have been very happy with mine which resides permanently at my vape station.
Would it be possible to use the jarhead in another way, like with a car charger?
Might just be easier to use a lighter for during the day... still stoked about an induction heater. I’ll be going with the jar for sure.
 
Zoned89,
  • Like
Reactions: ataxian

Prophecy

Well-Known Member
@Rollingstoned I have this info from @Pipes FAQ Doc so I copy and past it. The Portside Mini has a 800mAh battery and when I right remember I think he is going out from 3 heating cycles per bowl

"To help you decide on size, the math works out to approximately 80 mAh per bowl. So, the 800 mAh battery provides 10 bowls and the 3000 mAh would be around 35 bowls."
 
Last edited:

DeeCee5

Livin' La Vida Loca in FL
For those of you who have asked for a comparison between the Portside Mini and the Flux Deluxe, I posted a Flux Deluxe specific review at: http://fuckcombustion.com/threads/f...eaters-for-dynavap.33573/page-31#post-1352700.

However, I couldn't forget @Pipes and my IH peeps, so here is the Portside Mini focused comparison review:

As noted in my Flux Deluxe review; My apologies for any errors. My calibers came from Harbor Freight, my scale from Amazon and the stop watch courtesy of Windows 10.

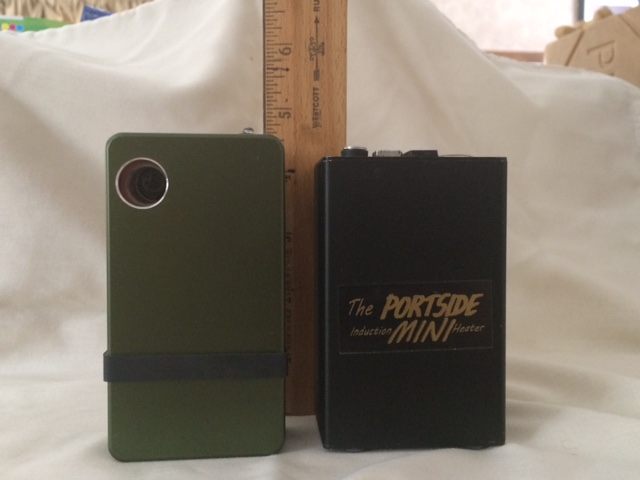
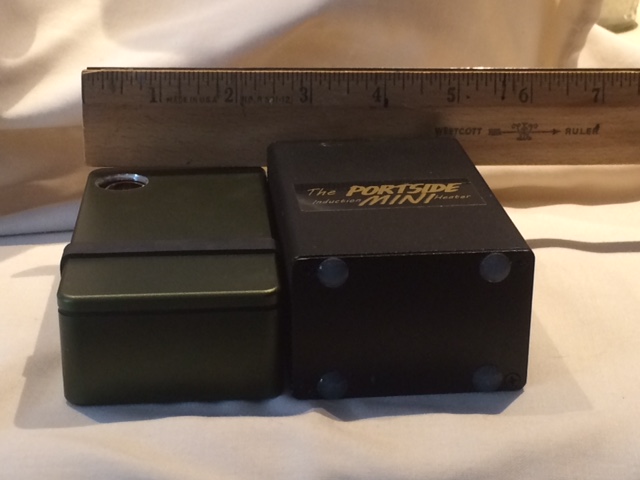
The biggest surprise is the size and weight of the two units are similar.

comparison-Table.jpg


While both units are similar in size and weight, the Flux Deluxe felt more compact.
This may be because the dark green aluminum 1590B enclosure that the Flux Deluxe uses is more expensive and attractive to look at. I would most likely grab the Flux Deluxe if I was leaving the house to go out with friends for the evening or on a trip away from home.

For home use; I would most likely go to the Portside Mini as the location of the IH coil makes it taller and easier to reach when on the coffee table. I also like that the red IH indicator leds are integrated onto the glass tube.

Each of these units appears to be well made and each will make a fine Induction Heater for the Dynavap. Each unit will have a proud place and frequent usage in my home.

For the engineers among you, here are some details on the Portside Mini
Portside Mini
Dimensions:
Height = 3.9” (100mm)
Width = 2.6” (66mm)
Depth = 1.7” (43mm)

Accessories:
Comes with 12V charger

Observations:

Exterior:
Black Aluminum case. Top and bottom of case are secured with screws.

Top of unit has the following: Power Button, magnet, 12v input, better than nothing battery gauge.

Where the opening for the glass insert was drilled, the edge of the hole was deburred and the hole was touched up to match the black case -no bare aluminum is showing.

Inside:
14 awg wire makes up the coils along with a 2mm thick glass tube.

ID of coil is 16mm.

Heating of Dynavap is done using momentary switch that is wired with red led indicators at the bottom of the coil/tube.

Momentary switch has a .25” wooden dowel on top of switch for protection.

ABV:
As the picture shows, the ABV from each look similar. I really couldn’t tell any difference with the Dynavap between the two Induction heaters.

avb.jpg


Comparison Pictures:
Length:
FDv-PM-Length.jpg


Width:
FDv-PM-Width.jpg


Depth:
FDv-PM-Depth.jpg
 

muunch

hotboxing the cockpit
Thanks for the comparison!

I was eyeing the Fluxer Heaters, but saw a PSMini pop up on entexchange the other day and had to grab it.

Received it today and am pleased so far! I honestly had thought the FH was much smaller than the PS Mini, and I'm kinda over carrying tons of batteries, so I'm glad I got what I got.

Anywho, dumb questions that have probably already been answered inbound!

Is there a car charger I can get?

And

How do I precisely read/use the battery meter? Is a battery replacement possible if performance drastically decreases over time?

Thanks, and cheers. This absolutely revitalized my VapCap use
 

DeeCee5

Livin' La Vida Loca in FL
Thanks for the comparison!

I was eyeing the Fluxer Heaters, but saw a PSMini pop up on entexchange the other day and had to grab it.

Received it today and am pleased so far! I honestly had thought the FH was much smaller than the PS Mini, and I'm kinda over carrying tons of batteries, so I'm glad I got what I got.

Anywho, dumb questions that have probably already been answered inbound!

Is there a car charger I can get?

And

How do I precisely read/use the battery meter? Is a battery replacement possible if performance drastically decreases over time?

Thanks, and cheers. This absolutely revitalized my VapCap use

Until @Pipes answers the thread, I'll give you some information that I've discovered from his FAQ IH document: https://docs.google.com/document/d/1_202eBzWeF7rkTjqV5sWumPxtbSNtfjqOZEs1i9d16k/edit

1. I would double check with Pipes if this charger can handle the PS Mini, but the document above does reference a recommended car charger; https://www.aliexpress.com/item/12-...32826058550.html?spm=a2g0s.9042311.0.0.eOtYl5

2. Pipes built the PS Mini in a module fashion with connectors that make assembly/disassembly easy. See the following video that he created on opening the PS Mini;

Replacement batteries for the PS Mini can be obtained from Hobby King; https://hobbyking.com/en_us/turnigy...light-compatible-eflb0995.html?___store=en_us
 

Pipes

Addicted DIY Enthusiast
Accessory Maker
Howdy. Yes, the same chargers can be used for either unit.
To measure the battery, it's best to measure while you have the VC inserted. This puts the battery under load and will measure lower on the readout. These gauges are the same as most gauges and just measures voltage.
You get used to how to read it. :science:
 

asdf420

Well-Known Member
how many amps is the power supply? The charger died while using the PSmini plugged in, guess it wasn't charged enough. it's the same 5.5X2.1mm for PSmini and the jarhead? I need to clean it and stuff too, it takes too much force to activate.
 
asdf420,

asdf420

Well-Known Member
Does the charger have positive center polarity? mine died, it just blinks red. I should clean the PSmini too, it takes too much force to activate.

Anyone got a link to a good cheap power supply for the PSmini? (for use without a battery) i assume the same PSU as the jarhead's would work? Just can't find a link to it

edit: sorry about the double post, i couldn't edit the last one
 
Last edited:
asdf420,

Pipes

Addicted DIY Enthusiast
Accessory Maker
Please contact via PM for individual failures and troubleshooting. :cool: Yes, center pin is positive.
PSM has a charger and JH has a power supply. Not interchangeable. Also, cleaning does not make the switch easier to push.

As for general mechanical switch maintenance, I've made an instruction doc for this and will add to the instruction sheet once finalized.
Here is the first run at it:

Tactile switch maintenance and cleaning for Rhinestone vintage IHs.
The tactile activation switch is a heavily used mechanical mechanism in this unit and may need adjusting and periodic cleaning. Adjustment of the outer retaining ring is critical as it functions to help keep the top heat insulator in place on the top of the switch as well as prevents the switch from been pushed from side to side.
Misadjustment will show up as switch taking too much pressure to activate which indicates it is resting too low and bottoming out. Usually caused by a VC inserted without a cap on it.
First thing is to make a little jig using a paperclip. Unbend a paperclip and fashion one end into a small hook. This is needed to insert into the glass hole and past the rubber outer ring and twist to position the hook under the bottom to assist in pull it up. Work one side at a time to bring up evenly moving about 1mm at a time. Do not yank too hard as will break the switch. Ideally, the correct position is they have the top of the rubber sleeve rest between the tactile switch top and the top of the rhinestone.
If it is resting too high, you will see a small puff of smoke and smell of burning rubber when heating a VC.
A wooden skewer can be used if need to push down some. Note that sometimes smoke may be observed but will clear by itself after a couple uses. This is just if its a small high spot and it will lower by itself from the heat.
Cleaning can be done with ISO and a Q-tip. However, care must be taken not to push against the outer rubber ring as will push down and cause a hard to push switch and will need adjusting as per above.


Hope this helps. ;)
 
Last edited:

Pipes

Addicted DIY Enthusiast
Accessory Maker
I believe you're asking about powering via a car's accessory jack..?
Your car battery has enough power for sure. A Bare Bones or Jarhead will work fine. Only concern lyes with the accessory plugs nipple. Because of the high current, this contact point for the plug is very important and needs to be a good quality plug as this contact will get hot if not well connected. I speak from experience with this exact setup. If it gets loose, the end will heat and melt which will cause permanent damage in the accessory port. If wanting to go this route, I highly recommend a direct wire to the fuse box and have a 5.5x2.1mm plug on the other end for the IH.
Also, a safer route is to use a battery powered unit and get a car "charger" for insurance of not being left with a dead IH unit. They can use the accessory jack just fine.
:science:
 

sk8man121

Frozen_Vaporent
Hi folks, it's been a while since I've posted in here! Still using my portside mini on the daily, although I've noticed some black burn marks on the dowel where the vapcap is inserted. See below:

xb0qc8.jpg


I haven't looked back to see if anyone else has reported this, but is it normal? Any risk of inhaling toxic fumes as a result or otherwise damaging the device? I usually pull the vapcap as soon as the second click occurs.
 

Pipes

Addicted DIY Enthusiast
Accessory Maker
Come on now, that one is just getting warmed up. I've seen them completely charred black and harder than rock. The darker the wooden heat shield gets, the harder it becomes. The same idea as our ancient ancestors did with their spear tips by putting in the fire.
Show us again next year. :D
 

sk8man121

Frozen_Vaporent
Come on now, that one is just getting warmed up. I've seen them completely charred black and harder than rock. The darker the wooden heat shield gets, the harder it becomes. The same idea as our ancient ancestors did with their spear tips by putting in the fire.
Show us again next year. :D

Fair enough.
 
sk8man121,

kamile

New Member
Greetings,

As a long time follower and first time poster, i want to thank you everyone for the great community.

And pipes, you are not only a visionary but also a generous... bah i cant praise you enough anyway, i need your help.

i made 2 pipes induction heater before and i decided not to use a tactile switch at the 3rd one because i couldnt make an efficient way to use of it and i'm bored of constant repairs. so i decided to use power switch with led lightining.

but i cant figure out how to use it. like i said it's all your design except the tactile switch. wiring diagram is below. any help is much appreciated.

aaa_zpstjfelw1e.jpg
 
kamile,

Pipes

Addicted DIY Enthusiast
Accessory Maker
The above diagram is all correct. Not sure what you're asking.
First off, the switch needs to be rated for at least 5 amp.
The markings shown are:
-,+ are the internal LED light.
C - common or center pole of the switch.
NO - Normally Open (used for this configuration)
NC - Normally Closed (not used here)
 
Top Bottom