'The Misty Log' - DIY wooden Log Vaporizer

blokenoname

DIY Log Dabbler 😁🪵💪💨💨💨
And...here finally comes the new Vapcap adapter :D
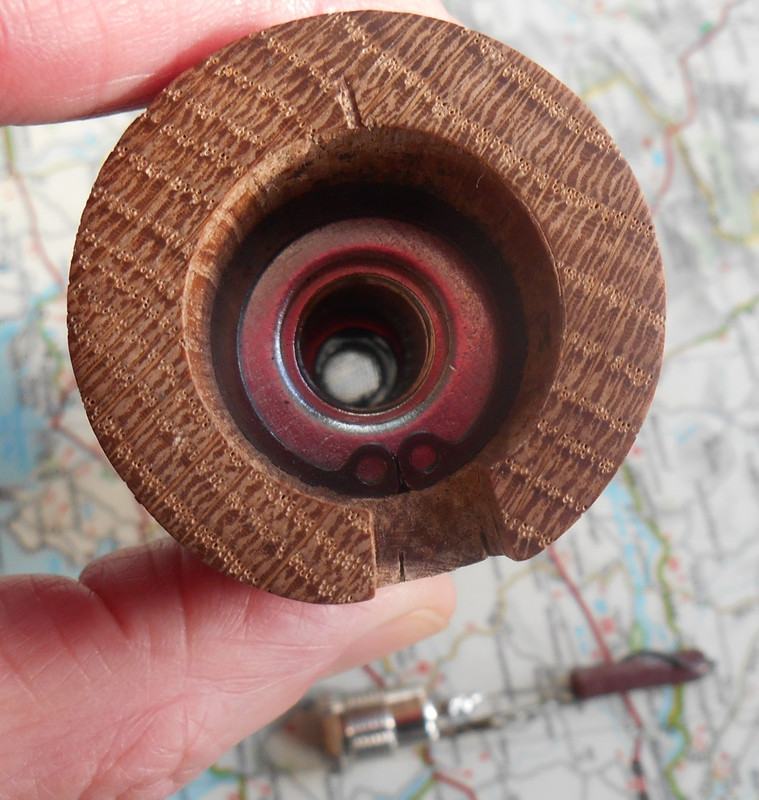
Ed had an 8mm step machined into his Woodscents heater cover, the Vapcap tip can rest on... and we just use a short 8mm ss standard tip, and slide that into the Vapcap tip itself (which of course has an inner diameter of 8mm), using the VC tip's own screen for a backstop and also let it protrude about 5mm, so that we can slide it into the Misty's heater port now. As the tip is quite long now, you can also add an additional DIY bucket screen for smaller loads.

Quite a nice & easy DIY mod that, as all you need is maybe a centimeter of 8mm x 0,3mm ss tubing there and can then use your Vapcaps not only with the Misty, but also with your Underdog and Heat Island/HI :evil::cool:

2lwvw93.jpg
 

Megaton

Well-Known Member
Awesome! Glad to see you got the heaters back in! I do love a resistor for the sheer simplicity of it, but i somehow feel the cartridges do have the edge in terms of performance, even if they don't have the same romantic nostalgia of the original logs!

And another ingenious innovation with the adapter there! Do they stay nice and snug in the vapcap tip? Last thing you want is for them to stick in the heater port with a load in :lol:
 
Last edited:

blokenoname

DIY Log Dabbler 😁🪵💪💨💨💨
And another ingenious innovation with the adapter there! Do they stay nice and snug in the vapcap tip? Last thing you want is for them to stick in the heater port with a load in :lol:
They do. Indeed, they do :D like with the other tips, the tubing is bent a bit out of shape at the back end, to provide a snug friction fit.

ETA: Also, I'm not averse to the 7,5w cartridge heaters. They do indeed work fine and have a bit more reserve, than the resistor heater and also have a bit larger diameter (6mm, where the resistor measures just 5mm), than the resistor, spreading the heat more evenly. It was just the problem of finding an EU retailer, having them in stock! But that little nuisance is solved now too :)

I'd also like to try the new 95 series resitor, @Alan is currently testing for his new, larger heater cover for the HI, but haven't yet found an EU source:

95vs25.jpg
 
Last edited:

brainiac

log wrangler
The big event chez brainiac this week was the arrival on Wednesday of the drill press.
Finished assembling and setting it up yesterday and.. switched it on today :D
Had some pine handrail/mopstick ready cut into blanks so I got out the forstner bits and 'had a go' :uhoh:
Took great care regarding safety issues but otherwise made every rookie mistake in the book :)
The first and main one was not having the section cut at right angles to the length.
If that's not straight then nothing else is going to be.
Fortunately, I've got 1.8m of this handrail and that's a lot of blanks :) - looks like I might need 'em :nod:

Anyway, here's the first drill press attempt at a Misty body.

side-view.jpg


The jack plug connector is just in there for show. The electricals are a whole other deal :)

top.jpg


That's a 50mm heater well. The heater screws onto the shelf.
Also drilled out the base to 20mm with the 25mm
Rounded off the top a bit by bolting the drilled blank into the chuck and sanding it.

Thanks again, Bloke. This thread is log builders heaven.
Plenty to do still ofc but things are certainly moving in the right direction :)
 

blokenoname

DIY Log Dabbler 😁🪵💪💨💨💨
@brainiac

Man, that is a much better first attempt, than I ever managed, when you go back to the beginning of this thread :clap: :tup:
I'm much more messy there at first, when I start out on projects like this :D

Heater cover and the electrickery should be really quite easy going now :nod:
 

brainiac

log wrangler
Well, look what the postman brought me this morning :D

Log-builder-s-kit.jpg


A log builder's kit :tup:
Drilled and undrilled blanks for me to mess about with, ss tubing (two different diameters), a variety of washers and cliprings and a complete heater cover :clap:

It's yet another fine display of Bloke's generosity :rockon:
This lot certainly moves my first working unit a lot closer.

Many thanks my friend - it will all be put to good use :nod:
 

Abysmal Vapor

Supersniffer 2000 - robot fart detection device
Well, look what the postman brought me this morning :D

Log-builder-s-kit.jpg


A log builder's kit :tup:
Drilled and undrilled blanks for me to mess about with, ss tubing (two different diameters), a variety of washers and cliprings and a complete heater cover :clap:

It's yet another fine display of Bloke's generosity :rockon:
This lot certainly moves my first working unit a lot closer.

Many thanks my friend - it will all be put to good use :nod:
Looks nice ! Reminds me of the old school Pandora kit that the PD offered back in the days :")) !
 

blokenoname

DIY Log Dabbler 😁🪵💪💨💨💨
Great, that the parcel still made it for the weekend! :tup:
Enjoy the experimenting :science: @brainiac :D
(and careful there with the bamboo body! Those little buggers really like to crack)

Meanwhile, I tested the aroma cup from the Air/Solo on the Misty, which is a perfect fit and so the whole flat smells like freshly cut tangerines right now ;)

Also pondering new ideas for fastening a glass heater cover, as I wanted to rig up a @MUSA Vaporizer style Halo Log for myself, set into one of the smaller Misty bodies. This will also be just a one off for proof of concept, as an additional Halo Log adds a bit too much diversification to the already existing variety of my log models ;)

ml1c7c.jpg
 
Last edited:

Abysmal Vapor

Supersniffer 2000 - robot fart detection device
@blokenoname Ha-ha i used a retaining ring in a similar fashion to prevent the glasscover from sliding off the bore ,it still will comeout if you pull hard enough, which is not entirely a bad thing,because i gets u rid of the need of the two-part concept. So this way i am getting easy access like with a simple 19/26 male joint just like with the two adapter concept :). By the way.. i finally figured out where the old issue with the buzzing sounds was comming from and it was dimmer relater as we thought,one just need to use dimmers in inaudible frequencies .
Is that an arizer aroma top ? I am using an Aromabulb from an old vapor tower one of my friends bricked back in the days.IT works great and looks beautiful on the halolog..
iu
 

blokenoname

DIY Log Dabbler 😁🪵💪💨💨💨
By the way.. i finally figured out where the old issue with the buzzing sounds was comming from and it was dimmer relater as we thought,one just need to use dimmers in inaudible frequencies .
Is that an arizer aroma top ?
Ja. Aroma cup from an Arizer Air. The EQ's aroma cup comes with a 19/26 female, so.... :)

I believe so, with the buzzing :tup: But also, lots of these tiny buggers are made for use with LED strips, which usually don't draw 3 amps or so. All of the buzzing ones are still in frequent use here now, as they're completely inaudible with the low wattage (7-10w) Log vape heaters I use, drawing maybe half an amp ;)
 
blokenoname,
  • Like
Reactions: Megaton

Abysmal Vapor

Supersniffer 2000 - robot fart detection device
@blokenoname I believe the Arizer Air aromacup has a hole on the bottom,therefore it is useless in my scenario ,or am i wrong ,i might got confused by the photos initially when i was looking into those? I am talking bout vaping essential oils here.
Edited:..
Well i definetly see a hole :).
arizer-extreme-q-aromatherapy-dish2.jpg
 
Last edited:
Abysmal Vapor,
  • Like
Reactions: Megaton

blokenoname

DIY Log Dabbler 😁🪵💪💨💨💨
The small cup from the Air on my pic doesn't have a hole. The big one from the EQ (that's the one in your pic) has, though. But I just soak a bit of cotton in the oil anyway and then put that into the cup.
 
Last edited:

blokenoname

DIY Log Dabbler 😁🪵💪💨💨💨
Preparations... :hmm::science:

Needs some glass cutting and probably also some filling of the swear jar, but in principle should do... :borg:

2u7b034.jpg


Edit: Cliprings didn't fit snug enough. Reverted to a cork base, which works fine. As the heater cover finds its natural stop on-top of the DC jack, it can't be pushed further in accidentally anyway and fir ripping it out, you'd need to apply a bit of force on purpose, I guess.

Otherwise, it's working as expected. Tested it at 11,5v with the GonG with a flat screen and it milked the bong quite nicely and fast, though I just covered the screen with a thin layer. Stirred once and the avb was well extracted. Light to middle brown, not as dark, as you'd get from a ss tip, of course.
Also seems to need that voltage, to work well, as the joint & heater are competley extruding from the body, with only the glass itself for insulation.
Couldn't make it work with the other, longer GonG & the ELB though, for whatever reason. Maybe it didn't seal right within the GonG... don't know :shrug:
Works fine with the shorter GonG and screen.

And frankly... for me personally, this was already overkill :p
This thing can make a real lot of clouds :sherlock::rockon:

As this is just a one-shot proof of concept anyway, all's a bit off, center wise ;) Did the great No-No of applying a bigger Forstner bit to widen an existing hole, which is guaranteed to be off centre, as the bit has nothing to center on :p
Also wouldn't trust the unit running 24/7, with a thin shell, like this. It's first centimeter is getting quite hot. Maybe best to run it at about 6v, when you want to run it continously and only ramping it up to 11v+ for a session then.

qoer9z.jpg


ndosp1.jpg
 
Last edited:

blokenoname

DIY Log Dabbler 😁🪵💪💨💨💨
Ooops... forgot the tech specs:

Heater is a 12v/35w Osram halogen bulb. You'd need a 12v power supply with at least 3A here. Using one with less amps (like the ones we use with the 7w Logs), you'll risk damaging it or even a meltdown.
 

blokenoname

DIY Log Dabbler 😁🪵💪💨💨💨
Well, the concept is the MUSA's, but brilliant it indeed is :cool: :lol:

It's more meant to be used with the WPA only, as it's quite hard to block the glare for use with a dd stem. A 10mm OD glass tube or a Vapcap tip could be used for a dd stem, I guess. Sealing with an o-ring.
 

brainiac

log wrangler
Well, after much strenuous testing:science::science:, here’s my review of the latest Misty log vape.

Friday, January 11th - tracking info indicated immanent arrival of the new oak Misty. Pm’d Bloke: “…the runway’s clear and the landing lights are on” - and it’s been my daily driver since it touched down.

This is certainly a different log from the mahogany prototype beta. It’s new in terms of both function and appearance but let’s start with the old bits. Heat is provided by the stalwart Ohmite 7w/20ohm resistor which takes its power from 12v DC adapter via a 2.1mm jack plug. That’s it. The rest is new.

The heater cover is now screwed into place. Mahogany’s hc was held down by a ringclip and washer. Now the washer is screwed into the body of the log. Drop it? No problem. There’s also an additional washer over the screws just to keep the heater well looking nice ‘n tidy. Jackplug connector is now within the base well with a ‘mousehole’ type entry point for the power lead. I was a little unsure of this arrangement at first. Did it affect the stability of the unit? And how does it look? Well, stability is fine, not an issue. And what you see in there is stainless steel and oak – so no problem there, either.

review-empty-log.jpg

The red colour is the ss reflecting the colour of my camera :shrug:

I took the heater out today. The heater and jack plug connector assembly unscrews with just a pair of pliers thanks to a small modification to the connector. This means that in the highly unlikely event that the heater fails then it’s easily replaced. Alternatively, you could swap the resistor for a cartridge. A ‘by-product’ of this arrangement is that you can adjust the height of the resistor/cartridge by some 5mm in order to fine tune the unit’s heat output. This all adds up to a generous helping of optional modifications that can, if it suits you, dial the unit’s performance in to exactly where you want it. Btw, heater and connector went back in as easily as they came out.

review-heater-out.jpg


I really don’t feel the need to describe, in any detail, this unit’s ability to produce vapour. The means by which the herb gets cooked are pretty much the same as the earlier model and I covered that in a previous review. I’ll just say that extraction gets the full five stars.

Being made of oak means that it comes with it a host of comforting metaphors. This Misty is taller than its mahogany iteration and the wall thickness is greater. As a result of these changes the heft is also - satisfyingly - greater. The mahogany unit had all the functionality that you need from a log, but the oak combines this with a physical appearance that has positively enhanced my living environment.

This is a first class log vape and it deserves to be out there providing a first class service to a wider audience. My hope is that it gets the chance to do just that.

@Bloke – I didn’t run this past you prior to posting so if you need to correct any of the technical details I’ve covered – I won’t be offended :)
 

blokenoname

DIY Log Dabbler 😁🪵💪💨💨💨
Great review there again, @brainiac :clap:
Many thanks, man! Really happy and exited here, to see you enjoying the new design that much :) :tup:

There werde also some new and exiting developments over the last couple of days :nod:
One thing is, that I'll be finally getting myself a mini lathe, which might be quite the game changer, regarding shape, form and wood choices for the Misty's body.
The other thing is, that somewhen in the hopefully not so far off future, the Misty might just become officially available for sale (though quite still in very limited numbers) to US customers in a well known and loved place.
But that's 'nuff said!' for now, as all of this still needs some working out yet ;)

Have a nice evening, folks :)
 
Last edited:

Megaton

Well-Known Member
Great review @brainiac ! I need to get my arse in gear and share a few more words (and pictures!) over here, especially seeing as i love my Mistys so much!

And oooh, intrigueing update from @blokenoname there!

It seems there are big things in store for Bloke and the Misty!
 

brainiac

log wrangler
Oak 12.5mm (1/2 inch) doweling rods arrived yesterday so I drilled out an 8cm length.
Countersunk at one end by 1cm with the 8mm bit to hold a ss tip.

Very difficult to centre and drill accurately down the middle - but if you photo it from the right
angle you can almost disguise that ;).

So I now have a matching stem for my oak Misty :cool:

a-set.jpg


Also made a green bamboo stem. It grows in our village park so I cropped a tiny bit this afternoon.
Easiest stem you'll ever make - already got the hole down the middle so just needs countersinking
for the tip, It'll go brown over time.

today-s-work.jpg


That's my first attempt at a heater cover - using the ss tubing bloke sent me. Decided to go for the 'splayed base' option there. Put a waist in 1cm below the top which stops dd tips going any further in.
Sawed and filed the notches in the heater retaining washer to take a couple of screws.

Amazingly, tho there's still plenty that could go wrong, there now seems to be a real chance that I'll manage to put together a working log :nod::)
This is entirely due to the various tutorials bloke's put in this thread and the direct practical and
material assistance that he has freely given. Credit where it's due :nod::tup:.

And here's wishing Misty's new adventures in America the very best of luck :rockon:
 

blokenoname

DIY Log Dabbler 😁🪵💪💨💨💨
Great work there, @brainiac :nod: :tup:

Have seen some similar oak rods on Amazon recently and wanted to get me some for making dd stems. So far, I have only had fir and beech dowels for experimenting. The fir is terribly soft and the beech doesn't really look so nice at all.

Heater cover looks good :tup:

Together with the pine body, you already made, the only thing missing is putting it all together and setting in a heater. For extending its leads, you can also use fitting, uninsulated butt splices, then the only thing that needs soldering, is the connection to the DC jack :)

When I find the time, I will also update the parts list and building instructions here, so that it's up to the most recent developments :)
 

brainiac

log wrangler
Got 3 x 30cm lengths of oak from this site on ebay - enough for about nine stems.
They do say "un-sanded" and they ain't joking :o
My advice is don't handle them without gloves until you've given them a good sanding.

Bought some of that silver plated copper wire that you mentioned in an earlier post - .9mm x 5m, Also got lead free rosin core solder.
Drilled a jack plug apperture today without destroyng the inside wall of the base well :tup:.
Stuck a round(ish) piece of wood in there and packed it in tightly prior to driling.
Small things like this provide a real sense of progress :nod::).

Thought I'd give this centre finding tool a go with the handrail blanks.
It certainly seems to help and any help in that department is welcome :nod::nod:

Heater construction this w/e :)
 

blokenoname

DIY Log Dabbler 😁🪵💪💨💨💨
@brainiac

That solder (Sn99,3Cu0,7) you chose there won't do. That's low-midrange temp solder, which liquifies at 217°C already. Also, it's much too thin a diameter. This is solder for use on PC boards with tiny electronics components and such.
You need a high temp solder here, like Sn97Cu3, which only liquifies at 300C° And go for 2mm or 2,5mm in diameter.
You'll usually find this one more often in the plumbing section, rather than in the electronics department ;)

Problem is not so much in finding the centre, but in convincing the Forstner bit to stay on centre, once you hit the power button. Ye bigger the bit used, ye greater the chance of it, 'wandering' off center, once you apply pressure. Simplest center finding tool for an exactly round blank like a handrail, is drawing a circle of the same diameter as the blank on paper with a compass. Cut that out, put on top of your blank and then simply mark its center with a pen.
The tool you've ordered might come in handy later on though, for use with your rustic blanks, as it's also meant to find the center of not so exactly round or square pieces :)

ETA: To keep the Forstner bit centred, find a drill bit of nearly the same diameter as the centering pin of the Forstner bit. Now drill a small hole (about 5-10mm deep) into the afore marked center of the blank, to help guiding the Forstner bit and only then apply the Forstner bit itself. That way, your bore should be centered enough :)
But take care, not to use a bigger drill bit than the diameter of the centering pin, as then the pin won't find anything to center on and the Forstner bit will go all over the place.
Too small a guiding hole is also bollocks, as then the Forstner will simply slip out and you've the same problem, as with no guiding hole at all.
 
Last edited:
Top Bottom