Best Of Dynavap VapCap

Status
Not open for further replies.

flotntoke

thoroughly vaped
...... Right now my preferred method in using a triple triangle & placing the cap at the very top of what you called the outer; just above where the 3 flames converge; so, the cap is only being grazed by the heat on the outermost flame; simply put, just above all visual blue in the flame. I liken it to using a single flame. It takes longer to heat, but it is totally convection & I prevent even negligible combustion. And I get light to medium vapor.

Sounds like you're definitely in right part of flame. When I use a triple jet in triangle config (instead of jets being inline) I find best heating with 2 jets hitting out towards end of cap, and 3rd jet lined up dead center and away from end of cap. Very simple diagram with blue dots as jets.

eZ3kX4Z.jpg


bofc.png
 
Last edited by a moderator:

Square4Life

Well-Known Member
Hey guys, new to the induction heater idea, they look amazing! Anyone have experience with an OmniVong and any suggestions as to what set up or modifications create and ideal set up? Cheers in advance.

Had just posted this up over on Reddit. I don't have any experience with the omnivong but that shouldn't make much of a difference.

I bought a portside recently from pipes...

I think the torch is easier to perfect although once you get the depth tweaked (if needed) and the timing down...I'd say it performs easily as good as a torch, possibly better. I'll put it like this...since I've got the induction heater, I've only used a torch one time because I was out and about and just threw the dynastash in pocket.

The timing is key. When my cap clicks using the portside and a titanium tip, I count "one, one thousand, two, one thousand, three, one thousand, four" and then pull it out. With the ss M tip, I take it to "four, one thousand" or even "5". The ss tips take a bit more to heat up but IMO...torch or induction heater, the M produces more and longer vapor. I also timed my saying and when I stop on "four", it is right at about 3.5 seconds. Of course, the depth plays a role in this too. I shaved off mayyyybbeeee 1\32 from the way Pipes sent it. But it made a huge difference. Just be careful, can easily take off too much. I was getting pretty significant scorching at the tip even when tamped it down away from the cap. Now it is almost perfectly cooked throughout.

Another cool thing you can do with the induction heater is to heat it up as stated above, take a draw for a few seconds, stick it back in the heater for 1-2 secs, take another 2sec draw, put back into heater, etc. Once you get it down, and it isn't hard, you can fully extract a load very quickly and using only one cap click initially. Pretty cool stuff imo. Someone just reposted the vid recently if you look a page or two back.

I'm very comfortable with the torches, spinning the Dynavap,, etc and have no issues with them but I've really enjoyed my Portside Induction Heater.

Edit: oh one more thing....bed time hits! Not sure about you but as I'm winding down or possibly wake up and have a hard time sleeping, a quick hit or a few (lol) really help. It's so easy to grab the DV, stick it in the heater using a finger to hold it down, you can feel the click, count like I said above and then pull it out. Torch works but not near as easy as this for this particular scenario.

Let me know if you have any questions:)

bofc.png
 

stardustsailor

Well-Known Member
Accessory Maker
Very cool with the O-Rings @stardustsailor ! Are they of the same material as the Dynavap ones?

Also, a question about the durability of the Cap: will the Caps degrade over time until they won't work/click anymore, or are they build to last a lifetime?

Most probably yes ,they are the same material,as I was not able to trace any quad (X-) rings made of Viton .
Only from Buna N ( nitrile ) .

The cap itself probably is going to last for pretty long years ( more than a few decades most probably ) ,
if not damaged by any mechanical stress / force.
But the "clickers" ( aka "snap discs" ,"bimetallic discs" ) have an average life range of just 3000 to > 100 000 clicks,depending on their quality (materials made of) and actual use ( or abuse = overheating ).

That means that the cap as an operating unit (and not as a simple cover ) has indeed a "pre-programmed end of life " .
Still,this is unavoidable .The "nature" itself of the "clickers" sets the limit.
Every simple or complex moving mechanism ,eventually will wear-off.
bofc.png
 

Squiby

Well-Known Member
How to Clean a Vapcap.....

There are several ways to go about cleaning your Vapcap. I thought I might post some of the methods we've discussed for the benefit of the new Vapcap owners.

The parts that require cleaning are the tip, CCD screen and the inside of the condenser/mp.

FIRST USE. You should clean your Vapcap before using it to remove any machining residues. To clean your Vapcap before first use, disassemble your Vapcap by first removing the cap and pulling off the tip then using the digger litter to push out the condenser. If you have an Omni, remove the condenser by pulling it out by the mouthpiece. Then pop out your CCD screen by placing your tip opening down on a towel and then pushing the CCD out with the condenser pushing down through the neck. Moisten a Q-Tip with your favorite cleaner and run it through the tip and condenser and both sides of the screens. Rinse with warm water and leave to dry completely before re-assembling.

1. DEEP CLEAN. You can take your Vapcap completely apart, remove the orings and soak your bits in your cleaner of choice. This would be a deep clean approach suitable for times when you have combusted or have a badly soiled Vapcap.

I occasionally do a deep clean using a nontoxic cleanser that does not affect the orings. I mix Zeus Cleanser with very hot water. This mixture is poured into the doob tube that the omni came in. The ti tip, the ti screen and the condenser or Omni condenser/mp is then placed in the doob tube. Shake and then soak for 10 minutes or so. Remove the parts from the doob tube and swab them out with a moist Q-Tip. When no more gunk can be removed and everything is shiny clean, rinse well with clean clear water and leave out to dry completely before re-assembling. Then have a toke to celebrate your good work.

Serious grime might need over night soaking.

you can use ISO to clean your tips and condensers. Don't soak any orings in it. The instructions caution against using ISO because it is flammable. If you rinse and thoroughly dry your Vapcap after cleaning with ISO, you'll be fine.

2. TIP SOAK. The tip can soaked without removing the orings by placing it upside down in a shallow bath of cleaner leaving the neck of the tip and the orings clear of the solution. After the soak, swab the tip out with a moist Q-tip rinse and dry completely.


3. Q- TIP SWAB.
I clean my Vapcaps once every month or two. I use a hemp filter sandwiched between two screens. This keeps the condenser completely free of any tiny particulates and very very clean for a long time. When the flavor goes off I remove the screens and filter, moisten a Q-Tip with cleaner and run it through the tip and condenser and both sides of the screens. After rinsing and drying I place one screen in the bottom of the tip, add a fresh degummed hemp fiber filter and top it off with another screen.

The midsection and wood mouthpieces do not need cleaning. However, wood bodies, stems and mps all benefit from a light coating of hemp oil/beeswax or some other nice wood conditioner. I don't think that the carbon fiber midsections require any special treatment.

4. TORCH THE TIP. You can quickly clean the herb chamber and screen by simply applying your jet lighter to the tip interior and screen. The flame will burn out any debris in no time.

bofc.png
 

Squiby

Well-Known Member
Ahh, so I have to swap out the stem as well as the body. Ok, I will plan accordingly when I get ready to order.

Stems and bodies are not interchangeable on Omnis unless you buy a different length Omni condenser to accommodate a different length midsection.

Vapcap midsections come in two lengths; 45mm midsections are called bodies and 62mm midsections are called stems.

If you get an Omni XL it will come with a 62mm stem midsection. You can swap any other stem with your stock Omni XL stem.

If you get a regular Omni it will come with a 45mm body midsection. You can swap any other body with your stock Omni body.
bofc.png
 

mrb

Accessory Maker
Accessory Maker

Squiby

Well-Known Member
... and presumably, I could place one clip, one screen, one @Squiby de-gummed hemp filter©, a second screen and a second clip..... right?
yes...Unless you seat the first screen at the bottom of the chamber, then add a filter and another screen on top. The c-cli holds the whole works together. You only really need one c-clip.

have you figured it out yet ?
Can realy tell how much herb it is caus of missing size relation.

no huge clouds ?
mmmh

thought this device was so great

The Vapcap is so great. Like the manual transmission analogy above, the Vapcap responds to the driver's technique. You are in charge and to blame for your results. Because you are in charge, subtle manipulation drives performance where an automatic vaporizer may be easier going in, with less of a learning curve, ultimately it's less fun and infinitely less nimble than the Vapcap. This is why the Vapcap rocks.

I don't fully understand why some people put so much emphasis on producing billowing clouds. Personally I'm just in it to get stoned. Anyway, here are a few ideas that may help you to produce thick clouds of vapor.

Stash. Drier herb will produce more white clouds of vapor than moist herb. Grind your herb and let it sit out a bit, or even put it on top of your TV and it will dry out in no time.

Heater choice. Just about anything will heat a Vapcap. But for newbies the best choice is either an Induction Heater or a quad lighter.

If using an IH, insert the Vapcap and wait for the click. Then continue to heat for another second or two. The maximum length that you can go past the click is about 3.5 seconds, like this: one 1000, two 1000, three 1000, 4. Stop heating, pull the Vapcap out of the IH and toke. If you have combusted, back off a second or so.

Using a quad lighter, adjust your flame to it lowest setting, without sputtering. Apply the flame to the base of the cap next to the fins of the tip and the cap digger outter, while twirling the vapcap, so that heat is applied evenly around the cap. Heat a second or two past the click. Stop heating and toke. After the cooling click apply your heat a bit higher on the cap. The blue inner flame should just lick the cap. Don't immerse your VC in the flame.

Draw technique. With your finger on the carb, pull vapor into your mouth, do not inhale directly into your lungs. Rather puff on it like you are drawing on a cigar or using a straw to bring a beverage into you mouth. Then after you have pulled a few puffs into your mouth, remove your finger from the carb and inhale fresh air into your lungs along with the mouthpulled vapor.


I hate single and double torches because they are prone to scorching my loads especially the doubles.
The technique differs when using a single jet compared to say a quad.
A section of the cap needs to be evenly heated. I heat the bottom half of the cap during the first cycle, then heat the middle third then the top half.

A single jet lighter flame needs to oscillate or move back and forth over the area to be heated. This requires the dexterity to twirl the Vapcap in one hand and move the flame back and forth in the other. While I prefer a single jet lighter for it superior effects, success comes with practice and so I suggest that it is best to first master heating with a quad lighter as it covers full area to be heated with no movement.

To resolve your scorching, try oscillating the flame when using a single or even double jet. You just don't want to heat a line around the cap.

bofc.png
 
I put together a tiny tip list acompanied with gifs. I thought it would be nice to have a thread for beginners. In this case, a beginner can be someone who recently purchased the device or someone who's new to vaporizing. If you wish to watch the video version instead it can be found here:

TIP LIST:


1. Why vaporize at all - smoke has a plethora of dangerous compounds in it. Vaporizing reduces harm to your lungs by removing...
https://imgur.com/TZxGR8e

2. Torch Placement - Torch placement is important for determining the temperature of the bud. Pointing the torch on the bottom end will produce harsher/bigger hits while point at the top will result in smoother/tastier hits.
https://imgur.com/xOqiYGD

3. Rotation technique - This one is up to you but here is an example of how I personally spin the dynavap.
https://imgur.com/0b4Ua3g

What are yalls favorite beginner tips? Let's help the newbies out!

bofc.png
 

Squiby

Well-Known Member
I've found that I need full range of carburation, from completely closed to full open during use. I've been seriously considering an Omni purchase (really TI Woody XLS vs Omni XL), but I can't help but wonder if I'm not going to be happy with a single carb setting.
Im thinking about doing the same, is it worth the price difference?
Well, the Omni XL and Woody XLS measurers in at 109mm and is longer than the 92mm M by 17mm. The extra length is luxurious and can be easier to spin especially for those with largest hands.

The M is the entry level, all stainless steel Vapcap. The Ti tipped Vapcaps (Woodys) have more features and the Omni is the top of the line all titanium Vapcap.

People often suspect that performance must incrementally change from model to model. I don't think choosing one model over another is about performance so much. All Vapcaps are wonderful efficient vaporizers. I think it's more about budget, function and aesthetics. The basic M stainless steel tip and build vs the Ti tip with wonderful midsection possibilities vs a precision milled condenser and mouthpiece.

The M is the least expensive Vapcap at $50. It has a stainless steel construction, including the tip. It is a great vaporizer but is basic in its design and engineering compared to the titanium tipped series of Vapcaps. Although you can switch out the stainless steel stem for other stems or Body/mp combinations, it does not have full modularity. For example, the Omni condenser will not function properly with the M tip. The ss tip is not quite as nimble as the ti tip with fewer air channels. It likely has a greater conduction ratio. The M is a fantastic economical adventure into the land of the Vapcaps. Everyone should have one. Take the M fishing...if you do drop it in the water, you will likely deeply mourn its loss BUT, it won't be the absolute end of the world.

The ti tipped series of Vapcaps offer full modularity. Buying one will take you on a deep dive into accessory bliss. LEGO for stoners. You don't have to buy all the models, but with parts you can have any one at any time. The titanium tip is more finely crafted and precision engineered than the stainless steel M tip. It has an more air channels and they are wider and deeper and has finely milled fins. There is an addition oring to create a tight fit onto the condenser and into the body or stem. I think that the 5th gen ti tips offer a higher convection ratio.

The full modularity of the ti tipped Vapcaps mean that you can switch up bodies and stems, straight or VonGs, mouthpieces and condensers. You can add an Omni condenser and achieve full dialled customized air flow.

The all titanium Omnivap is the top of the line. It is a beast. The build is very tight, beautifully engineered with incredibly tight tolerances and should be considered a work of art. The Omnivap is beautiful. The Omni condenser/mp is not only a precision milled component which offers a set it and forget it airflow, perfect for use with water pieces, but it's robust core offers additional strength to the overall device. You can run over your Omni with your car but the M or Woody may not fare so well.

Cautious folks should start with the M IMO.

Those that love wood might choose a Woody with it choice of wood midsections and wood mouthpiece. It sports full modularity with other bodies, stems and mouthpieces and can accommodate the Omni condenser if you want to upgrade to an Omni in the future. The Woody has a fully manual air port.

Those that want to own a finely crafted piece of art, indestructible precision workmanship, might dive headlong into the Omni with its dialed in set it and forget it airflow.
bofc.png
 

phattpiggie

Well-Known Member
Accessory Maker
M mod video.
Use the grooves to get the correct position, file at a slight angle to create a small scallop in the lip of the bowl.
Once you have this scallop change the angle and it will allow more material to be removed.
I'm currently using a stem that I made for my 1st and 2nd gen tips. It has a 0.5mm carb which, due to the Venturi effect, allows a nice drop in pressure behind the screen.
Which in turn makes for easier draws with thick vapor production

bofc.png
 

stardustsailor

Well-Known Member
Accessory Maker
A ) Stems : metal vs mineral/organic and length .
- Stems made out of Titanium (or stainless steel ,copper,bronze,etc) do absorb more
heat from vapor than stems made out of wood,carbon fiber,acrylic/PMMA,bone,horn,etc.
Thus,the vapor is somewhat cooler.
- The XL (79 mm) stems provide cooler vapor than the standard length (62 mm) stems.

B ) Toking : Mouthpulling vs lung inhaling
- Mouthpulls are creating a negative pressure only inside the mouth cavity ,with
the utilisation of facial muscles (mainly the cheeks ) .The range of muscle movement is quite
limited ,but the negative pressure created by mouthpulls is quite big.
My own longest mouthpull is not more than 2-3 seconds.
Smoking a cigarette,sucking liquids from a straw/tube are two examples of mouthpull utilisation.
The vapor stays for a while in the mouth cavity before it gets inhaled from the lungs.
Thus,it cools and gets filtered also.Using a carbless stem on a VapCap is the same as operating
the VC with the carb hole fully closed.So,mouthpulls is the only way to go ,at this case.

-Lung inhaling is creating a negative pressure almost
throughout the whole human respiratory apparatus.
The diaphragm and the sternum muscles are utilised.
The range of muscle movement is rather large,
but the negative pressure created by lung inhalling is quite limited.
Duration of toke can go up to 10 seconds ,
with some individuals being able to extend this limit even further.
Deep breathing ,feeling the lungs before a dive,toking from a whip /balloon are some examples.
As it is understood and probably well experienced ,any draw restriction at this case
will only cause discomfort .


C ) 
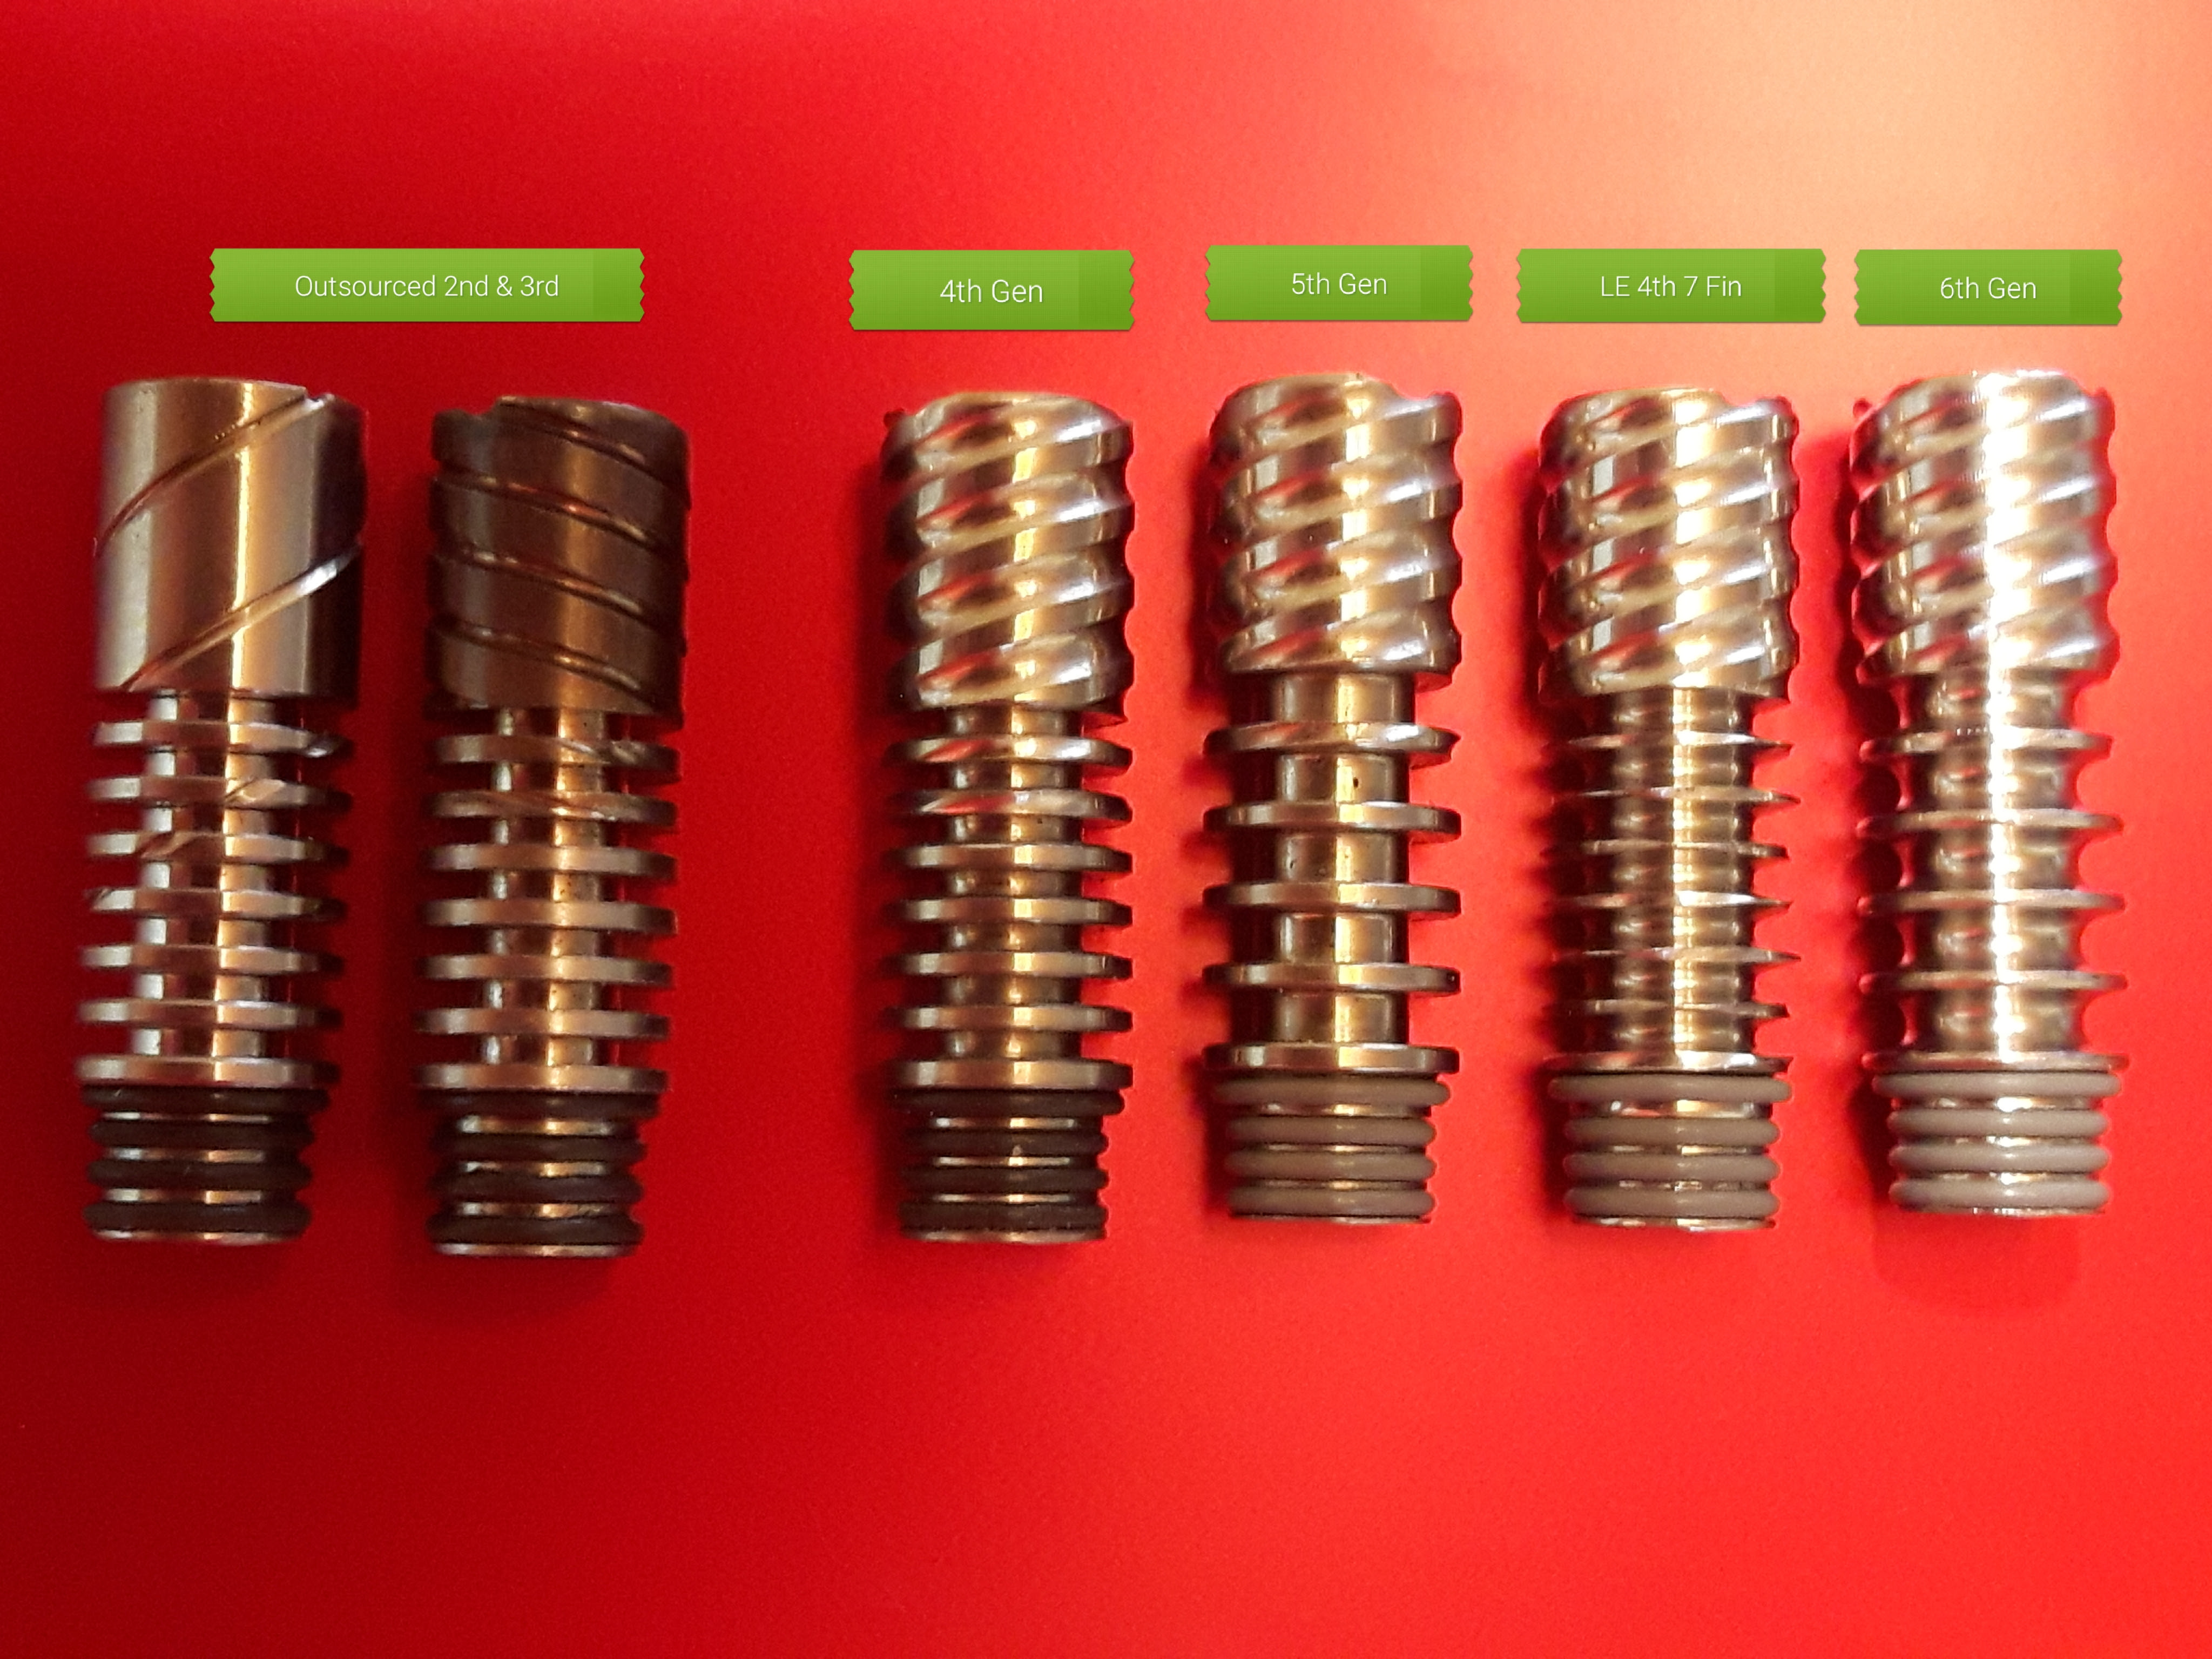
4th gen / 7 fin Ti tip vs 5th gen / 5 fin Ti tip : A personal experience

The new Ti tip ( 5th gen ) has 20% less mass than the 4th gen tip.
That means that it has 20% less thermal capacitance ,also.
In practice the 5th gen tip is 20% faster than the 4th gen tip.
Quite small difference ,but with the use of different length Ti stems ,
it kinda makes a "statement" to a keen and experienced VC user.

4th gen Ti tip + 62 mm standard length stem : Quite a lot of vapor production,
with full "body" vapor .Somewhat hot also,with the aroma & taste being subdued.

4th gen Ti tip + 79 mm XL length stem : A perfect combination !
Lots of vapor production ,the body of the vapor is there,the taste & aroma also there
and the temperature of the vapor is just as it has to be.

5th gen Ti tip + 62 mm standard length stem : It's my second favourite option.
It's like the above combo,just with a bit more taste & aroma somewhat,but the vapor
also being a bit hotter with less body .

5th gen Ti tip + 79 mm XL length stem : A good combo for resin,oil,wax ,etc.
With this combo ,going a bit past the click will quickly increase the chamber temperature
to the extraction point ,but also will quickly start decreasing thus not allowing for mishappens.
The vapor is quite cool ,at least for the high temps involved .
Reminds of dabbing.
If used with herb ,this combo is the best option for aroma & taste (respecting the click ,this time),but the vapor lacks a heavy body .Very cool and aromatic vapor ,but rather " light bodied ".
Ideal for those with sensitive respiratory system.

bofc.png
 

Squiby

Well-Known Member
Is this only for the old Omni? I just got a new Omni and spinning the mouth peace does nothing from what I've seen

All Omni models function the same way. The Omni does NOT have a spinning mouthpiece. Rather, the Omni has a condenser that threads onto the mouthpiece and requires a deliberate twisting of the mp to change its setting. It's purpose is to allow the user to adjust the airflow to their preference without the requirement of manually manipulating the carb. Set it and forget it and toke with abandon.

Pull the mp/ condenser out from the body. Notice that the mp threads onto the condenser. The mp can be threaded all the way tight onto the condenser or loosened off and barely threaded and anywhere in between.

As the mp is loosened off the condenser the length increases. As the mp is tightened or threaded further onto the condenser, the overall length decreases. As the condenser becomes longer, it's beveled end pushes farther into the neck of the titanium tip. This cuts off the air that would otherwise enter the carb.

Practise adjusting the mp/condenser outside the body, then reassemble and test. Then pull it out again, adjust and test until you get the hang of adjusting the Omni mp/condenser. You can adjust the airflow from wide open all the way down to a tight air restriction.

Once you find your sweet spot, you'll be in heaven.

Promise...:nod:

Regarding spinning mps; only the Vapcap S and Vapcap XLS have spinning wood mouthpieces. These are held in place by xrings. The wood mps are free spinning and provide additional ease to the twirling maneuver. You can cradle the mp in your palm and spin the Vapcap easily while you heat it.

Omni mp and spinning mp - two different animals, each with a distinctly different function.
bofc.png
 

shredder

Well-Known Member
thanks for the tips, I think you guys are right i was using too much heat, so much in so my lungs were really tight for a few hours, need that water filtration asap; this vapcap stuff is all new to me, I was using the vapman prior to this I might have to stick with it until the water. heat seems to irritate my lungs, have some sort of exercised induced asthma last i was told.


Welcome to the (asthma) club! There are a few of us here. Water will make a difference. I definately prefer using mine with water. I mostly use a small water pipe without a ton of diffussion.

But even without water, once you get the heat cycle down your hits can be cooler, it takes practice. And each torch has different characteristics. So there is a learning curve. I like a two flame lighter, but truthfully mostly I use my induction heater from @Pipes. IH heaters are very consistant and really are a game changer.

Another way to get cooler hits is to use a mouth pull when taking a hit. You fill your mouth with vapor, then inhale. Your mouth cools the hits before it hits your windpipe. Again practice helps.

@Squiby likes to use a hemp fiber filter she sandwiches between screens. The "best of" thread has more details if you havn't been there yet.

The herb you use makes a difference too. Moister herb ground loose provide cooler hits than fine ground dry herb.

I'm sure you'll figure out a good technique. Quite a few of us asthma sufferers use their dynavaps daily.

bofc.png
 

babaganush

Well-Known Member
Hey guys, just posting this in case anyone else has/gets an issue with their caps getting stuck on the tip after it cools down:

I was having an issue with my cap getting stuck on the tip after it cools down every so often (like between every 1-3 hits). It would take a lot of force to pry it out, often spilling the contents in the bowl when it did come out. I didnt know why this was happening, so I hit up Dynavap and they suspected that perhaps the inside of the cap needed a little cleaning. It looked clean to me already when I put a light to it, but I gave it a shot. I rubbed the inside of the cap with an iso dabbed qtip and rinsed it with water, let it dry completely, and surprisingly since then I havent encountered this issue again. Seems obvious in hindsight, but I was thinking the diameter of my cap was a touch too small, so if you have this problem and youre as clueless as me, Id try cleaning the cap first.

bofc.png
 

Shnoofkin

Active Member
Many M's will be modded into XL-M's now in this forum.

Any advice to get the MP to spin?

I watched George's video on this but it is still very hard to spin.
I tried to sandpaper it a bit on the inside.
Still no free spinning.

A friend of mine has a free spinning one.
Very very handy while heating
did you check the orings sizes? I ordered a MP+XL condenser about a month ago and got 2 big 1 small instead of 1 big 2 small -- if the big oring is holding the MP, it won't spin. I solved it by taking the small oring from the old condenser and it worked like a charm!
xl-condenser-w-mouthpiece.png


bofc.png
 
Shnoofkin,

420golfer

It helps my backswing
12 days, 1 Omni and 1,000 pages. I know everyone is waiting on pins and needles for my review :lol:

Almost 2 weeks and 240+ heat cycles, liking the Omni more and more.

Vapor
The vapor is top-notch. Ti tip set to .05 gets me 3 really good clouds. The second draw rivals my evo desktop. The potency is off the charts. I spent the last decade of combustion using a one-hitter exclusively. I remember packing that thing 6 or 7 times per session to get decent effects. Naturally, I felt the need to do multiple-pack sessions with the Omni. Nope, I'm good with 3 cycles as this thing can kick yer arse. Maybe a double pack sometimes. I consider myself high tolerance and continue to be shocked and amazed.

Efficiency
It's hard to find a more efficient weapon to medicate. I've tried all three bowl sizes and have found myself at .05 most of the time. It has cut my usage by half and I feel as though I'm as baked as I have ever been. The euphoric effects come through brilliantly.

Cleaning
I use the Omni daily and all day as I'm lucky enough to work from home. I am really happy with cleaning. Every few days I wipe the condenser clean and run a q-tip through it. I keep a toothbrush handy to brush the fins clean every now and again so tiny bits and pieces don't get combusted during the heat cycle.

Learning
If you are getting one or thinking about a dynavap it's an outstanding product. Personally, all vapes have some learning needed. There is so much knowledge on FC. Most everything you need to have a blast is here. If you are having trouble, try heating the cap in the middle about a half inch above the torch flames.

I've read a post, "I'm new to vaping, what should I buy". Many suggestions and questions followed. One response suggested a dynavap if "using a butane torch was OK". There are many "battery only" enthusiasts. I was one of them. The Omni has shelved my mighty.

My badge of Honor...:cool:

6hxOw0N.jpg


bofc.png
 
When I first got my MFLB it was a god send, but after months of use it eventually became less and less powerful. That was mostly because I needed to purchase replacement batteries. I assumed that all vaporizers would eventually degrade. That assumption was changed when I received the Dynavap 'M'. It has held up wonderfully and I wanted to see how other vaporizers hold up after months

I made a video about how the Dynavap 'M' holds up after 4 months of use. You can find that here:

How has your vaporizer held up against time?

bofc.png
 
Few Minute Programming,

stardustsailor

Well-Known Member
Accessory Maker
316L stainless steell tip vs Titanium 99.75 (Grade 2 ) tip

Heating power / time
: Titanium tip needs half power or half time than ss tip to reach the click point !
Sometimes ,when outdoors that difference becomes quite a ..need! ;)

Cooling time: A Titanium tip cools much faster than a ss tip.

Draw resistance : The Titanium tip has (suited for its characteristics ) smaller draw resistance than the ss tip.

Weight : Ti tip has less than half mass of the ss tip.

Taste : Titanium does not affect taste by any means. SS has a taste of it's own .
And it may neutralise certain aromas,also.

Cleaning :Titanium tip is far more easy to clean ,as Titanium surface is not an easy surface to stain ( as is rather impossible to paint, ).

Extra O-ring : Better air sealing & sturdier hold .

3x chamber volume options : Very useful to some .Specially micro-dozers !

More or less...
:2c:

bofc.png
 

Squiby

Well-Known Member
Thanks Squiby, I got my light and dark vongs in the flash sale. Got a new ti tip too, added the o-rings, couldn't get it to fit in the vong without the o-rings rolling out of their grooves, tried a SS tip, same thing. They fit very
securely though with the very tip-most o-ring in place, so I'm happy, even if I'm doing it wrong.

The tip will have come with the o-rings already in place. There should be no need to add extra o-rings.

When assembling a Vapcap it's important to lubricate the o-rings that are on the tip and the X-rings that are on the condenser. Without lubrication they will resist inserting smoothly. Any lubricant will do; a tiny bit of wood conditioner or even a bit of spit will work nicely.

First insert the condenser into your midsection. If the rings bind, pull the condenser out and remove the middle x-ring and insert the condenser with only the end x-ring in place. Use a finger nail to seat the x-ring flush to the end of your Vong. Then take the other x-ring and place it into the tip end of the VonG and use a straw to surround the x-ring and push it up the condenser into the Vong. All that matters is that you should place it above the air intake if you want to manually control the air resistance or just place it between the air intake and the tip and to cut off the air intake.

To insert the tip, lubricate the o-rings and push firmly and straight in while turning the tip gently.

I hope this helps.

bofc.png
 

ronads

Well-Known Member
3. Concentrates

Hello welcome to the board.

I just got myself some nice legal pineapple express cbd wax isolate, and a full spectrum 70% cbd dank of colorado wax. Literally just tried concentrates for the first time I have used hash but never this wax stuff. Loving it so far didn't think it would have an effect and hits hard fuck me can't believe you can buy that legally in the street in the UK but plain old bud is illegal but that's off topic...

Anyway I have organic cheesecloth which is unbleached, all natural. I cut a bit off and roll it into a ball. This is the 'Filter'.

RklnEbn.jpg


Step 2 - Pop that fucker in. Use the lid to tamp it down so you have a little platform to put it on.

k0xFsMd.jpg


Step 3 - Put the wax on top, put the lid on, heat vape till it clicks..

yAz9oKb.jpg


Aftermath
o0TO6ix.jpg


This is what it should look like after it's done.

If you want to do hash WRAP the hash in the cotton, there is no concerns of it melting down the pipe, it will keep your filter nice and clean :) Plus it's easy to take in and out for reloading.

EASY!

bofc.png
 

Squiby

Well-Known Member
Tips, Tales and Generations

The tip generation discuss has led me to putting together a chronological post of the Titanium tip evolution. It all began in 2015 with some titanium prototypes...

http://fuckcombustion.com/threads/dynavap-vapcap.18853/page-24#post-841517

http://fuckcombustion.com/threads/dynavap-vapcap.18853/page-26#post-843562

The first mass produced Ti Woodies were sent out in the fall of 2015.

http://fuckcombustion.com/threads/dynavap-vapcap.18853/page-46#post-868530

http://fuckcombustion.com/threads/dynavap-vapcap.18853/page-52#post-879526

This would be the official 1st generation tip. 2 orings, 5 fins and 2 shallow right hand channels and a ceramic screen.

http://fuckcombustion.com/threads/dynavap-vapcap.18853/page-65#post-895915

http://fuckcombustion.com/threads/dynavap-vapcap.18853/page-67#post-897795

Here is the first pic of the second gen tip sporting 7 fins.

http://fuckcombustion.com/threads/dynavap-vapcap.18853/page-102#post-928610

http://fuckcombustion.com/threads/dynavap-vapcap.18853/page-106#post-931831

http://fuckcombustion.com/threads/dynavap-vapcap.18853/page-109#post-933671

The Omni was introduced March 12 2016 sporting that same 2nd gen tip.

http://fuckcombustion.com/threads/dynavap-vapcap.18853/page-115#post-940738

More 2nd gen porn.

http://fuckcombustion.com/threads/dynavap-vapcap.18853/page-129#post-947184

July 15 2016 A new cross hatch channeled tip was introduced, but seems to never have been publicly launched.

http://fuckcombustion.com/threads/dynavap-vapcap.18853/page-213#post-997568

http://fuckcombustion.com/threads/dynavap-vapcap.18853/page-215#post-999528

Dynavap began manufacturing in-house around Nov 9 2016, introducing the 3rd gen tip.

http://fuckcombustion.com/threads/dynavap-vapcap.18853/page-318#post-1045362

Here's the first three generations side by side.

http://fuckcombustion.com/threads/dynavap-vapcap.18853/page-375#post-1062142

Jan 1 2017, the 4th gen tip is introduced. Somewhere between the 3rd gen and the 4th, the direction of the channels changed. 3.5?

http://fuckcombustion.com/threads/dynavap-vapcap.18853/page-391#post-1066464

May 8 2017 the 5th gen 5 fin tip is introduced.

http://fuckcombustion.com/threads/dynavap-vapcap.18853/page-613#post-1119118

Feb 15 2018 the LE 4th gen 7 fin tip is revealed.

http://fuckcombustion.com/threads/dynavap-vapcap.18853/page-1033#post-1217298

George presents the subtle differences within and between the first 5 generations.


The current 6th gen tip with it's 5 thin chiseled fins and rounded valleys is shown on the website. I can't find the specific mention of it but I think I remember George introducing on one of the videos, but I can't find it. I think that it was introduced after the 18 M in March.

EDIT: Here's a reference to the latest 6th gen tip. Thanks @cybrguy!

http://fuckcombustion.com/threads/dynavap-vapcap.18853/page-1227#post-1247515

https://www.dynavap.com/dynashop/parts/titanium-tip-atp-1

This is what I have for tips. Versions of generations 2-6.


VAXEmmR.jpg


bofc.png
 

Squiby

Well-Known Member
For that matter, I would love to know what size (ID, OD, and... what’s the other one, width?) ALL of the various orings are. Just seems like a good thing to have plenty of spares of since it’s the only part that will really degrade on the vapcaps.

Anyone know the sizes of the different orings and where to order them from in bulk?

The stainless steel M tips, the titanium tips and the Omni condenser/mp assembly all use the same high temperature orings. They have a 6mm ID, 8mm OD with a CS of 1mm. Here is a silicon one.

http://www.oringsandmore.com/silicone-o-rings-6-x-1mm-price-for-10-pcs/


The regular condensers use two sizes of xrings. Here's the small one.

http://www.oringsandmore.com/x-rings-size-007-price-for-20-pcs/

And the large one.

http://www.oringsandmore.com/x-rings-size-008-price-for-20-pcs/

This page on the Dynavap website displays the proper x-ring location on the regular condensers.

https://www.dynavap.com/dynashop/parts/ss-condenser-o-ring-kit

bofc.png
 
Last edited by a moderator:

mrb

Accessory Maker
Accessory Maker
@2hrs
It has been a while since i answered anyone's questions comprehensively, so here goes...

The M body is actually classed as a STEM. A stem is the larger body length used to make the XL length vapcaps.
The original shorter vapcaps have the shorter BODIES not stems.

The M stem just like any other stem can either use a regular length condenser to be a standard length vapcap without using a mouthpiece. Or it can use an XL condenser with a mouthpiece to become an XL vapacp.
Any stem can also use the XL omni condenser - that includes the mouthpiece 'built in'.

Any body can only be used with a standard condenser+mouthpiece or standard length omni condenser. (Unless modified somehow by the user)

Any tip will fit in on any vapcap body or stem. The only issue is that the omni condenser will not be able to adjust/close the airflow properly on an SS tip.
Because the opening of the SS-tip, where the condenser extendeds into to close the airflow, is bigger and therefore airflow is less restricted by the adjustment of the omni condenser.

Some people prefer the Ti and some the SS. And many feel the SS better suited to heating with an IH heater, but Ti for lighters...

I think buying an omni and an M is a great start. And if you prefer the Ti-tip then you can buy another tip and fit that on your M no problem..

Hope that helps

bofc.png
 

Exsmoker

Plant Manager
My magnet quest is finally over. As some posters have already stated (thanks guys), a diametrically magnetized magnet is what works to hold a VapCap centered and upright. It just slides to the edge with an axially magnetized magnet.

They're not real common, especially in a size for my IH, but I did find some at K&J Magnets [Link].

Another option I found is that two common bar magnets side by side will center the VapCap - it will just slide to the edge if only one is used. They’re inexpensive and available locally at hardware stores and such.

Most importantly, the magnets significantly reduce the cool-down time. And the small magnet actually cools a bit faster than the larger bar magnets.

For testing the cooling times, I heated my VapCap M with my induction heater, then waited 20 sec before cooling with the magnets and starting the time.

- With natural cooling, the average time for the cool-down click was 55 sec

- With the bar magnets, the average time to cool was 12 sec - 358% faster!

- With the button magnet, the average time to cool was 10 sec - 450% faster!!

I’m sure all this has already been posted somewhere in this huge thread, but the info could still be helpful to some.


bofc.png
 
Status
Not open for further replies.
Top Bottom