The "Project" DIY Herbal Vaporizer

Checking in again, been using the wooden project for several months now. I've switched between my grasshopper and back. Both are very nice but the project wins for battery life. I only get 2 bowls with the grasshopper before the battery is done, probably 30 with the cuboid. Taste is slightly better in grasshopper, but I can't clean the wood stem like I can clean metal with rubbing alcohol.

Also I don't need to chill the vapor on the project, but it's a must for the grasshopper. I use a small glass bubbler without water normally to smooth out the vapor.

I like the new all glass mod, put me down for one!
 

natural farmer

Well-Known Member
Someone said earlier that the "Project" is not yet a Crafty or a Solo...
My opinion after just 4 bowls in is that it is miles ahead of those two and most other vapes out there! :whoa: What a powerhouse of a heater! :o
First load through the Lotus-sized bowl of the original Pipes stem, TCR at 120, 0,54Ω, 50W and 250°C on the Cuboid gave me a couple of invisible terp hits. Maxed the temp at 310-315°C and very quickly got some really good vapor, tasty and potent! Have to pulse the fire button every 10secs cause of the protection kicking in. Is it safe to bypass this? Is it advisable?
Tried a few changes in TCR and ended up setting three profiles M1=130, M2=140 and M3=150 where M1 is for low temp vaping and M3 for fast high temp sessions. Temps are set to the upper limit for those fee first bowl.
Also tried one bowl with the Vapcap as the stem (had to use two silicone tubing rings to fit it on the Project). Huge hits from tiny load (0.05?)!!!
Third stem was a Lotus aluminum long stem! :lol: Project fits right on top of it and vaping is amazingly even and thorough! I really didn't expect such great results so soon! I am blown out of my mind!!! :bowdown:
DIY stem choice is infinite and very fun already!!! :D
Fourth stem is the OG again but with a Milaana screen perfectly resting in the SS tube that makes the base of the stem! Half a load and TCR 150 , 70W, 290°C gives so fast and effortless clouds that I can't find words to describe the experience... Can't wait to show this to my friends and drive it through some glass in the following days! :rockon:
ABV is surprisingly even for what I have seen so far from pics and haven't noticed any kind of hot spotting so far! I am amazed!
@Pipes! Project is probably the best kept secret of FC! People should be all over this! Man! Wow! :whoa::whoa::whoa:
Will be back for more thoughts!!! Testing makes writing really hard!! :freak:
 

Pipes

Addicted DIY Enthusiast
Accessory Maker
Thanks for such great first impressions. It does do as advertised.
Funny how your using the TCR to control temperature. The TCR is mainly to make a change of 10 degrees to be 10 degrees. It has more to do with amount of temperature difference the numbers mean. Although, it also changes the initial temperature numbers as well as it's all intertwined.
I'm currently playing with a TCR of 190 as makes a 10 degree change much more noticeable. Can get yourself in trouble as the upper limit with this TCR can overheat the unit in a heart beat if temp is set too high.
With the "myevic" firmware, the 10 second time out can be changed to 15 seconds. IMO, more than enough.
Another cool trick with the "myevic" firmware is the ability to turn off the ohms check. So when locked, it keeps the inputted ohms. You can vary the ohms manually therefore "tricking" the unit to a new starting temperature. Important note here is that it if the entered ohms is over 10% difference, it will kick back to actual read. However, that 10% gives us lots to work with to "calibrate" our temperature scaling.
So, @natural farmer, give it a shot, install the "myevic" firmware, change the ohms from .54 ohm to .59-.60 ohm range. TCR to 190, temp to 380F and watts to max. The firmware now supports .001 increments of ohms so you can really fine tune this. So the idea is to set lower vape start temp by adjusting the ohms and the upper useful temp or 440F or so using the TCR number. All changes interact and the numbers I'm giving is what I found works best so far. Be careful now because if you run the temp up it will run away until it burns out.

You're gonna love using with glass.

"@Pipes! Project is probably the best kept secret of FC! People should be all over this! Man! Wow! :whoa::whoa::whoa:"
Shhhhh now, remember I'm lazy.
I sure hear ya about testing... :ko:
 
Last edited:

natural farmer

Well-Known Member
Funny how your using the TCR to control temperature.
Hmmmm, I use it more like as a general marker for how hot I want the device to be. I have set the first TCR memory to 145 for flowers that "can't take the heat", second one at 150 for the ones that "can take it" and third one at 155 for concentrates and hash. I still control temp with the temperature setting.
I just set the TCR with 315°C being the top of the heat I want for each application (not actual temp of course, just my max temp) and then it goes down from there. Currently I am using second mem. TCR at 150 and vary sessions from 250°C to 310°C. Sessions keep getting better and better and I am running out of herbs! :argh:
So, @natural farmer, give it a shot, install the "myevic" firmware, change the ohms from .54 ohm to .59-.60 ohm range.
I think I really like the way it works so far and I guess it is safer as well so I am sticking with stock firmware for now, just need to get the latest update... ;)

Question: How does wattage affect things? I have it at 70W now... Is it OK? Feels ok...

I am really stoked with the Project so far!!! :freak: It has made all past vapes seem like obsolete toys in comparison. It's pumping tasteful vapor so effortlessly I can't really believe it! :mental:
 

Zheka

Member
@Pipes, when using Solo stem, do you stick it in all the way to the oven screen, just the edge or some position in between? Do you vary the depth depending on how much flower is being used?
Thanks
 
Zheka,
  • Like
Reactions: Pipes

Pipes

Addicted DIY Enthusiast
Accessory Maker
I just set the TCR with 315°C being the top of the heat I want for each application (not actual temp of course, just my max temp) and then it goes down from there. Currently I am using second mem. TCR at 150 and vary sessions from 250°C to 310°C. Sessions keep getting better and better and I am running out of herbs! :argh:

I think I really like the way it works so far and I guess it is safer as well so I am sticking with stock firmware for now, just need to get the latest update... ;)
If just using for three favorite temps then your found one way to do it.

TCR- slop of temp vs ohm/temp curve.
In real life this slop is not linear. SS316 can range from 80-120 and ecig users select depending on what their preferred temp is to match real life as best as possible. The SS316 preset TCR varies between manufacturers.

Ohms- where to start on the temp vs ohm/temp curve.
This is the number that effects the starting point on the curve. The resistance at room temperature so to speak. This is the most important and biggest factor of the equation. And we can now control it, which makes us God with determining a wanted temperature.

Watts
- how fast it can change temp. Actually, this has the smallest impact. A large workable range, however, too low and the mod will start to kick out of TCR mode and into power mode. The reason is the firmware monitors the resistance change and if the temp doesn't rise fast enough to meet it's set time allowance. Same symptom as a weak battery. On the other hand, if too high you get some charring on the first draw of your load. This is do to the over shoot when temperature is rising. I actually like it as gives a preheat effect, so I leave it at full. Only trick is to wait a full second before you rip it because it is vulnerable for possible combustion at that first draw point. Or rip fast immediately. You can, of course, avoid this by lowering the watts to under a 100 but keep above 60 watts.

@Pipes, when using Solo stem, do you stick it in all the way to the oven screen, just the edge or some position in between? Do you vary the depth depending on how much flower is being used?
Thanks

I push it in all the way. As the flower shrinks it's distance to the heat source increases. Towards the end increasing the temp compensates for the greater distance. It really shrinks up nicely. Sometimes I have to scratch my head on where did it go?...
 

natural farmer

Well-Known Member
Hey guys!

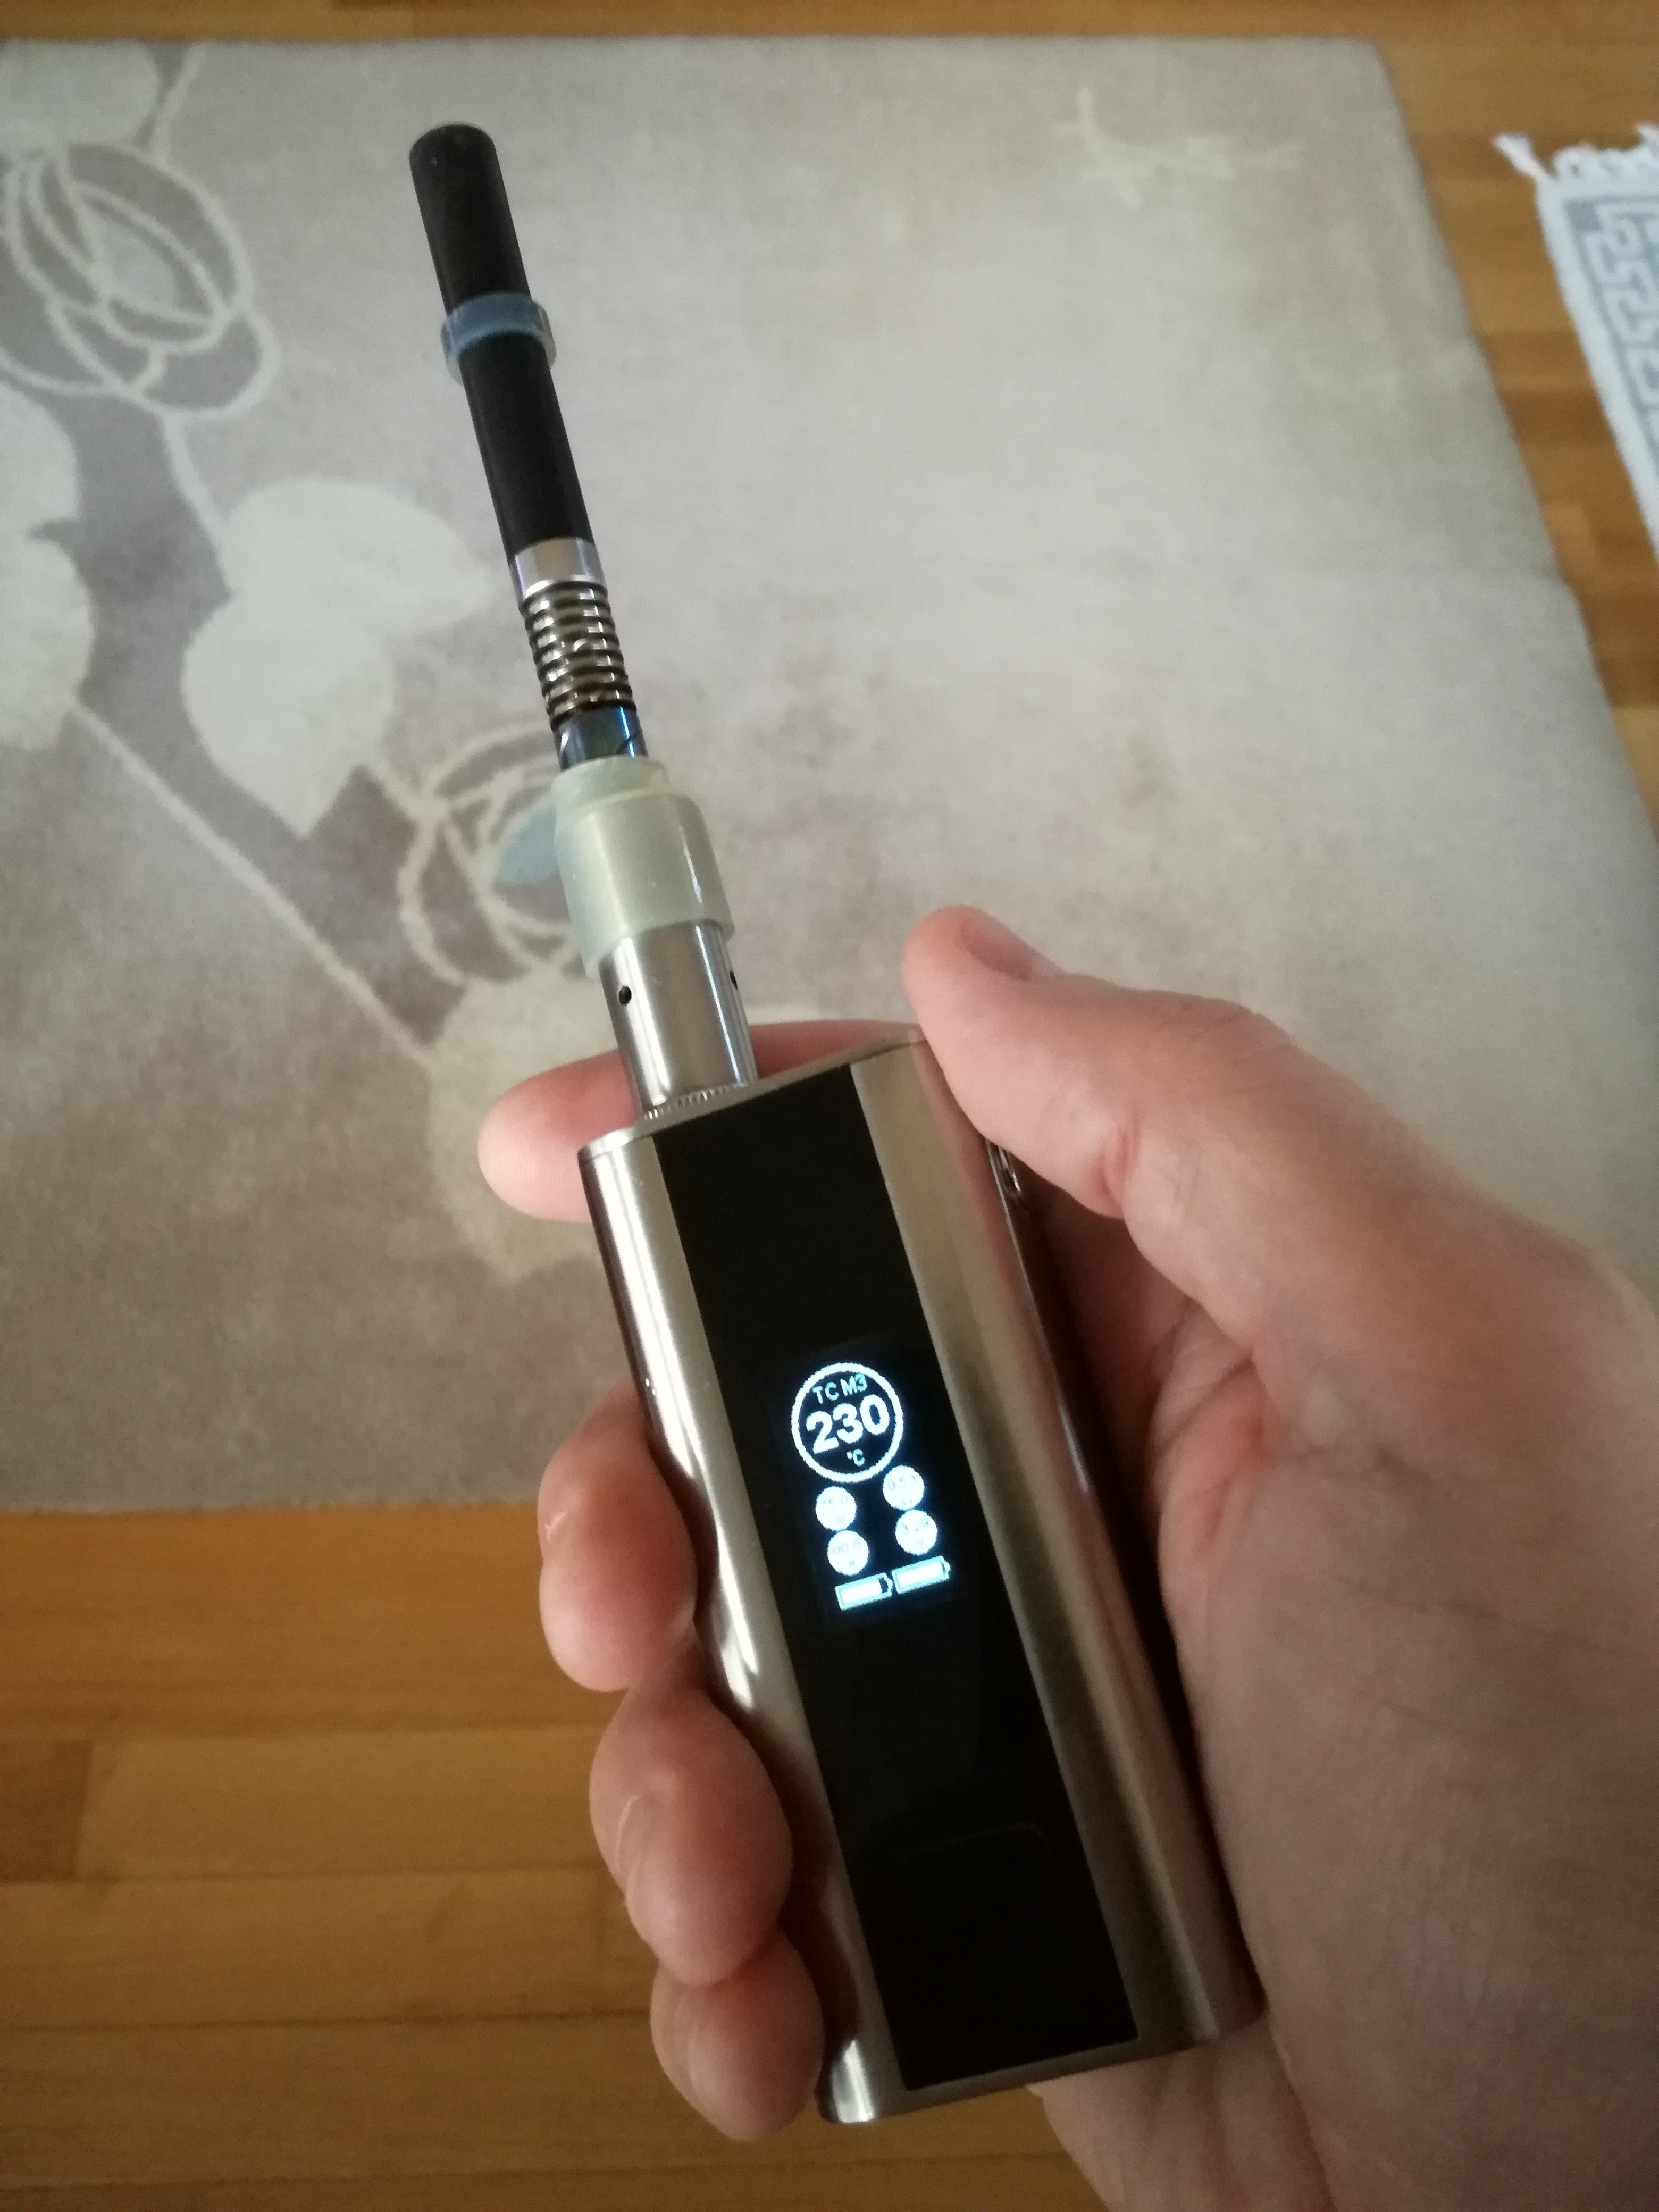
I am having veeeery good times testing the Project these last days with some really sticky outdoor super skunk. So far I think it outperforms Milaana, as it is quite faster and because of that controlling a hit midway is easier and more effective. I am thinking like Milaana without the lag. I think someone mentioned that as well... Not sure if it was in this thread or in MistVape's one. Heat up is instant, cool down is very fast. The silicone sleeve and the included SS/wooden stem work extremely well together. Inserting and removing the stem for checking the load and/or stirring is a joy for senses! :p
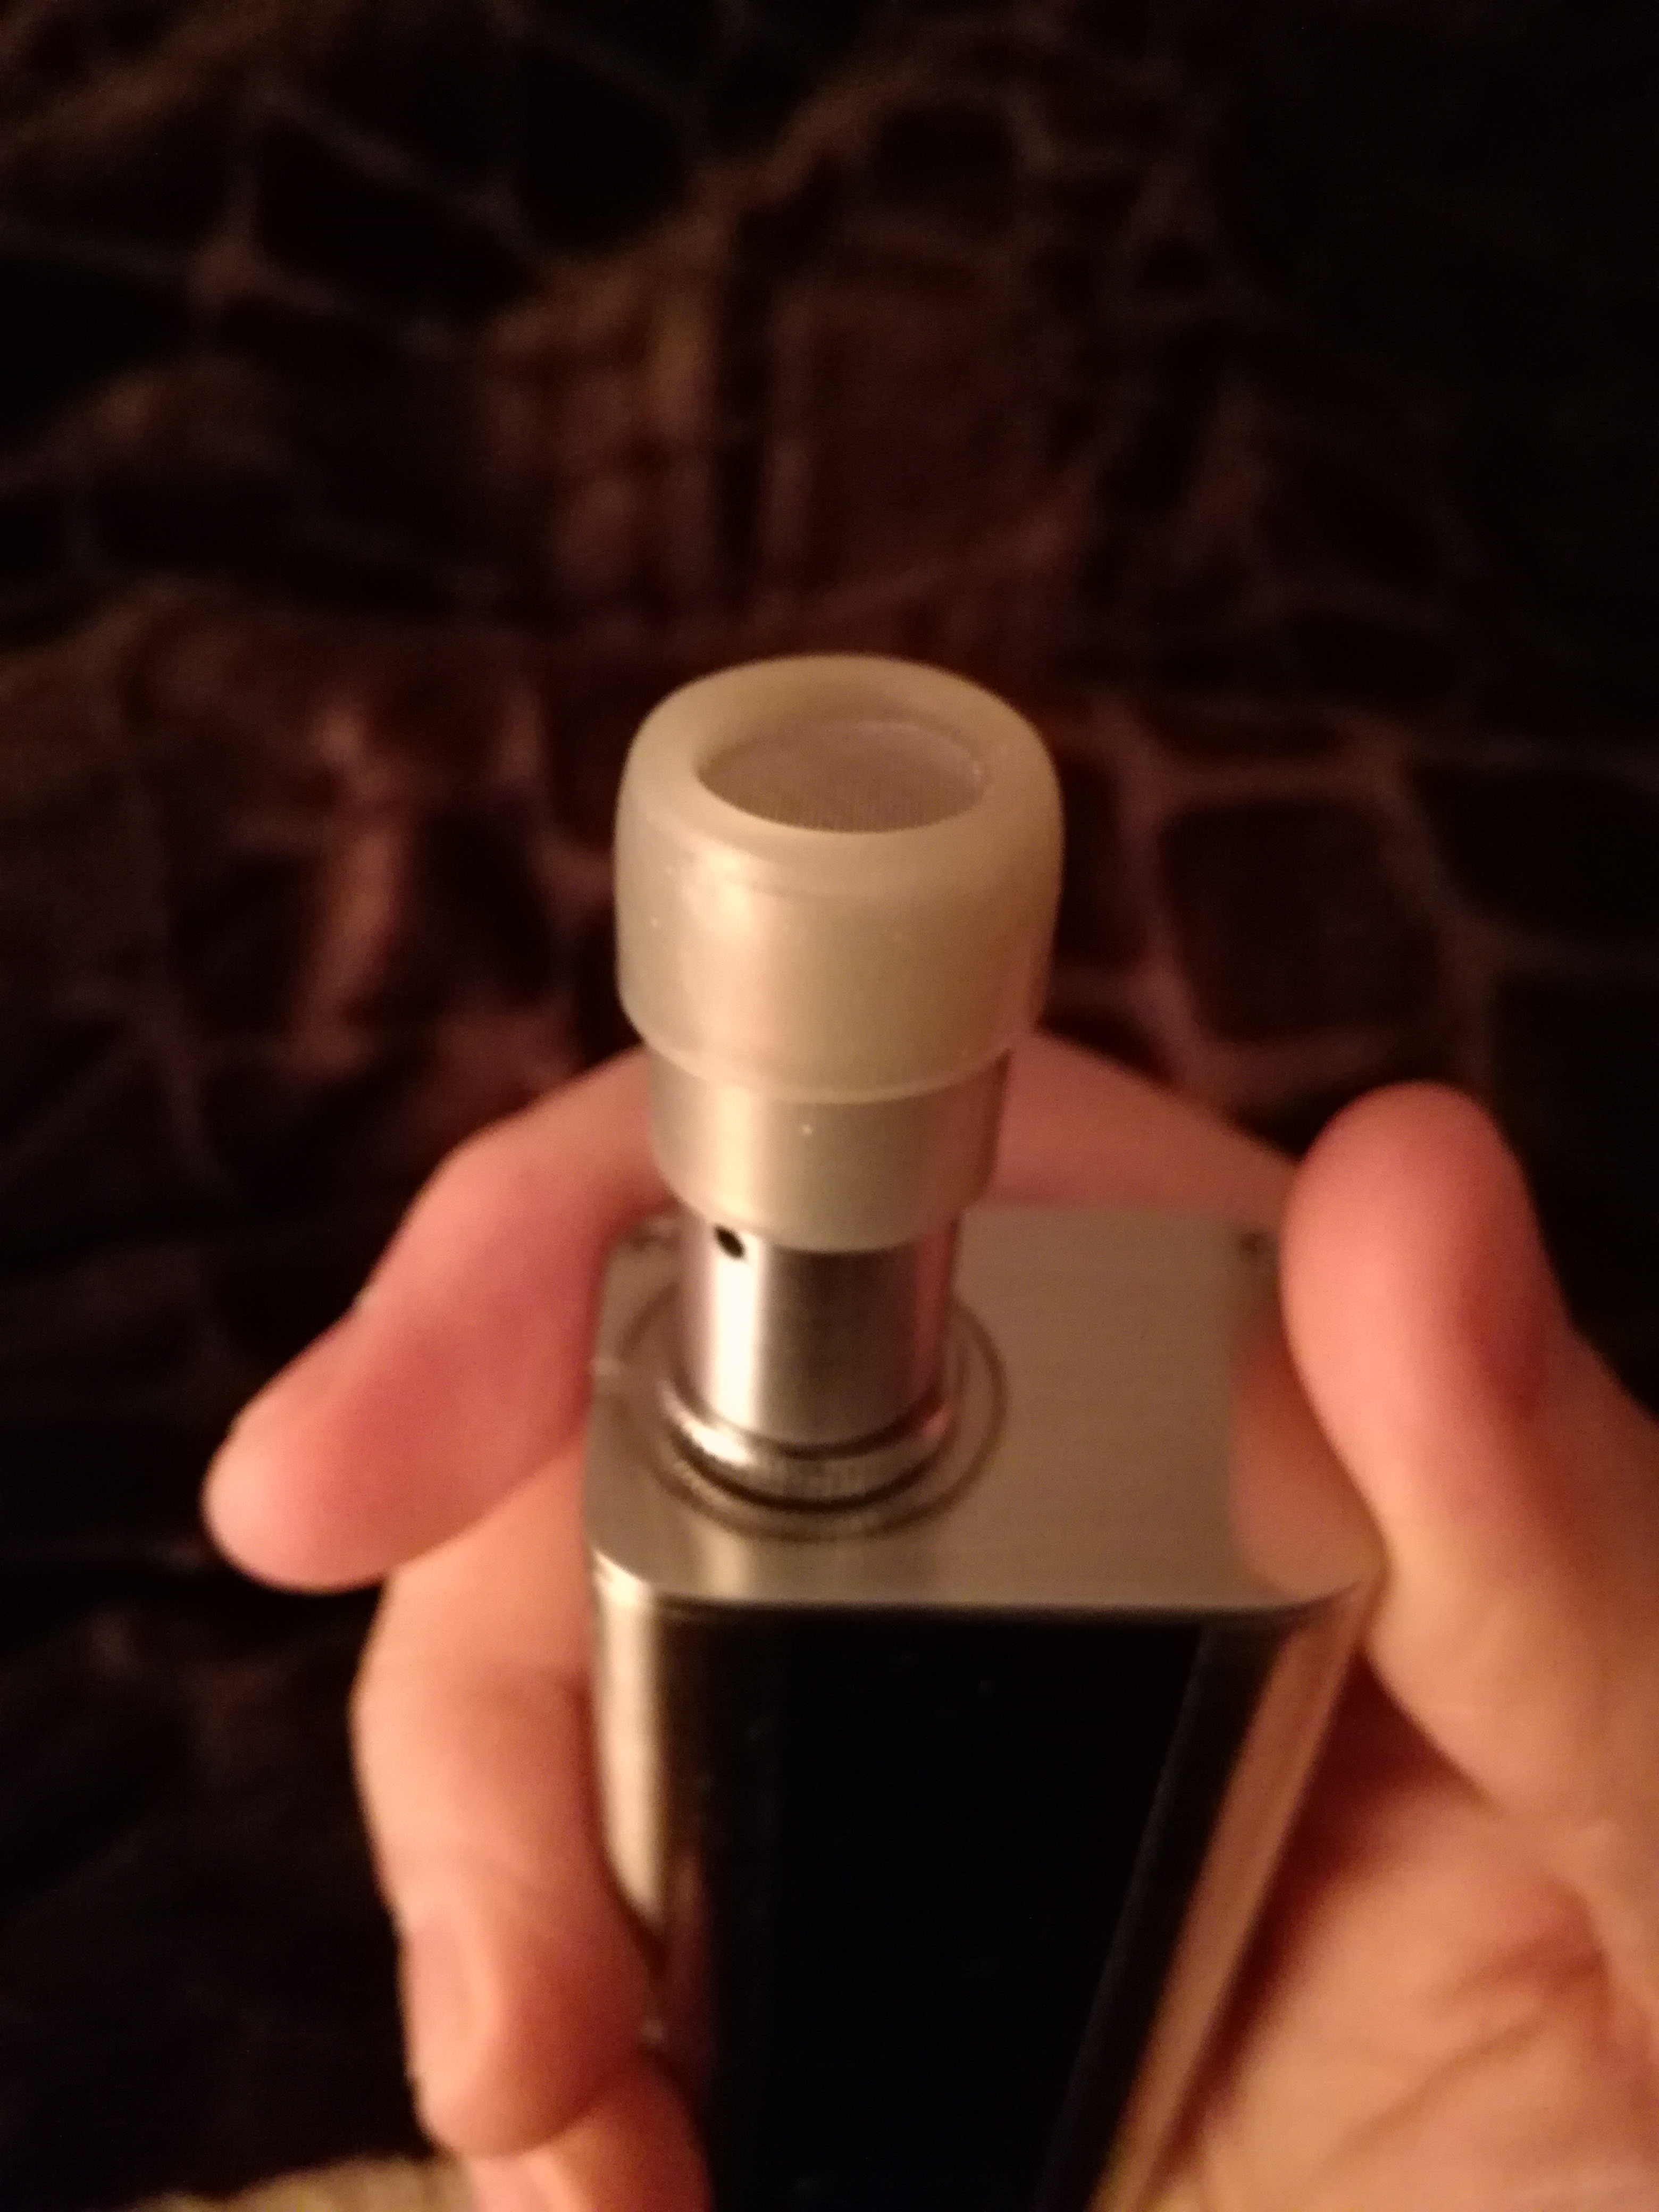
Silicon sleeve has a nice deep red colour, thankfully not so bright in real life and is thick and looks durable!
Not so durable for my clumsy hands though as I managed to rip it close to the holes trying to remove the SS tube from it! :doh: It still works but I 'll get another one from Pipes at some project if I don't come up with a better solution.
My current one WORKS so far! ;) :D

Wt6SoMF.jpg

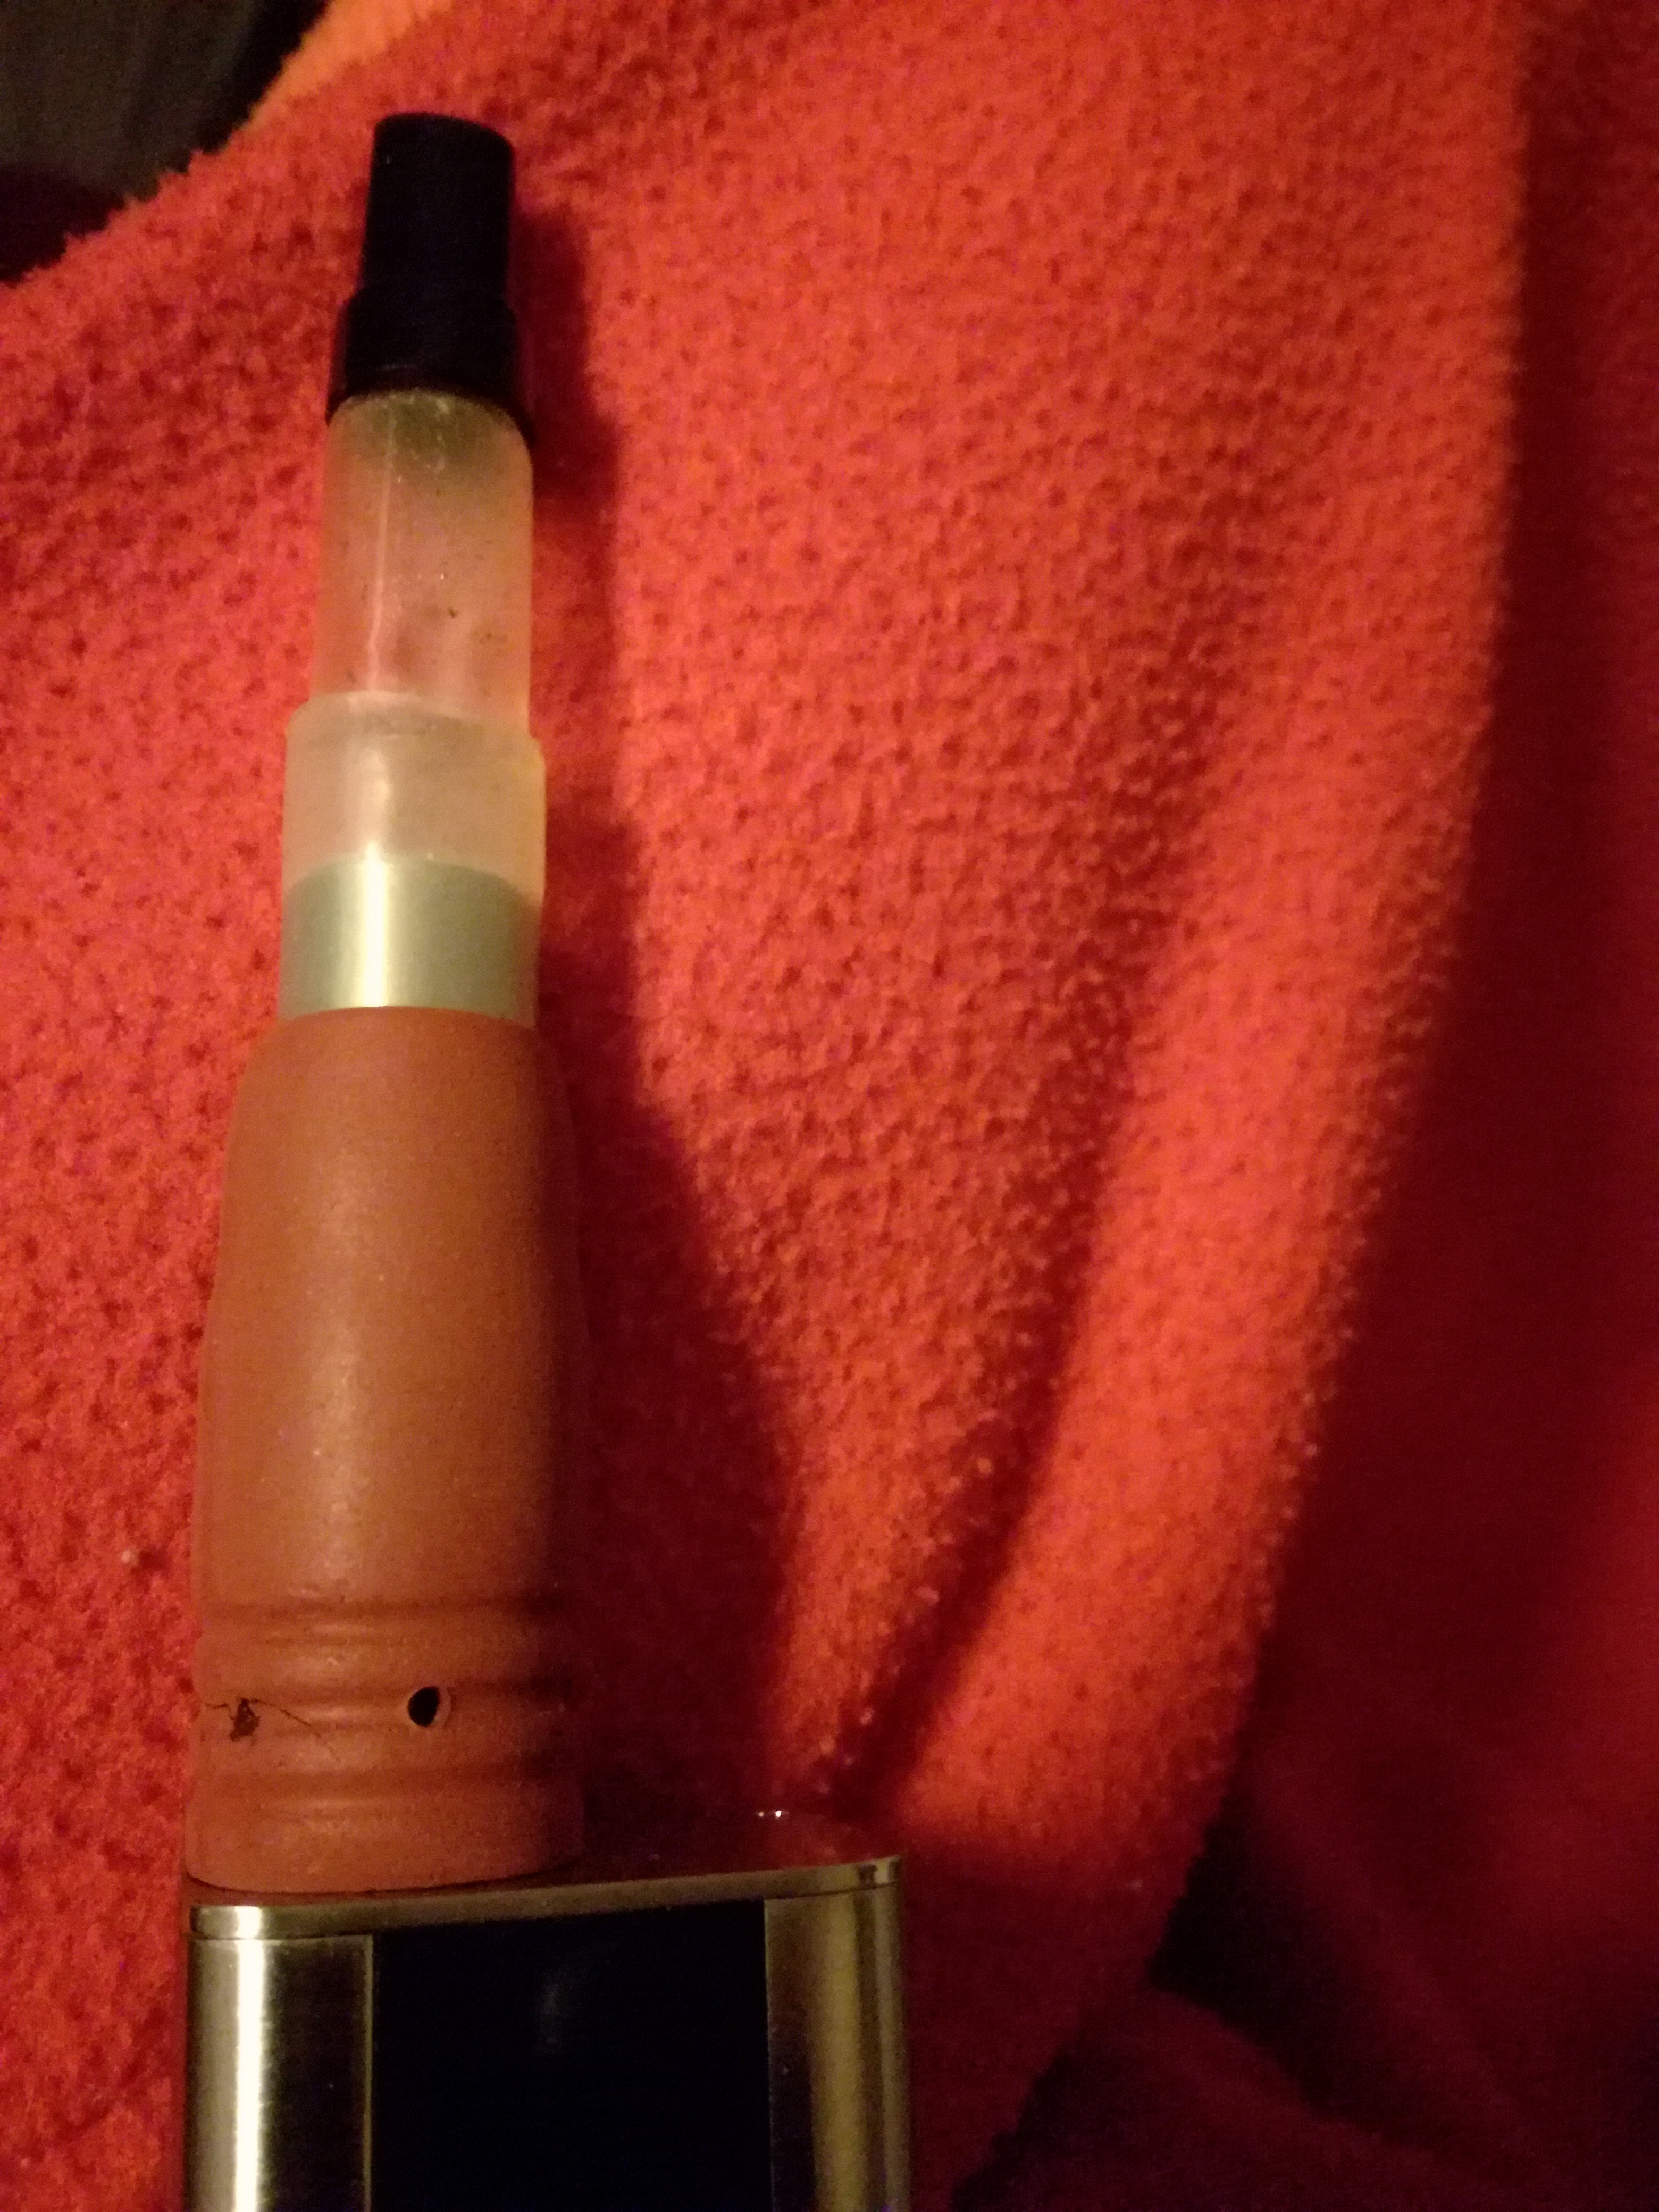
This is my current driver! A combination of Vapcap and the Project! :science:
I removed the Red silicone sleeve and replaced it with a 1/2" I think silicone tubing piece with a screen as well. Vapcap tips fit great in there, tip rests on the screen, vaporizing chamber is smaller and narrower than the original/Air/Solo bowls, draw resistance is higher and it gives an entire different vapor profile with less tunnelling and hot spots even with harder draws. Not sure if I prefer it to the original setup but I am gonna keep testing. It's also a looker!!! Elegant even!! :brow: Can't wait to stick an Omnivap in there!!!
P6aH5VV.jpg

sZ0IGP1.jpg


As far as settings go, I followed some of @Pipes's suggestions and I have somehow matched the displayed temps with the actual ones by experience mostly, nothing accurate. I am at TCR 200 and play between 180° and 240° C. 240° can combust if I keep pushing I think. Coil is barely glowing. :tup: Great hits!!! :nod: Project stays cooler than Ti tip. Not dangerous at all. ;) Glass Vapcaps can also be used. I want to try it with an Eleaf iStick Pico. Would be so small and handy!

This post might as well have been posted in the Vapcap's portable electric heater thread or the Vapcap's one :p but it's mostly a Project mod and Vapcap just plays the role of a stem. I am sure pretty much most stems out there can fit the 1/2" tube and can be used as effective, micro-dosing alts to the original stem. UD stems, HI stems etc.
If I manage to make a few Projects myself for friends I might use this configuration to get away with sleeve construction... Looks slimmer as well! :D

avRTQh6.jpg
 

Pipes

Addicted DIY Enthusiast
Accessory Maker
Glad your lovin it.
Don't throw out your ripped sleeve. It can be repaired.
Get some Eraser repair in a tube:


Clean the pieces to be adhered together. Use a toothpick and apply fresh gasket maker on the rip. Once in place and looking correct, no longer touch for a few hours. Best to do before bed to avoid temptation. Next day, any access should be easy to cut/peal off. (as long as you didn't try to remove while wet) Bam!, as good as new.

Now for a Mind Blowing Update!!!

Have been looking for a device to use for Shatter and have tried many coils on RDAs and nails alike. All work but I end up coughing like a bastard.

Here it is, the solution using the Glass Project.
I have read about perks using these SS or Ti compressed pucks and thought that those can be made DIY style. I had a spool of 29 AWG SS so I ended using about 6 feet to make a customized formed tear drop shaped SS sponge.


I purposely left a loop sticking out at the end so it can be easily pulled out to clean using a torch.


Virgin.


Melted a good dab of Shatter.


All vaped up.


Man, it was smooth and got the biggest rush since, well a very long time. It sure sent me to bed last night.
 
Last edited:

Pipes

Addicted DIY Enthusiast
Accessory Maker
Grizzly, welcome to the land of choices. It's completely "open source" and I try to stick with materials which are readily available and provide links to sources. The problem is in acquiring all the bits and pieces for them, you end up having enough to make 10.
I do my best to accommodate requests and take PMs to make the dreams come true.

Currently awaiting the 510 mouthpieces to get the Glass version out there. Coming from China so predicting their arrival is next to useless. Being close to a month so far. Tracking RP350809669SG

The TCR Mod box is up to the user to get themselves. Personally, recommend either the Cuboid or 2/3. But a few are confirmed working well.

The Eraser, I can currently get out quickly.
:science::tup:
 

natural farmer

Well-Known Member
Hey guys!

I have been enjoying the Project even without the OG red silicone sleeve while waiting for that gasket maker to come!
Some 1/2" tubing in different configurations can accommodate various stems giving different vapor signatures.
avRTQh6.jpg


The Project is VERY flexible! This heater is also a monster!!! So much power in hand!!! :argh: Vapor is instant and you can do anything with the variable temp! :love:
Just enjoyed a load in the OG stem which is the greatest stem so far for me with the addition of a Milaana screen and the folded tubing managed to hold it in place well enough. Not as secure as the OG sleeve but good enough. :tup: And it looks slicker! :p
QX8F5T3.jpg

ygID0JA.jpg


Project ROCKS! Well done @Pipes ! :clap:
 

natural farmer

Well-Known Member
I have reached "No-stir-land".....!!!!! :love:Temp stepping, slight stem rotation after every hit. Taste stays to the end, lost count of hits but close to ten, maybe more. Now I need a good movie... :p

PS: Red sleeve is so very user friendly!!! Inserting, removing and rotating the stem brings great satisfaction to the senses. So much smoother than the white HiTemp silicone. Doesn't attract dust and lint at all. I have put it back and works great while waiting for the gasket maker to fix it like new! Great design @Pipes! :tup:
 

Pipes

Addicted DIY Enthusiast
Accessory Maker
@Pipes I may have missed it in the thread, but how can I flash my cuboid with the same firmware you use?
As for mods, I recommend off this list:


The reason is they all have the same chip set and the code has been leaked out and now open source.
This chip set has proven to work well for our purposes. The newest firmware even allows for PID alterations of the heat up algorithm. The customized firmware is in a file called myevic.bin and is being changed regularly. Advanced options like 15 second time out is a nice option. The same file works on all the above compatible mods.

For information and menu instructions go here.

For the actual file and some history go here.

Set up the Project with a TCR of 145 and lock the resistance. Change the protection timer to 15 seconds if you like. To get into the full menu hold the fire and + buttons at the same time for a few seconds. Don't play too much with other settings until you read through the instructions as some are quite confusing. You should find the usable temps in the mid 500sF area.

;)
Highly recommend you look through the menu instructions as has lots of features. But once all set up, you will love it.

@natural farmer, so happy you're enjoying the Project so much. It does become a daily driver very quickly. And have never had a coil burn out on one yet. At least, that I've heard of. So seems to be surviving the test of time too.
Removing the silicone cover is a feat best done by holding around the bottom and prying it up. Two reasons, one is that the sleeve holds the screen and squeezing the sleeve without the tube installed will crush it and will need to be taken out, straightened and re-installed. The second is as Farmer discovered, the weakest part is grooves that have the intake air holes, and as we now know, can be pulled enough to split it at that point. Under normal use this should not be any concern.
:science:
 

rabblerouser

Combustion Fucker
I'm back to putting The Project thru it's paces... I managed to bungle the coil accidentally, but was able to get it back into shape after a few misadventures. My settings are no longer the same, but I've got it dialed in again so 600 barely glows.

I'm still not sure it can bump the e-nano, for me, for desk use, mainly just because that's always ready and no need to even push a button. But, I brought it up my buddy's house yesterday and he was pretty happy with it. He compared it to the nano.

I'm still not clear on what upping the TCR to 190 and fine-tuning the ohms would buy me?
 

natural farmer

Well-Known Member
Highly recommend you look through the menu instructions as has lots of features. But once all set up, you will love it.

@natural farmer, so happy you're enjoying the Project so much. It does become a daily driver very quickly. And have never had a coil burn out on one yet. At least, that I've heard of. So seems to be surviving the test of time too.
Removing the silicone cover is a feat best done by holding around the bottom and prying it up. Two reasons, one is that the sleeve holds the screen and squeezing the sleeve without the tube installed will crush it and will need to be taken out, straightened and re-installed. The second is as Farmer discovered, the weakest part is grooves that have the intake air holes, and as we now know, can be pulled enough to split it at that point. Under normal use this should not be any concern.
:science:
What I did to rip it was to push the tube from underneath (near the holes) while holding the lower part of the silicon (near the holes again) between my fingers. As the tube was rising my fingers crashed the silicon against the tube and it ripped! :doh:

Project performed amazing today! :love:Also tried a new stem configuration and is my favourite so far! I attached the Air's small stem to the SS bowl of the og stem with the help of some tubing and now I have the best from both worlds! :science: The bowl that I love which gives me the best results with an RBT screen installed and the Air stem which offers more cooling (as the vapor hits the drilled glass plate it cools down initially and then it cools more as it swirls into the rest of the glass stem and hits the plastic mouthpiece) than the og wooden stem and a very comfortable mouthpiece!!! :tup: The hits are even more comfortable now. Taking 10sec high temp hits feels quite comfortable! :nod:

CBlBsrx.jpg
 
Last edited:

EmDeemo

ACCOUNT INACTIVE
To me, this has been a bit daunting to set up, and within seconds of use was concerned I'd burnt out the coil, had smouldering rubber, gone thru a mess of 'no atomizer found', 'atomizer short', ohm readings up to 1.20. A whole new language of settings I dont understand at all. Thankfully, I ordered two and had a mate here with his boxmod NOT doing anything I was doing and taking it easier than I was, learning from my mistakes as we went along. Plus hes used boxmods before and is an ecig vaper.

Normally I'm really good at reading all the instructions first. I think any fuck ups with the coil were down to me not reading properly and pressing the power button before I knew what I was doing :) I certainly didnt read the instructions that came with the Cuboid, normally the first thing I do is sit and read! Stupid me :)

But finally I'm getting a result. I cough really easily so low temps are good for me, but I like to push things thru some water and finish a load on high temps. Anyway, what I seem to have somehow ended up with is 0.68 ohms, 60w, 200c, and getting tasty vapour, havent combusted but this is just the first load I've done. TCR I've left at stock 120. Only used dry so far, a bit tickly but not much, which is great, and if I am vaping at around 200, certainly no where near as tickly as the damn volcano is for me. As a comparison, the coughing I get from a volcano at setting 6 or 7 is intolerable.

I checked my friends while he was here and my Cuboid recognised his eraser at 0.55 immediately. I didnt fire it up tho as I didnt wanna fuck his up (if mine was fucked).

Part of my coil now looks like a spent sparkler :) Oops. Appears to be working after some fiddling tho.

Edit to say, my friend got his working just fine and it was fucking awesome. Huge cloud after huge cloud, all tasty until the last spent bit. Highly recommended and impressive results. I'm battered.
 

Pipes

Addicted DIY Enthusiast
Accessory Maker
Man, wow. :razz:.
Cuboid dead is a rare thing. Even when things go south updating the firmware, it has a recovery method. Pressing and holding the + and fire buttons. Now the firmware loader(s) should be able to see it on the PC.
OR if in really deep dodo (no display at all):


I think you are getting readings from a hot coil. You need to let it read at room temp, like it read your friends, and then note that number. (.55-.56 area)
"Lock It In" Anytime it asks if it's a new atomizer, say NO. Well saying it won'y help, so press the right button. You are getting random results because the ohms it thinks it is, is too high and not under your control. You've got the keys, driving lessons are needed....
Seems a few have had a bumpy start. Once you are dialed in, it's like riding a bike.

You'll get there. I promise! :nod:
 

EmDeemo

ACCOUNT INACTIVE
Yeah, I was happy with it on the one bowl I did! :)

I'm pretty certain the cuboid is well and truly dead, I hadnt even got round to updating the firmware! Oddly tho, I just tried it and the firmware will update but its still not turning on, charging, firing blah blah.
 
EmDeemo,

Pipes

Addicted DIY Enthusiast
Accessory Maker
No display? 5 repetitive clicks do nothing?
Sucks, should have warranty.
 
Pipes,
Top Bottom