
You are using an out of date browser. It may not display this or other websites correctly.
You should upgrade or use an alternative browser.
You should upgrade or use an alternative browser.
The Herbalizer
- Thread starter nopartofme
- Start date
Tex
Well-Known Member
@John Lewus
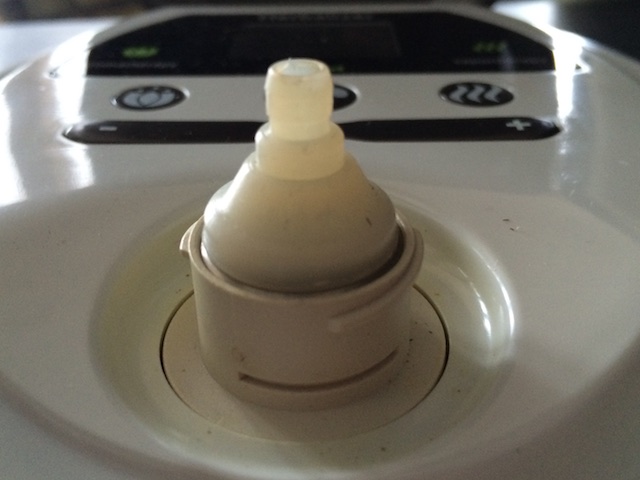
I just tried your idea with the digital thermometer pen and here is what I got. You can see the reading on the thermometer is 445.4 with Herbie set to 445. I did see 448 for a split second but then it went back. It was tough to get this reading because the thermometer was not perfectly still. I'll try a few other temperatures and see if I get similar results.

EDIT - Just tried it at 400 degrees. The thermometer settled on 400.8 degrees. I saw it vary from 398 to 408 but that only happened when my hand moved a small amount causing the tip of the thermometer to move a bit. The tip of the thermometer was always touching the top screen, though.
I just tried your idea with the digital thermometer pen and here is what I got. You can see the reading on the thermometer is 445.4 with Herbie set to 445. I did see 448 for a split second but then it went back. It was tough to get this reading because the thermometer was not perfectly still. I'll try a few other temperatures and see if I get similar results.
EDIT - Just tried it at 400 degrees. The thermometer settled on 400.8 degrees. I saw it vary from 398 to 408 but that only happened when my hand moved a small amount causing the tip of the thermometer to move a bit. The tip of the thermometer was always touching the top screen, though.
Last edited:
Tex
Well-Known Member
@Vicki
I just did some more experimenting. For the first temperature testing, I had the bowl put together and I was putting the tip of the thermometer in the whip hole and letting it touch the top screen. The temperature was bouncing around a bit.
The next few attempts I did with the bottom part of the bowl only. I also allowed the tip of the thermometer to touch the bottom screen. I noticed that my temperature did not vary nearly as much. My temperatures were very close to the temperature I had set on the Herbie, less than .5 degrees off.
Vicki
Herbal Alchemist
@Vicki
I just did some more experimenting. For the first temperature testing, I had the bowl put together and I was putting the tip of the thermometer in the whip hole and letting it touch the top screen. The temperature was bouncing around a bit.
The next few attempts I did with the bottom part of the bowl only. I also allowed the tip of the thermometer to touch the bottom screen. I noticed that my temperature did not vary nearly as much. My temperatures were very close to the temperature I had set on the Herbie, less than .5 degrees off.
@Tex
I wonder how accurate infrared will be. Hopefully hubby can get me that heat gun asap. I really want to test my Herbie.
Tex
Well-Known Member
Ok, more pictures to share! This is my material after about 6 hits through the whip/bong at 405. You can see how fine the grind is compared to the tip of a Bic ball point pen. Also, you can see the material stuck to my top screen. I pulled the bowl off for a tap/shake for the first 2 hits and the second 2 hits. After the 5th and 6th hit, I removed the bowl and took the pictures before tapping and shaking the bowl and finishing the session. After the 7th hit, very little material was sticking to the top screen.
I got 16 total hits from this bowl. Each hit was between 12 and 15 seconds. I timed most of them, and held all of them for 25 seconds. Each exhale produced visible vapor. I saw no vapor when I exhaled the 17th hit. I'm pretty happy with that performance. And I've been working on typing this for 35 minutes, so I'd say I'm very medicated. Lol.
The material wasn't actually as dark as it looks in the pictures. It was plenty brown when I was done with it though!
John Lewus
Well-Known Member
@John Lewus
I just tried your idea with the digital thermometer pen and here is what I got. You can see the reading on the thermometer is 445.4 with Herbie set to 445. I did see 448 for a split second but then it went back. It was tough to get this reading because the thermometer was not perfectly still. I'll try a few other temperatures and see if I get similar results.
EDIT - Just tried it at 400 degrees. The thermometer settled on 400.8 degrees. I saw it vary from 398 to 408 but that only happened when my hand moved a small amount causing the tip of the thermometer to move a bit. The tip of the thermometer was always touching the top screen, though.
Awesome. I can't wait to try this when I get back home in a few days.
lazylathe
Almost there...
Ok, more pictures to share! This is my material after about 6 hits through the whip/bong at 405. You can see how fine the grind is compared to the tip of a Bic ball point pen. Also, you can see the material stuck to my top screen. I pulled the bowl off for a tap/shake for the first 2 hits and the second 2 hits. After the 5th and 6th hit, I removed the bowl and took the pictures before tapping and shaking the bowl and finishing the session. After the 7th hit, very little material was sticking to the top screen.
I got 16 total hits from this bowl. Each hit was between 12 and 15 seconds. I timed most of them, and held all of them for 25 seconds. Each exhale produced visible vapor. I saw no vapor when I exhaled the 17th hit. I'm pretty happy with that performance. And I've been working on typing this for 35 minutes, so I'd say I'm very medicated. Lol.
The material wasn't actually as dark as it looks in the pictures. It was plenty brown when I was done with it though!
Next time don't fill as much and add an aroma pad on top of the herb.
You will find you get a few more hits and much darker ABV!
A fuller extraction some may say.
I tend to do this at night when i want a good sleep!
Tex
Well-Known Member
@lazylathe
My ABV is much darker when I'm done with it. This pic was only 6 hits in. I will definitely try the pad on top of less material though. I've been meaning to but never remember.
My ABV is much darker when I'm done with it. This pic was only 6 hits in. I will definitely try the pad on top of less material though. I've been meaning to but never remember.
Green_Foiler
New Member
Tex@Green_Foiler
I can't comment on the wooden fitting for the whip because I don't yet have a HT added to my collection....hopefully soon.
As far as the whip goes, I can't say I've noticed any strange tastes. Definitely nothing "tangy". I used my whip by itself for awhile, but now use it primarily with my bong. It works great. The ONLY complaint I have about the whip is that the exterior seems to attract dust/dirt/etc and it gets sticky. I wipe it down with ISO every now and then.
I have a high tolerance as well, and the Herbie never fails to impress. I can achieve any high I want. Sometimes I vape before going for my morning run. I like to set my Herbie at 377 and run it through the bong for some nice refreshing vapor. It helps wake me up, and helps me really enjoy my run.
I tend to favor the higher temps more than the lower temps for most of my daily sessions. When I use the whip/bong, I start around 390 and take several hits to get it going, then bump up to 400 for several hits, then 410, then 420 or 425 to finish the bowl out. Some bud will produce more vapor, and some will produce less. Make sure your bud is properly dried before grinding it up. Some members have had different experiences with grind, but I prefer a fine grind over a coarse grind. Initially, I was using a Piranha 4 piece grinder and was grinding upside down to get the fine grind I needed. I just switched to a Santa Cruz Shredder (3 piece small) and all I can say is WOW. Big improvement. I have some pictures of my grind that I have been meaning to post. I'll do that soon. When you load your bowl, load it up to the bottom of the flared portion. Usually about 0.2 g for me.
The Herbie can DEFINITELY knock you on your ass. Try max temp (445) and see how you feel after several hits. I'm always impressed!
Good luck, and let us know how your first session goes when you get your unit!!
Thank you Tex for your response!
Are you able to plug the stock whip with the stock mouth piece into your bong and it seals nicely?
I'm happy you say you like the Santa Cruz shredder. The holiday special herbalizer I'm getting comes with that grinder and it's only 650$ so 130$ in savings! I'm pretty excited it should be here tomorrow as they do overnight free shipping!
Any other advice or tips for this herbie newbie are greatly appreciated!!!
Will update after I take her for a test run!
@Fine Grind
Ok, I'm back with pictures for the DIY turkey bags! This is going to be a long one, so bear with me.
**Note, it really helps to have an extra set of hands.
1. Lay the turkey bag flat on the table. The tail end of the bag is tucked under in the picture so the whole bag would fit on the table.

2. Obviously the bag has a pre-sealed end, and an open end. We will be sealing the open end first.Tear off a piece of clear packing tape that is about 2 inches longer than the width of the bag at the open end. You want the tape a little longer so you can have about an inch of excess on each side. You can trim it when you are done, or leave it. Lay the tape on the table, sticky side up. Initially, I was worried that the tape might be unsafe, but it really does not have any exposure to the vapor. There haven't been any unpleasant or strange smells/tastes and it hasn't bothered me, my girlfriend and the 3 or 4 of my friends that also vape with me.


3. Have your friend hold the edges of the tape on the table, while you carefully position the bag on the tape, covering about half of the sticky surface of the tape with the bag. Try to avoid getting any wrinkles in the bag where it contacts the tape. I usually pull the bag a little so it is taut, then center it on the tape and place it on the tape leaving about an inch of tape left on each side.

4. With your helper, Carefully fold the tape over and seal the bag completely. Once the tape is folded over, run your fingers down the seam and make sure the tape has adhered to the bag completely. If you see any air bubbles, try to work them out. Sometimes I have a few tiny bubbles/wrinkles, but they never leak.

5. So, now we have a sealed bag that just needs a valve. I found that trying to wrap all that excess material around the valve and seal it was a PITA. My solution is to put the valve in the corner of the bag instead. So, turn the bag around so you are holding the pre-sealed end. Pick a corner, and grab your scissors. In this picture, I outlined the area to be cut out in blue. You want to get close to the seal, but not too close! Try to leave about 1/8" or so.


6. Now it's time for the important cut. You need to cut the corner of the bag off so you can put the valve in. The goal here is to cut as small a hole as possible. As long as you can get the "pronged" part of the valve assembly inside the hole, you're good to go. In this picture I've colored in the approximate area I cut off each time I make a bag. Ruler for reference. About an inch each way.

Both pieces cut off:

7. Now we need to put the "pronged" part inside the bag. In the first picture you can see the 3 pieces of the valve: the mouthpiece, the "collar", and the "pronged" part.

In the bag:

Another view:

8. Now, hold the bag as seen below. Make sure you have enough material sticking past the "pronged" part. You'll see why in step 10.

9. Slide the "collar" over the "pronged" part.

10. Hold the collar in your right hand between your thumb and forefinger, and pull on the bag material with your left hand (seen below). You don't need to pull hard, just a little to make sure the collar/pronged part are seated.

11. Fold the remaining material down over the collar.

Another view:

12. Slide the mouthpiece over the collar and press everything in firmly. And now, take the time to pull all the air out of your bag. If done properly, you can pull all the air out and eventually try to draw and there will be absolutely no air. Now you have a perfectly sealed, leak free bag. Enjoy!


Anyone know where I can get turkey bags like that? I'm in Canada hopefully someone to ships from Canada
")
Also, you are using the mouthpiece from an original bag? You just removed the mouthpiece from the original bag?
Madcap79
Jack of all trades, master of none.
Any grocery store will have them. Yes you reuse the original mouthpiece. Pay attention when disassembling the mouthpiece and bag, it'll help when rebuilding.Anyone know where I can get turkey bags like that? I'm in Canada hopefully someone to ships from Canada
Also, you are using the mouthpiece from an original bag? You just removed the mouthpiece from the original bag?
MinnBobber
Well-Known Member
Looking for help/ideas to find a wire basket setup that fits the Herbie chamber.
I love the miniVAP basket module, pictured below. It keeps the heating chamber spotless, lets you preload baskets, it is double protection to keep fine herb particles out of the innards, super easy to empty after the herb is extracted, etc

The miniVAP module has a bottom wire basket with a silicone cover. I'm looking for an all wire basket and wire cover that you can load and fit into the Herbie chamber. The miniVAP basket is too small to work--as using it with a screen stuffed in the top leaves way too much room for the hot air to flow around it, instead of thru it.
Any ideas of existing accessory baskets that would fit or where to find or make a decent fitting setup?
I find that the miniVAP basket module spoils me--- IMO every vape should load/empty/stay so clean.
I want one for my Herbie!!!!!
Thanks for any ideas or suggestions on how to make my dream come true")
I love the miniVAP basket module, pictured below. It keeps the heating chamber spotless, lets you preload baskets, it is double protection to keep fine herb particles out of the innards, super easy to empty after the herb is extracted, etc
The miniVAP module has a bottom wire basket with a silicone cover. I'm looking for an all wire basket and wire cover that you can load and fit into the Herbie chamber. The miniVAP basket is too small to work--as using it with a screen stuffed in the top leaves way too much room for the hot air to flow around it, instead of thru it.
Any ideas of existing accessory baskets that would fit or where to find or make a decent fitting setup?
I find that the miniVAP basket module spoils me--- IMO every vape should load/empty/stay so clean.
I want one for my Herbie!!!!!
Thanks for any ideas or suggestions on how to make my dream come true
Been Vapin
Fringe Class
Looking for help/ideas to find a wire basket setup that fits the Herbie chamber.
I love the miniVAP basket module, pictured below. It keeps the heating chamber spotless, lets you preload baskets, it is double protection to keep fine herb particles out of the innards, super easy to empty after the herb is extracted, etc
The miniVAP module has a bottom wire basket with a silicone cover. I'm looking for an all wire basket and wire cover that you can load and fit into the Herbie chamber. The miniVAP basket is too small to work--as using it with a screen stuffed in the top leaves way too much room for the hot air to flow around it, instead of thru it.
Any ideas of existing accessory baskets that would fit or where to find or make a decent fitting setup?
I find that the miniVAP basket module spoils me--- IMO every vape should load/empty/stay so clean.
I want one for my Herbie!!!!!
Thanks for any ideas or suggestions on how to make my dream come true
I have been messing around with inserting the top of a Cloud ELB into the filling chamber. It fits in with a few mm of play on each side. Give it a try.
lazylightning
It's an obsession but it's pleasin'
Looking for help/ideas to find a wire basket setup that fits the Herbie chamber.
The miniVAP module has a bottom wire basket with a silicone cover. I'm looking for an all wire basket and wire cover that you can load and fit into the Herbie chamber. The miniVAP basket is too small to work--as using it with a screen stuffed in the top leaves way too much room for the hot air to flow around it, instead of thru it.
Any ideas of existing accessory baskets that would fit or where to find or make a decent fitting setup?
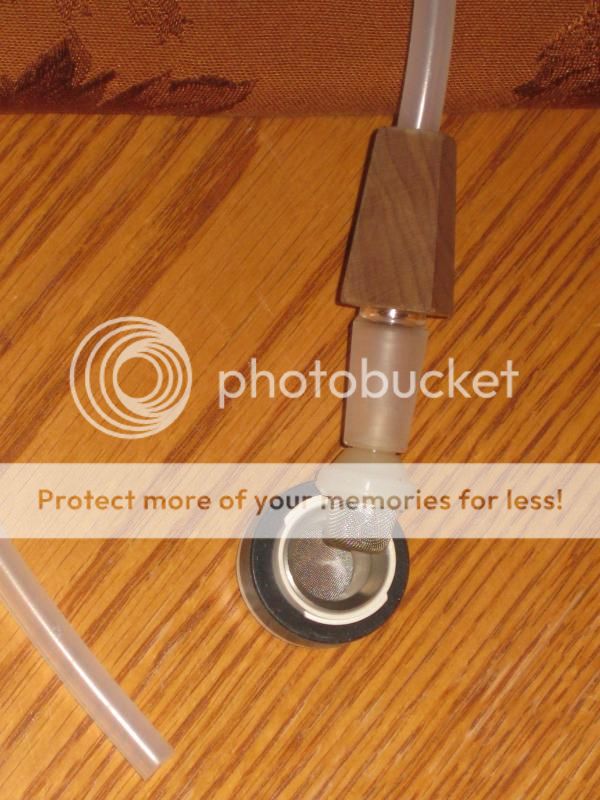
Love this idea. It inspired me to use the bottom of my Herbie bowl and just pop the MiniVAP's wire basket/silicone top module in. It seals very well and I got clouds right away using my f-Bomb HT.
Now I can use my Herbie with any HT directly on top of the silicone top. Still want a solution like MinnBobber wants but this is kinda cool too.
MinnBobber
Well-Known Member
...........................................................................Love this idea. It inspired me to use the bottom of my Herbie bowl and just pop the MiniVAP's wire basket/silicone top module in. It seals very well and I got clouds right away using my f-Bomb HT.
Now I can use my Herbie with any HT directly on top of the silicone top. Still want a solution like MinnBobber wants but this is kinda cool too.
Thanks---that's halfway there.
? Is the f-bomb hydratube 14 or 18 mm ??
My miniVAP basket module works in a 14 mm bubbler but not my 18 mm Mobius as the hole is flared and it drops in just far enough to not get a good seal.
Any flow restriction with your setup or it gets enough ? Have you tried with fan assist as my wife likes that technique ?
I'm already thinking of an addition to your setup pictured.....
I'll experiment and post pics...????
lazylightning
It's an obsession but it's pleasin'
...........................................................................
Thanks---that's halfway there.
? Is the f-bomb hydratube 14 or 18 mm ??
My miniVAP basket module works in a 14 mm bubbler but not my 18 mm Mobius as the hole is flared and it drops in just far enough to not get a good seal.
Any flow restriction with your setup or it gets enough ? Have you tried with fan assist as my wife likes that technique ?
I'm already thinking of an addition to your setup pictured.....
I'll experiment and post pics...????
The f-Bomb HT I have is 14mm and seals perfectly. Like you, I have to drop in an 18mm to 14mm reducer when I use the MV with my Mobius Ion.
Haven't noticed any flow restriction but I've only tried it with the little HT. I haven't tried with fan assist yet either, but it'll make for some interesting experimentation later. Maybe you'll have your test done and pics posted before I get to it
MinnBobber
Well-Known Member
......................................................................................The f-Bomb HT I have is 14mm and seals perfectly. Like you, I have to drop in an 18mm to 14mm reducer when I use the MV with my Mobius Ion.
Haven't noticed any flow restriction but I've only tried it with the little HT. I haven't tried with fan assist yet either, but it'll make for some interesting experimentation later. Maybe you'll have your test done and pics posted before I get to it
I just ordered some SSV clear whip tubing for part of my experiment but your setup gave me an idea for a non-water use. I really dislike opening the Herbie to tap bud off the top screen etc and love an independent basket module for all that it offers.
Time to experiment !!
edit: ok, two ways to get a Herbie basket setup with miniVAP and MFLB pieces. Both allow whip use (not water) and a basket module to pre-pack a load, keep chamber clean and no tiny bits getting into the innards, no herb onto Herbie top screen!!!!, and easy dumping of ABV.
Both are not as tidy as a self-contained basket that fits inside chamber. which would let you screw Herbie piece together. You need to hold these on/ together:
First is miniVAP flexicone basket with mVAP Flexicone Plus snapped onto flexicone nipple. It's a nice snug/secure fit. This gives to 6" whip.

Second is the mV basket with MFLB water whip attached. MFLB whip is reversed, with the glass water piece joint snapped onto the flexicone nipple. Very secure and gives a 20" whip
Awaiting SSV tubing as I believe it's bigger and will allow for other combinations.
FYI---I love wire baskets for vaping
Last edited:

MinnBobber
Well-Known Member
Well, this is the highest temperature I got, most were lower.

Tex, do you have a heat reading gun like Vicki has?? To do a side by side?
I am not confident that this type of temp gun will get accurate readings like your probe....
From using one in my snowmobile days, it seemed like it had to be a hard, SOLID surface and any kind of mesh (like the Herbie screen) or porous surface and it was totally useless.
I assume the Herbie screens are stainless steel which has another issue, besides being a non-solid surface. Copied from a website on infrared heat guns:
"If you were to point an infrared thermometer with fixed emissivity at the side of a stainless steel pot filled with boiling water, for example, you might get a reading closer to 100°F (38°C) than 212°F (100°C). That’s because the shiny metal is better at reflecting the ambient radiation of the room than it is at emitting its own infrared radiation."
So don't panic that yours is off. Do you have access to a digital probe like Tex used??
Last edited:
Tex
Well-Known Member
@MinnBobber
Unfortunately I don't have access to an infrared thermometer. I do agree that the temp gun @Vicki used is probably not the right tool for this job. I think a digital thermometer will produce much better numbers.
Here is a link to the one I used:
http://www.amazon.com/Cooper-Atkins-DFP450W-0-8-Digital-Thermometer-Temperature/dp/B000LDI8PK/ref=sr_1_2?ie=UTF8&qid=1419903819&sr=8-2&keywords=cooper digital thermometer
It is capable of going up to 450. The other one that I have is only capable of 300. Make sure you get one that can handle Herbie.
- Tex
Vitolo
Vaporist
I do not think this is accurate.Well, this is the highest temperature I got, most were lower.
At that temperature you would not get any vapor at all.
Vicki
Herbal Alchemist
Our heat gun is accurate. My husband uses it at work all the time.
I haven't been getting any vapor.
I do not think this is accurate.
At that temperature you would not get any vapor at all.
I haven't been getting any vapor.
Vitolo
Vaporist
I did not say the gun was inaccurate.
I said the temperature reading from Herby is not accurate.
Vapor can not occur at 168º at all....
but your ABV is dark.
168º would not accomplish that.
This implies that your tool is not in the spot that would tell you the actual temperature.
The folks at Herbalizer might have information to help
It is a confusing one, that the ABV is dark.